rhn's continued adventures: a build journal, guide collection etc.
- Thread starter rhn
- Start date
-
The FTB Forum is now read-only, and is here as an archive. To participate in our community discussions, please join our Discord! https://ftb.team/discord
You are using an out of date browser. It may not display this or other websites correctly.
You should upgrade or use an alternative browser.
You should upgrade or use an alternative browser.
 .
.I don't really have a set plan. Just sort of do what I feel in the mood for. Currently doing some more cosmetic overhauling on several areas that have needed it for long. Might post some pics later.What sections of your project are next to be done if i may ask?
I do have a few ideas on near future things that I want done however:
MOX fuel IC2 Reactor(s).
Enchanting area.
Animal farms.
Also have ideas of a cargo deck with freight containers in the lower deck in one wing and maybe a shuttle bay in the other wing. But that is purely cosmetic.

Here is a bit of that cosmetic work I was talking about earlier:
Garden and pond in the bee area:
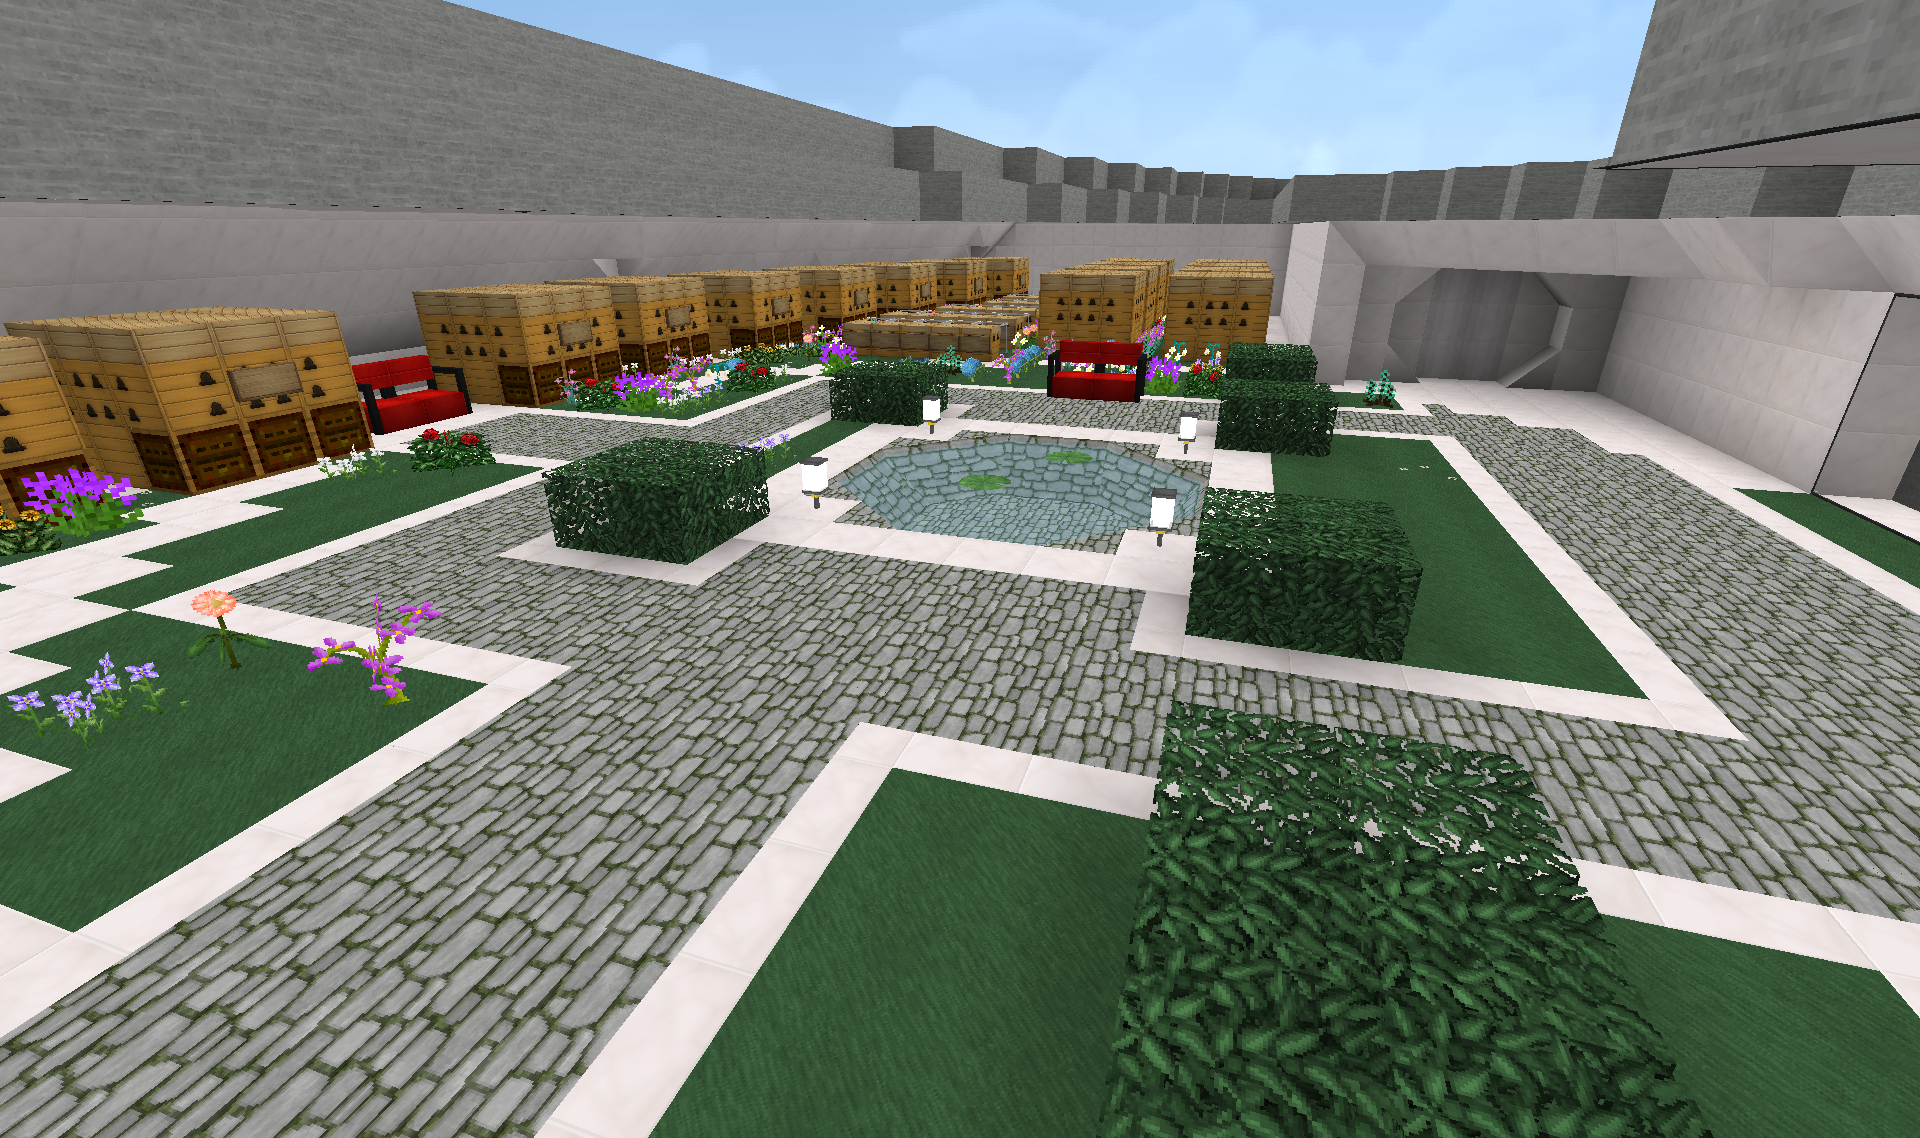
Amazing diagonal water with Carpenter's Blocks!
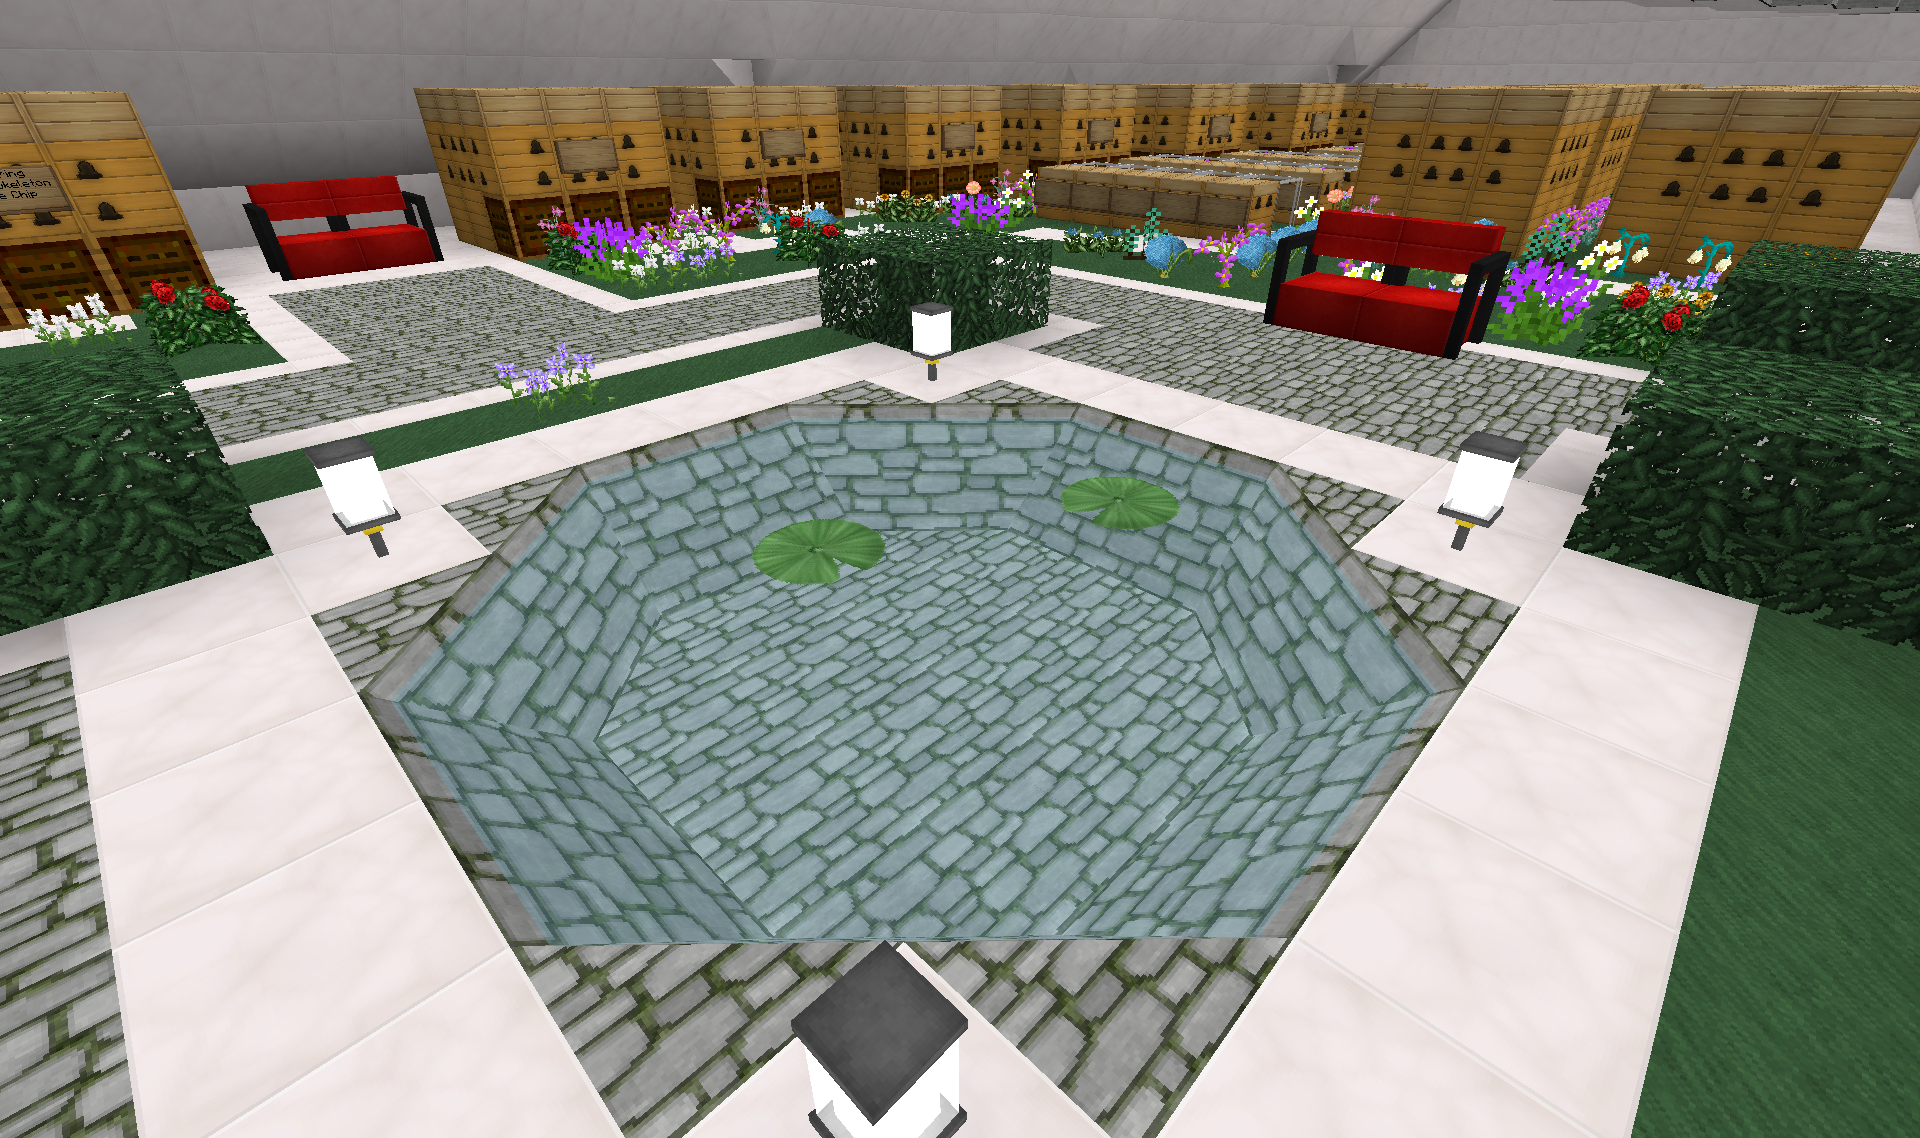
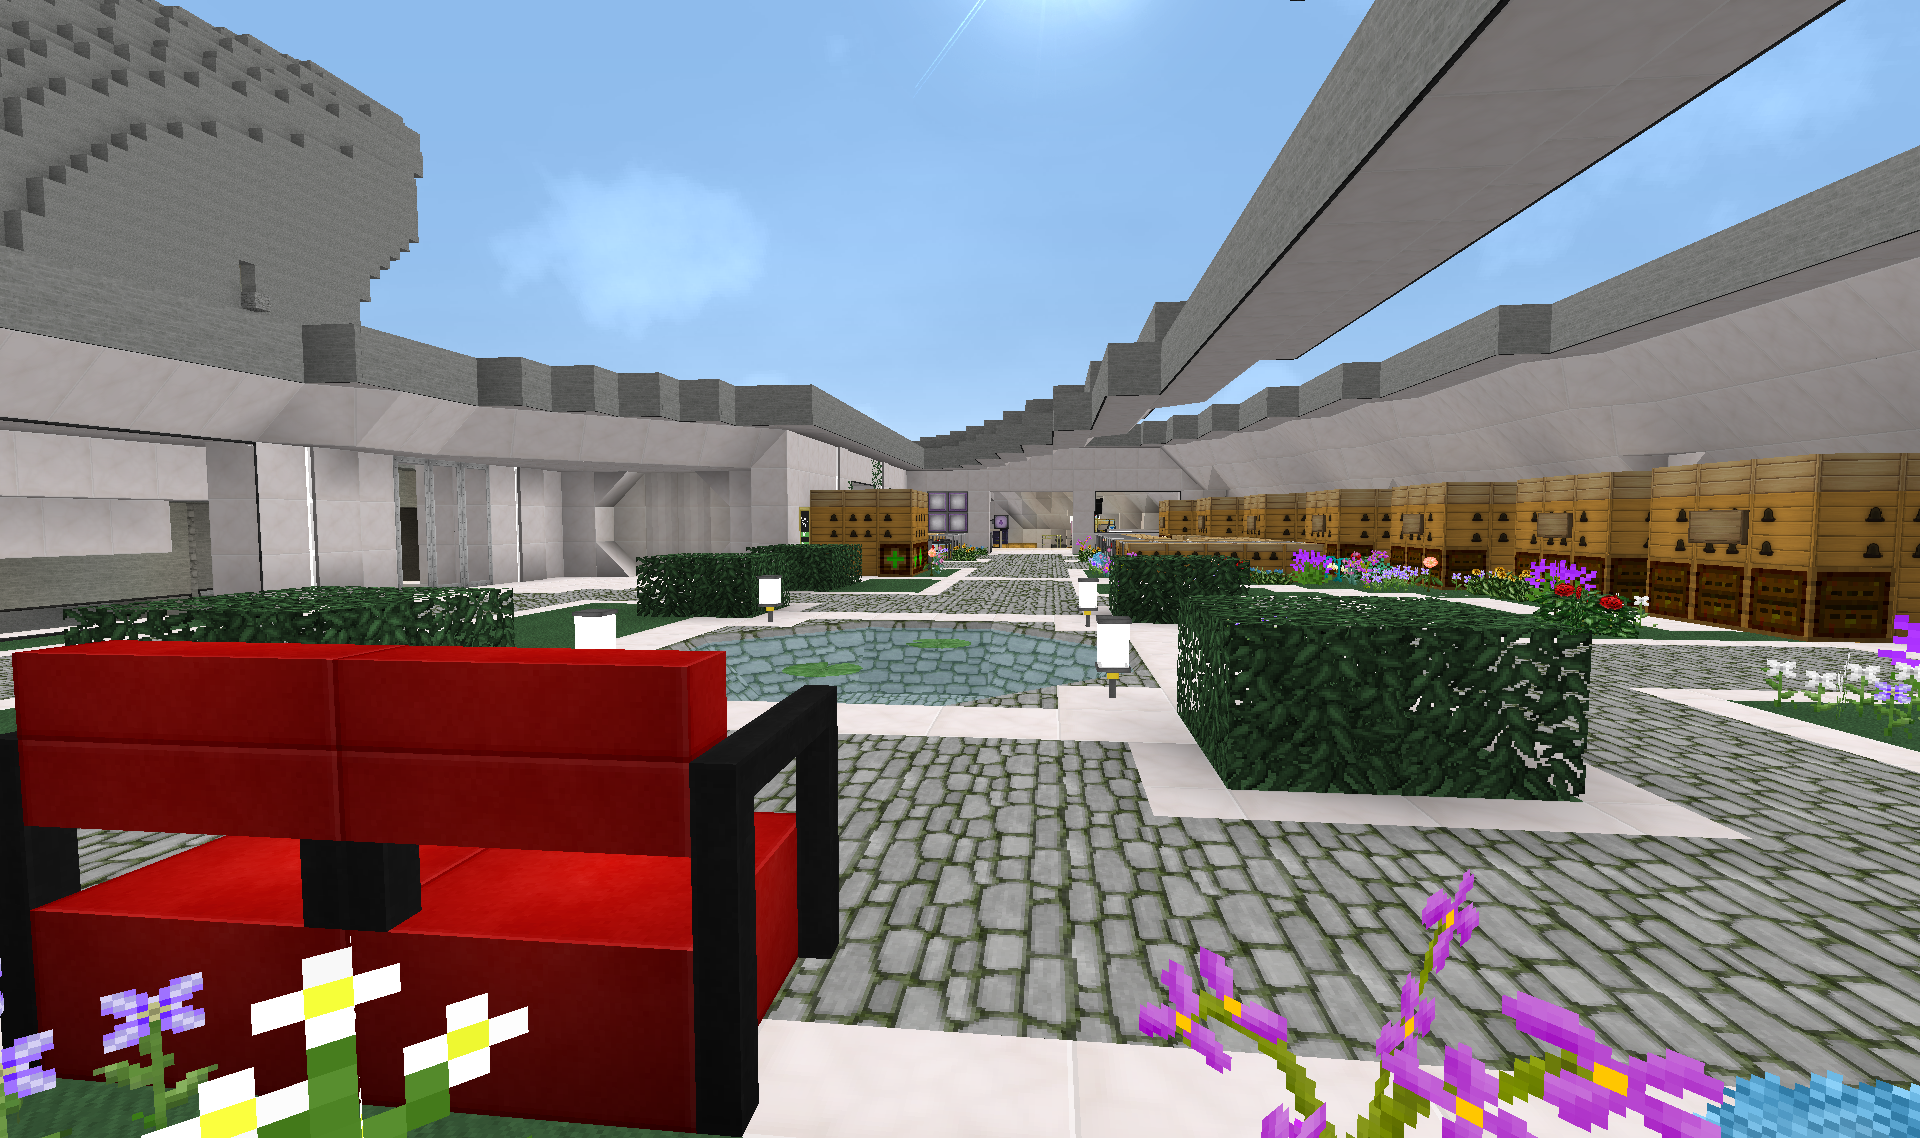
Grass is a little bare for now, removed all the flowers when I started building the garden. But I am sure the bees will make up for that in short time
The observant person might spot a few slopes missing on the walls. The case is that there arent room for them with the current placement of the Alvearies. There are 2 blocks missing furthest out that can only be placed if ALL the Alvearies and their automation are moved(not going to happen!). The 2 problems in the middle I will fix by bringing those 2 alvearies forward just one block. I have just been putting it off so far as it is a PITA
Finally pulled myself together and did something about the "Main hub" between the corridors from the wings and the main tower. Before it had raw cobblestone etc. showing, which was really not ok for the heart of the base! Still a long way to go though with detailing:
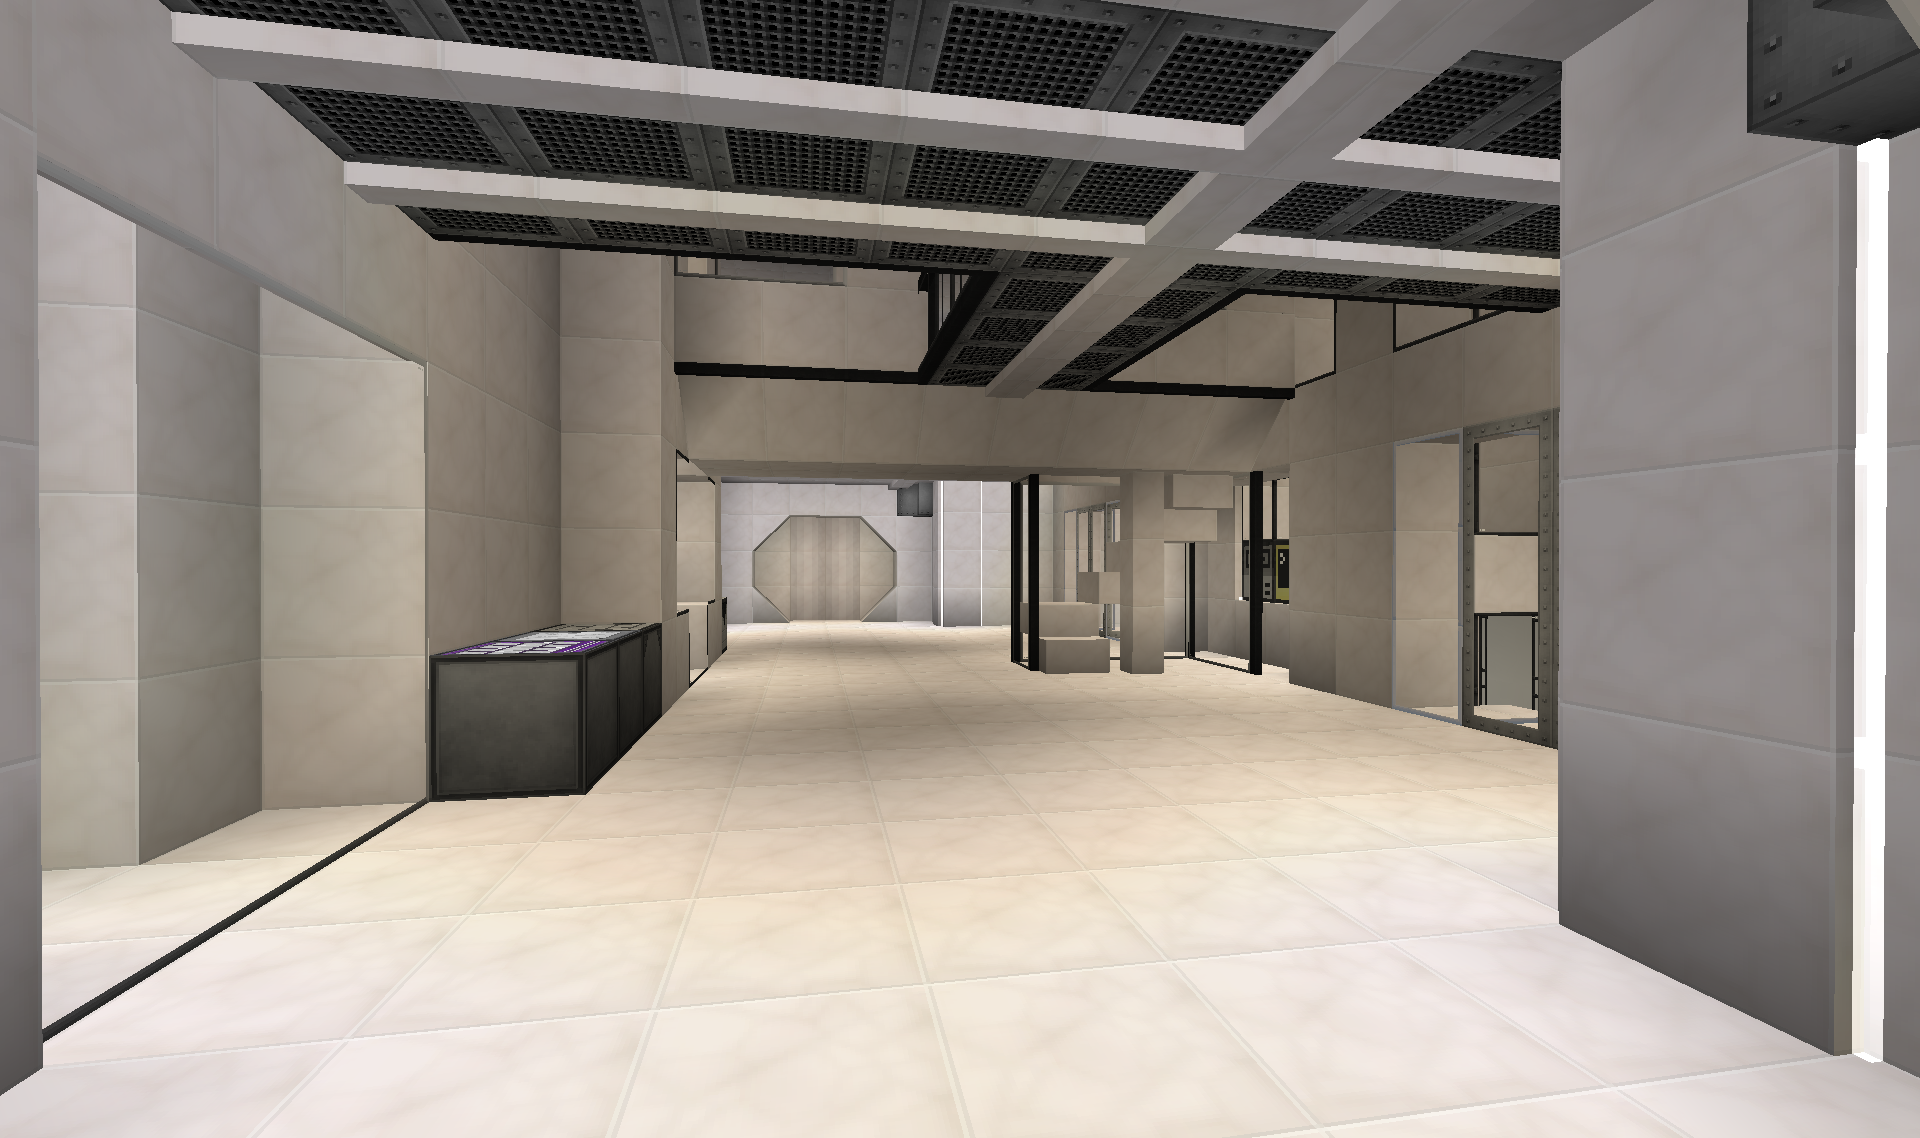
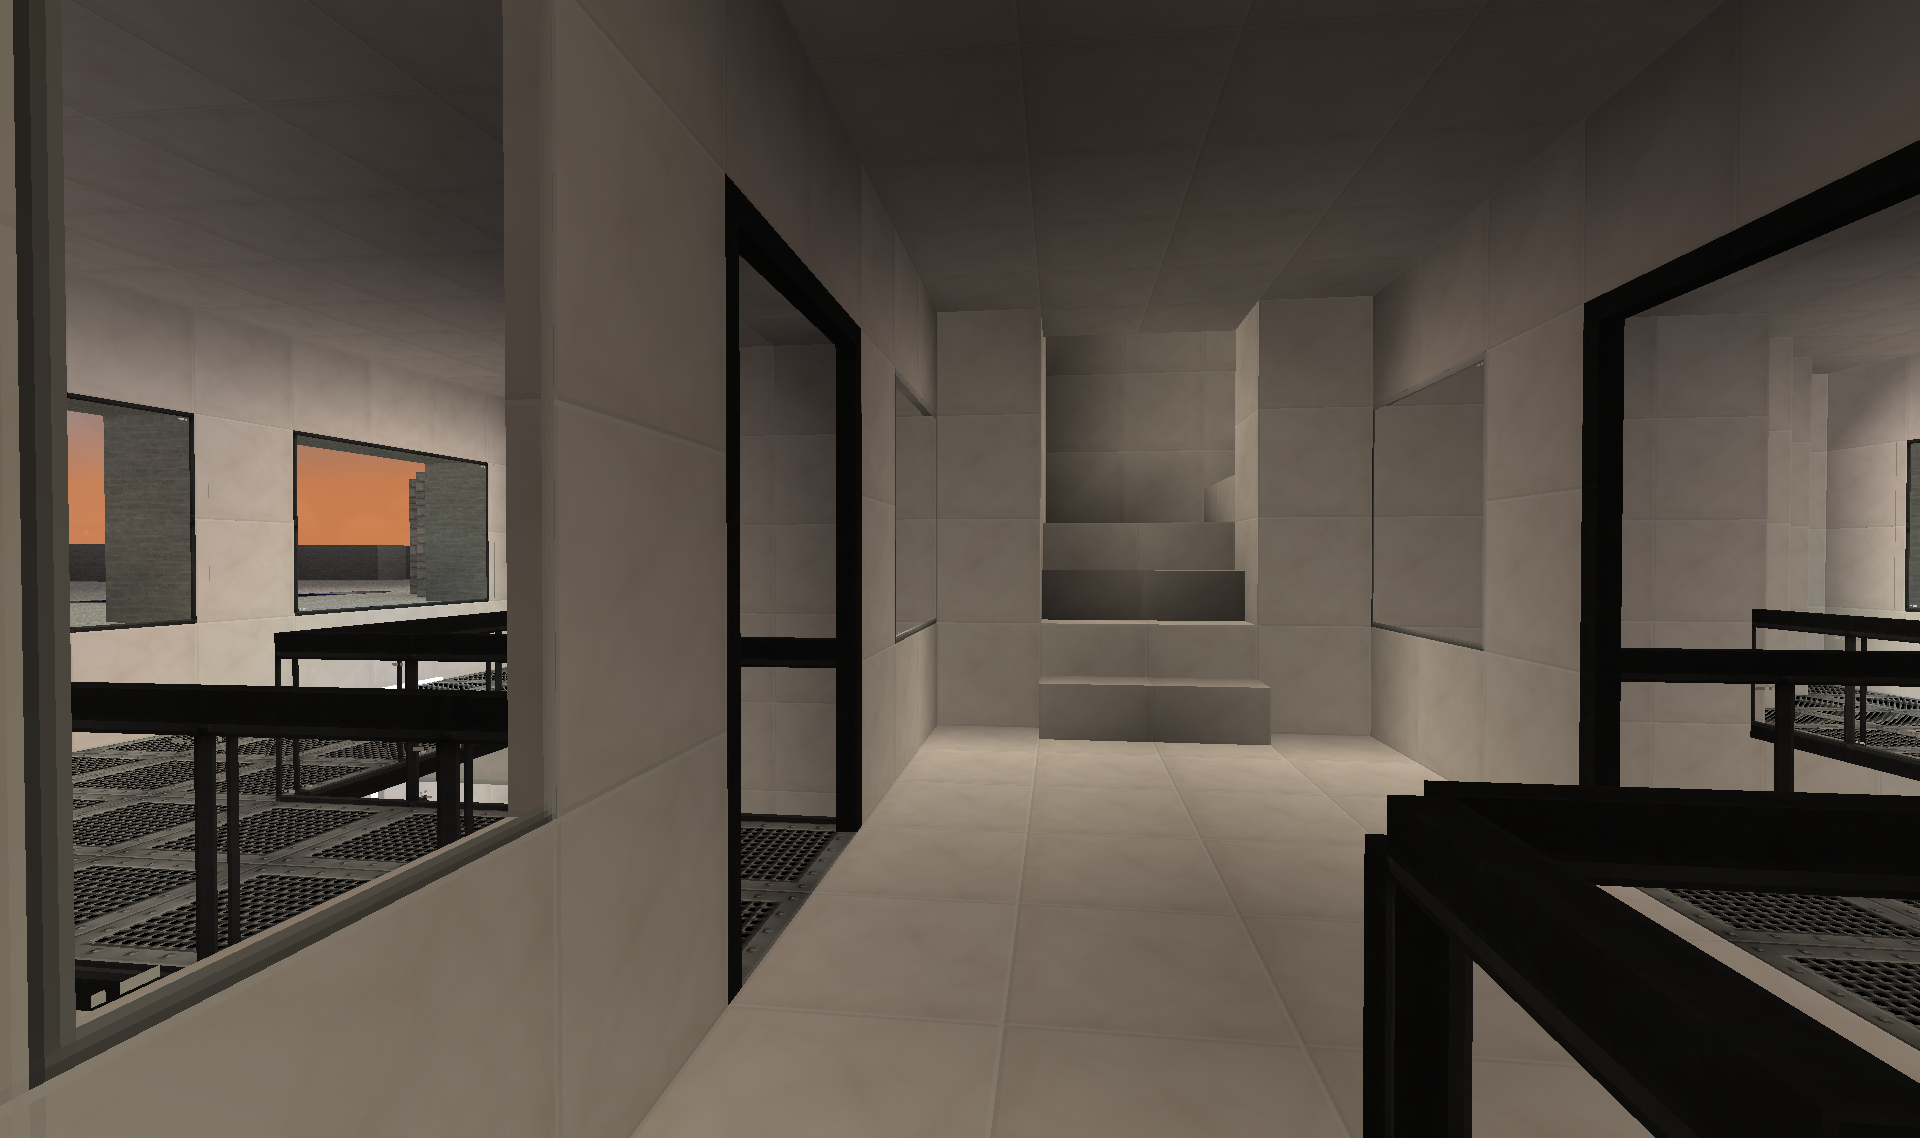
Not sure what this place is for, but there is access through this spiral microblock staircase:
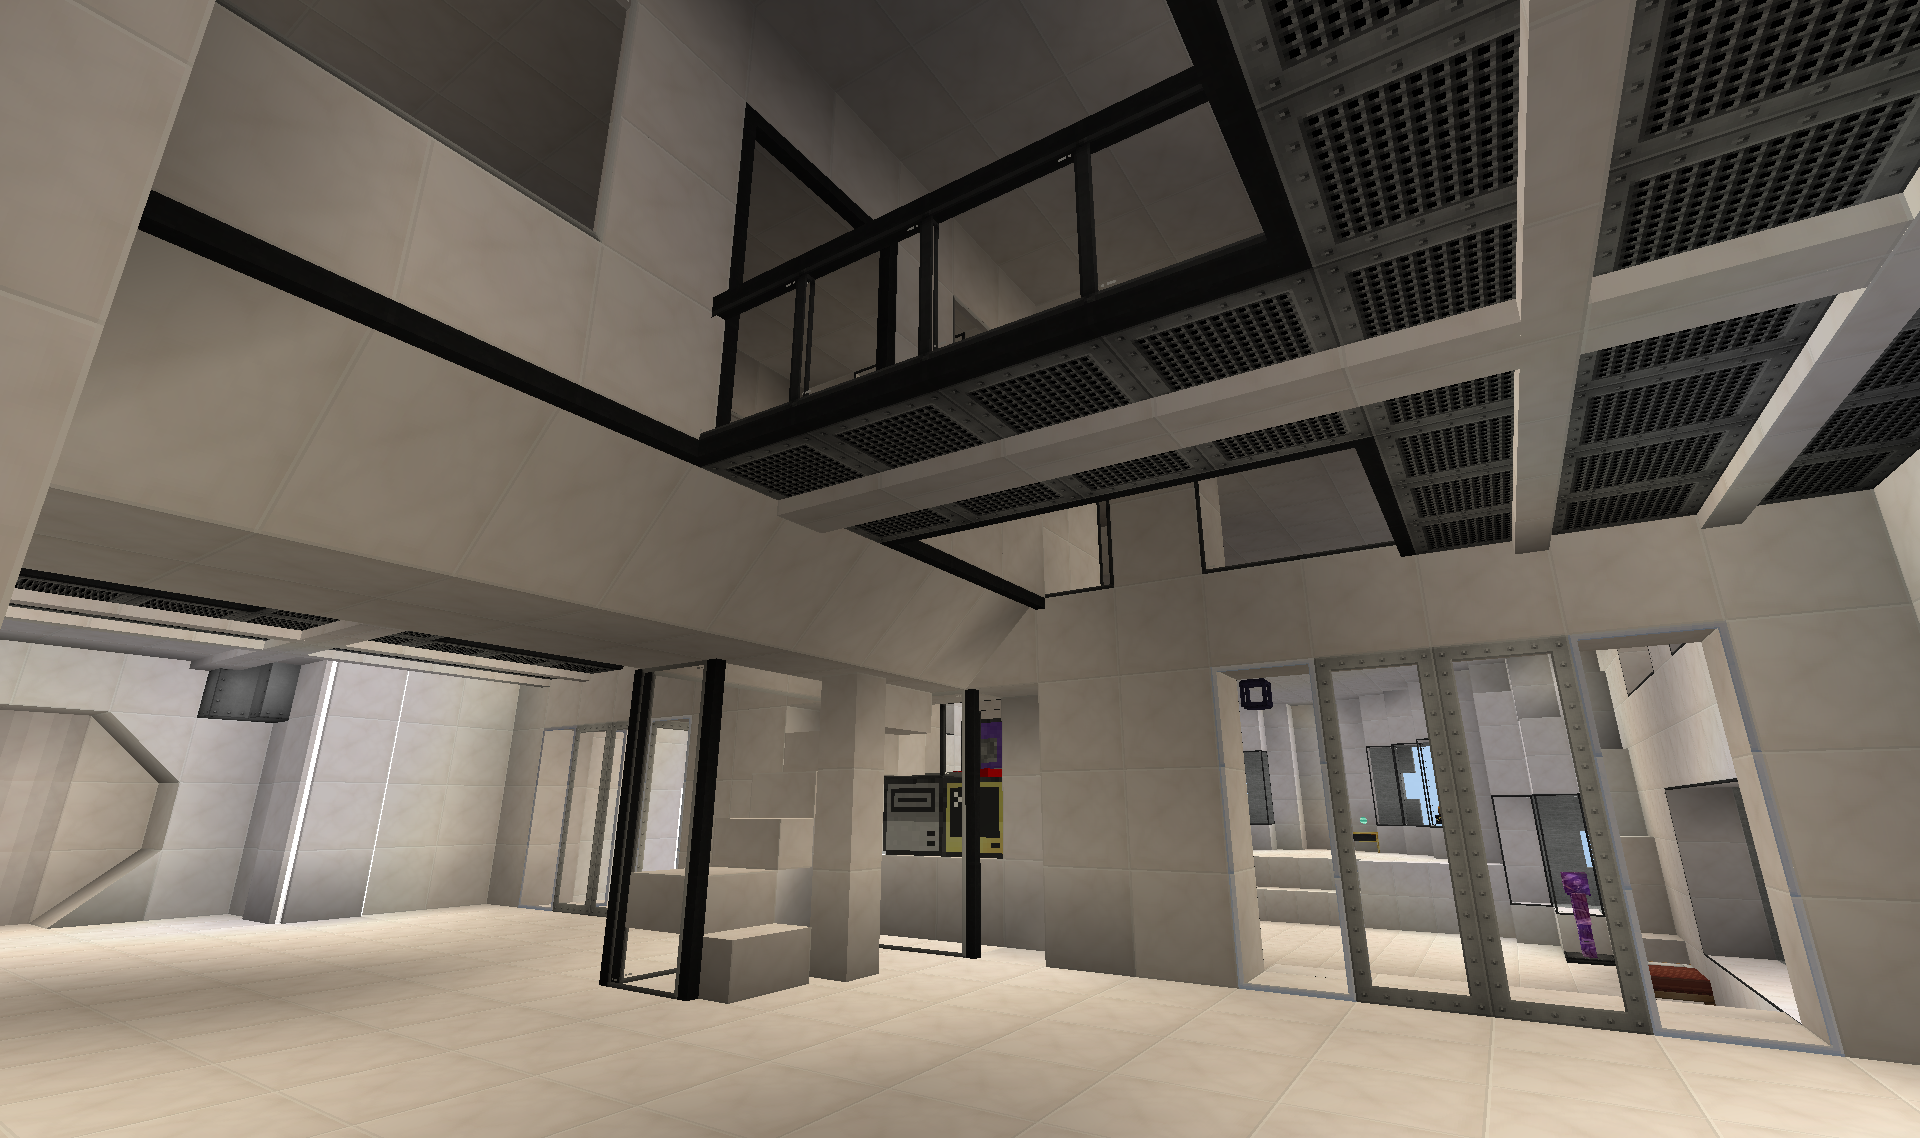
From it you can walk out onto these "observation platforms" for a view out over the hull.
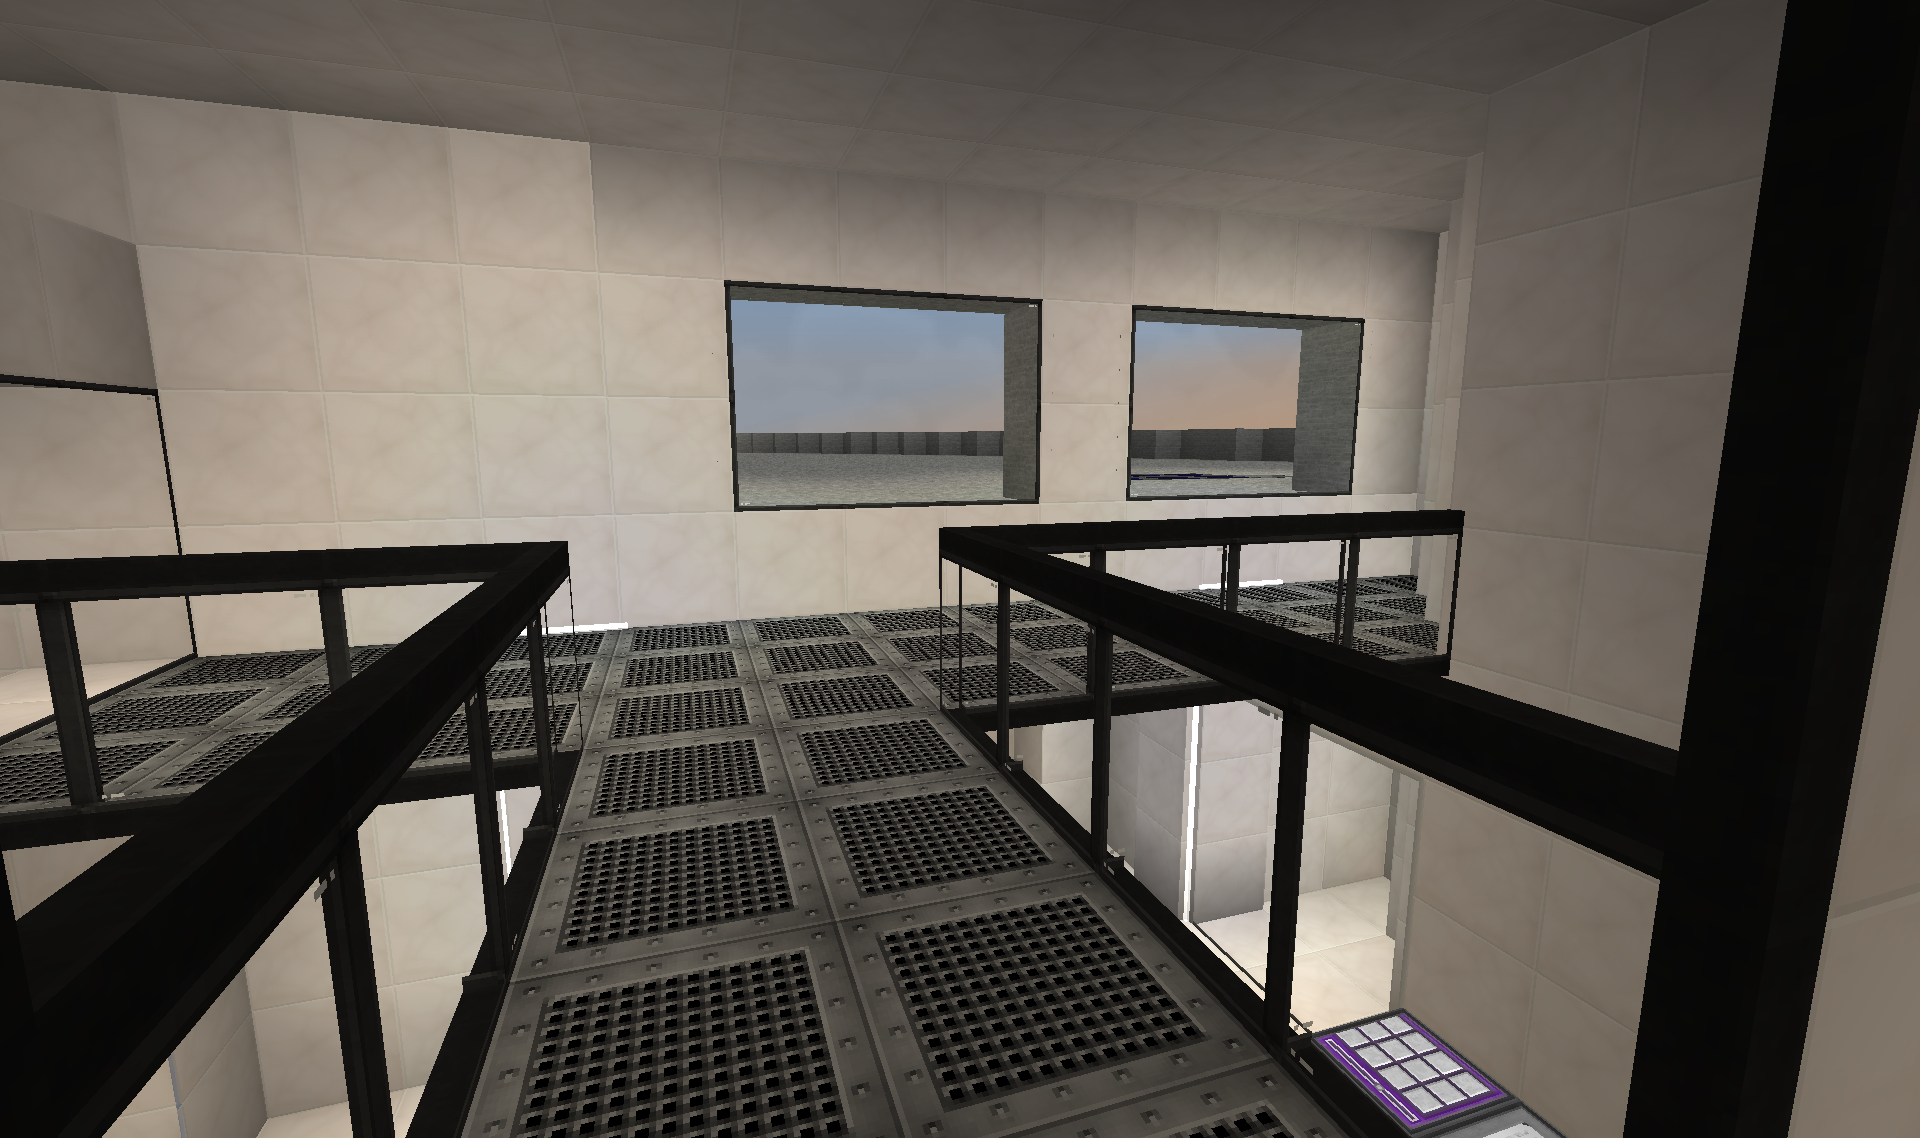
Plan to take these platforms into the main room (on the left on the picture above), to give some dynamics to the large hall.
And from this, whatever it is, I made a staircase to grant access to the floor above(if not using the lift/elevator).
Garden and pond in the bee area:
Amazing diagonal water with Carpenter's Blocks!
Grass is a little bare for now, removed all the flowers when I started building the garden. But I am sure the bees will make up for that in short time
The observant person might spot a few slopes missing on the walls. The case is that there arent room for them with the current placement of the Alvearies. There are 2 blocks missing furthest out that can only be placed if ALL the Alvearies and their automation are moved(not going to happen!). The 2 problems in the middle I will fix by bringing those 2 alvearies forward just one block. I have just been putting it off so far as it is a PITA
Finally pulled myself together and did something about the "Main hub" between the corridors from the wings and the main tower. Before it had raw cobblestone etc. showing, which was really not ok for the heart of the base! Still a long way to go though with detailing:
Not sure what this place is for, but there is access through this spiral microblock staircase:
From it you can walk out onto these "observation platforms" for a view out over the hull.
Plan to take these platforms into the main room (on the left on the picture above), to give some dynamics to the large hall.
And from this, whatever it is, I made a staircase to grant access to the floor above(if not using the lift/elevator).
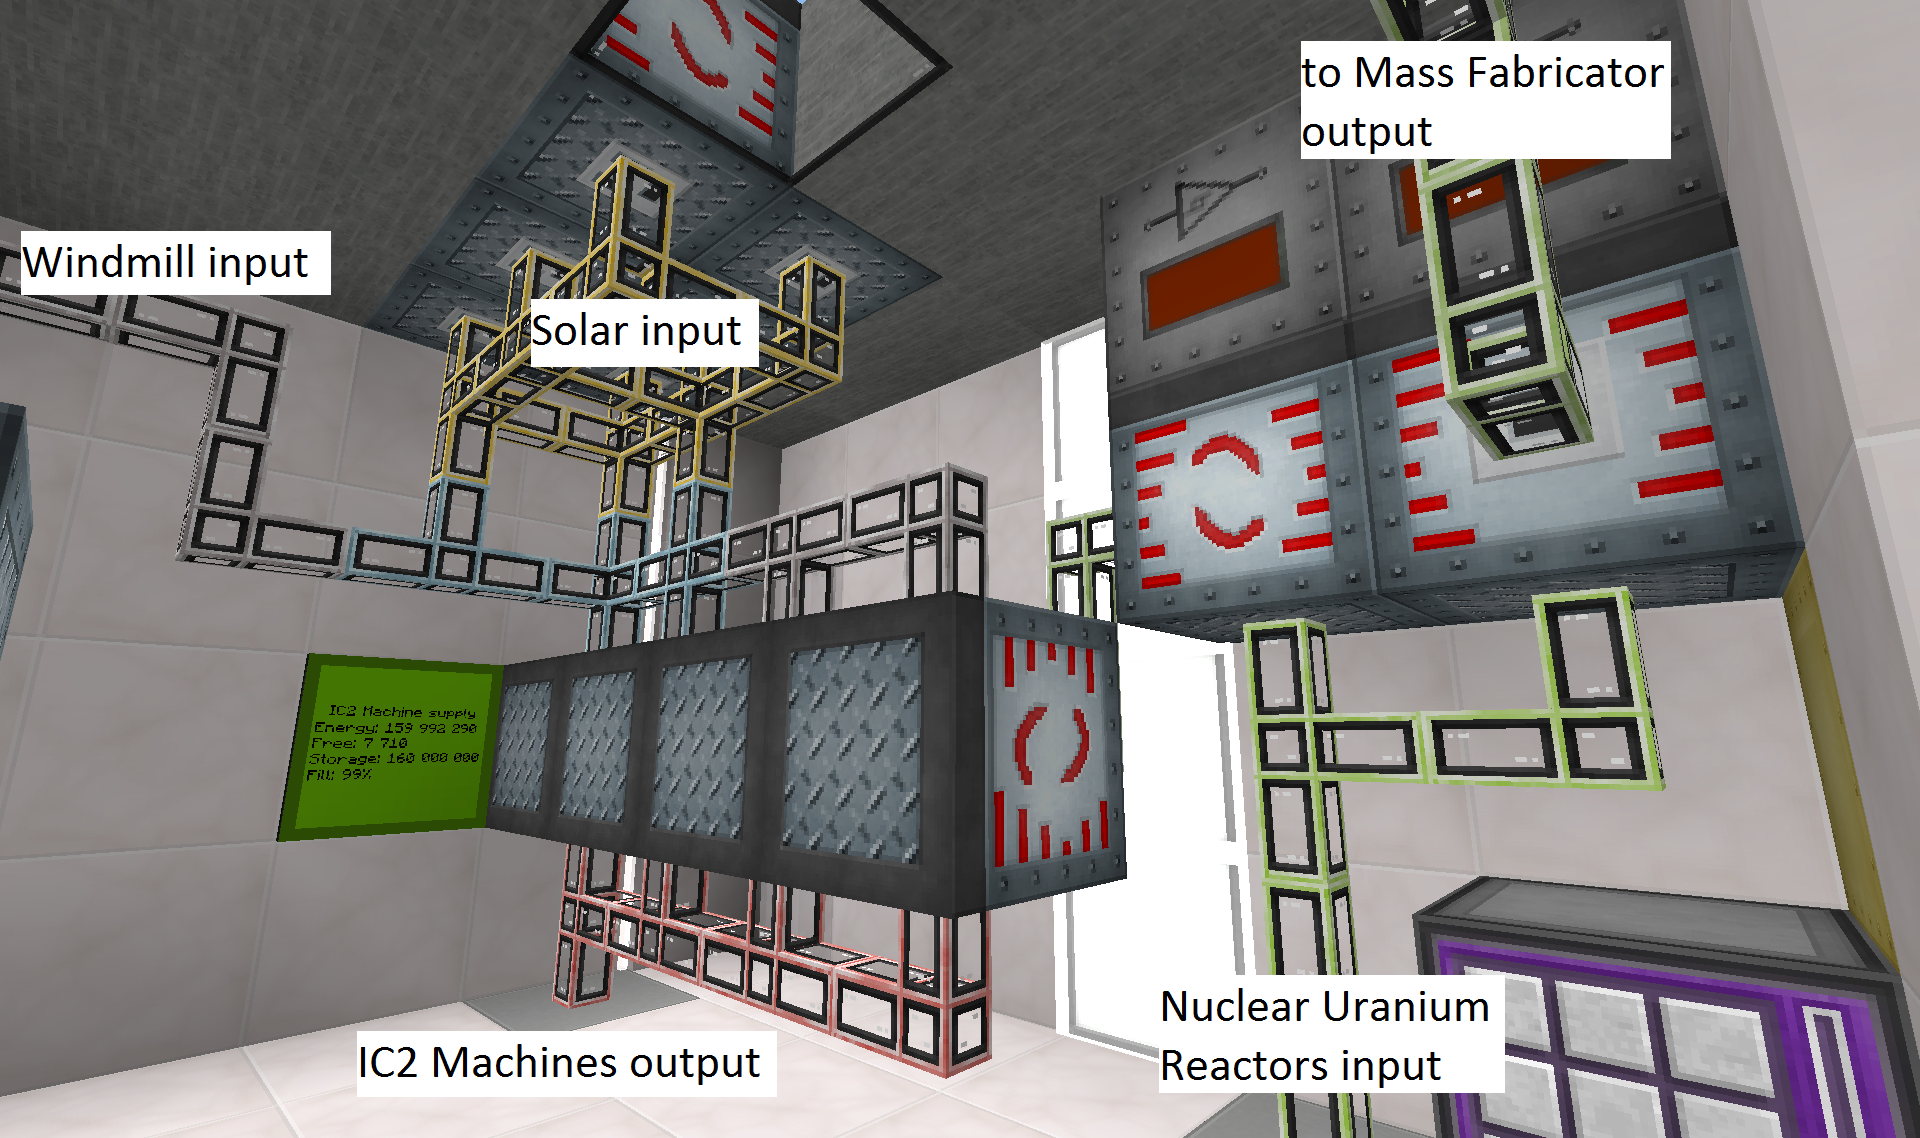
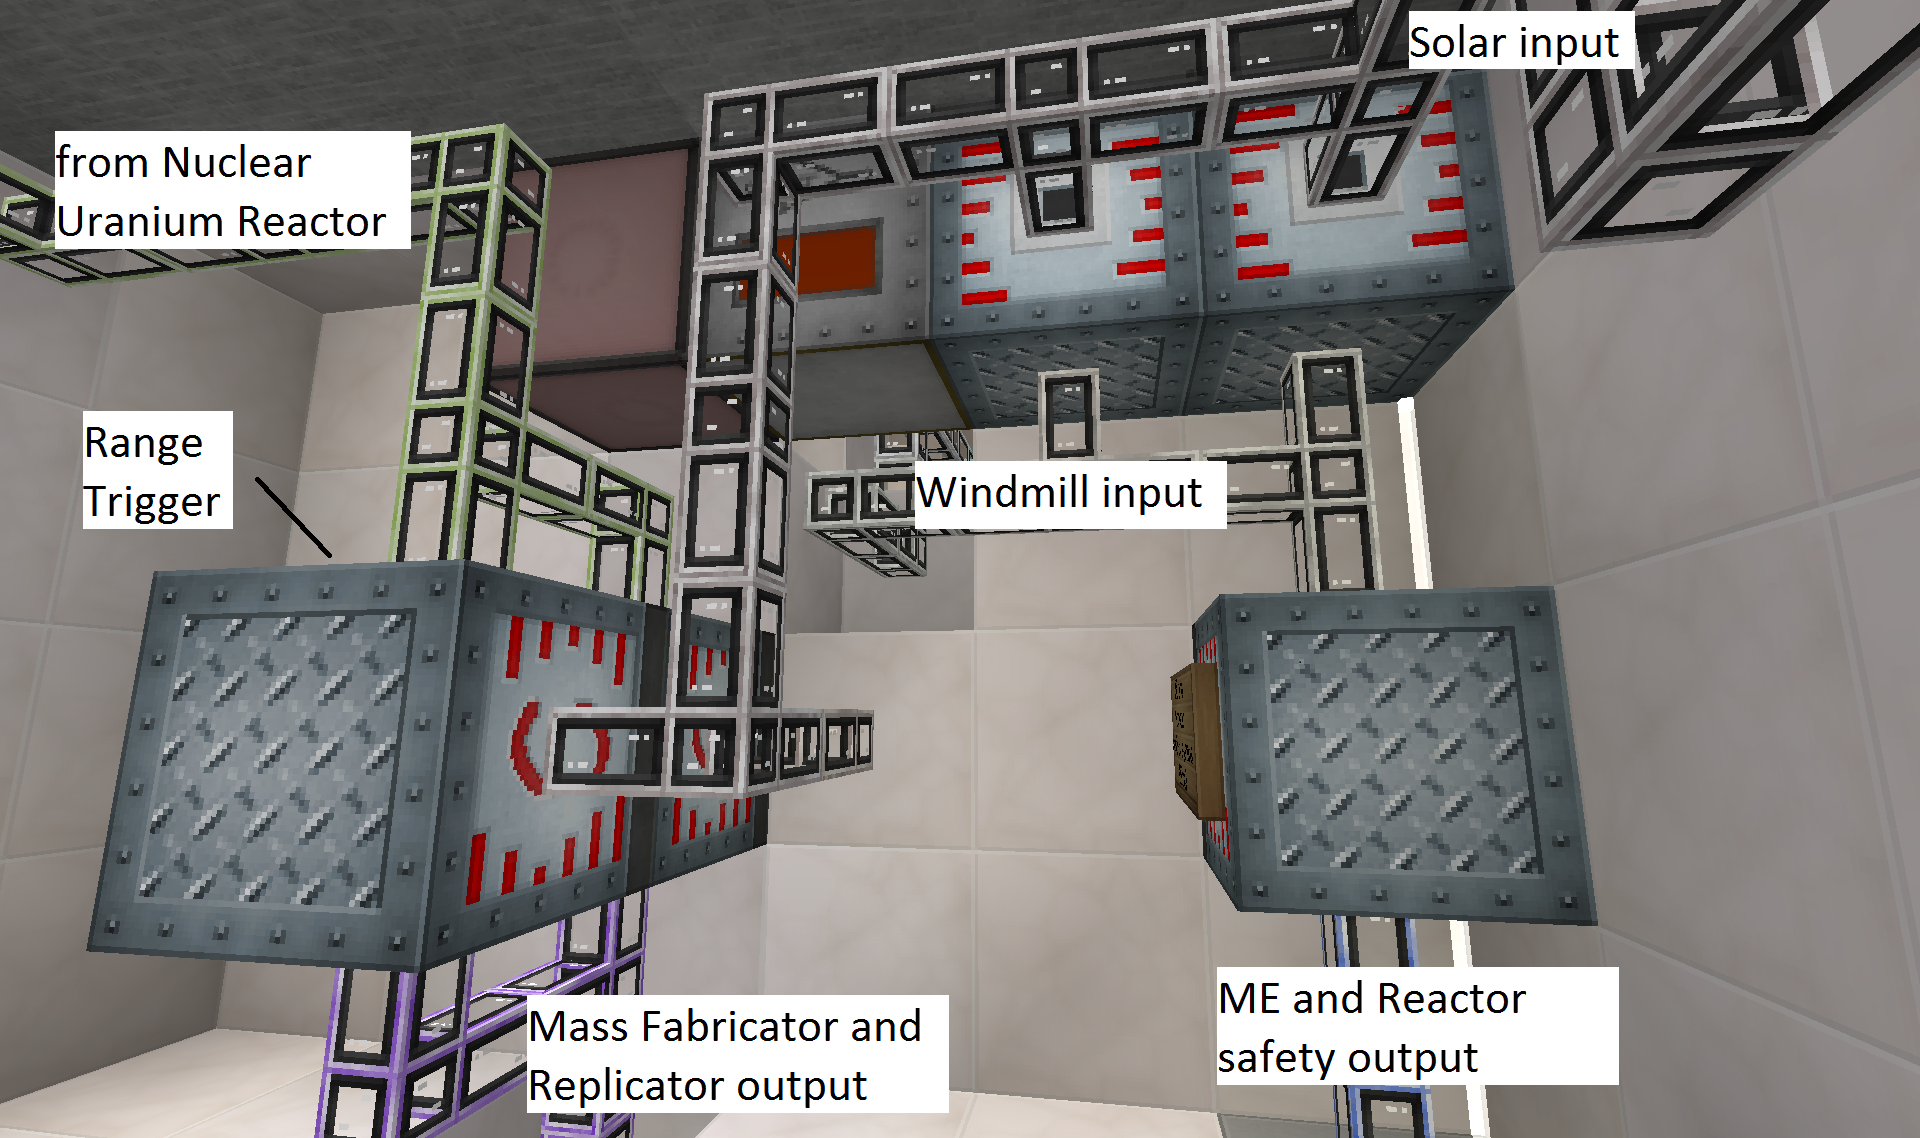
Also been trying to optimize/smartly control my IC2 power. In that effort I had to completely redo my IC2 power hub:
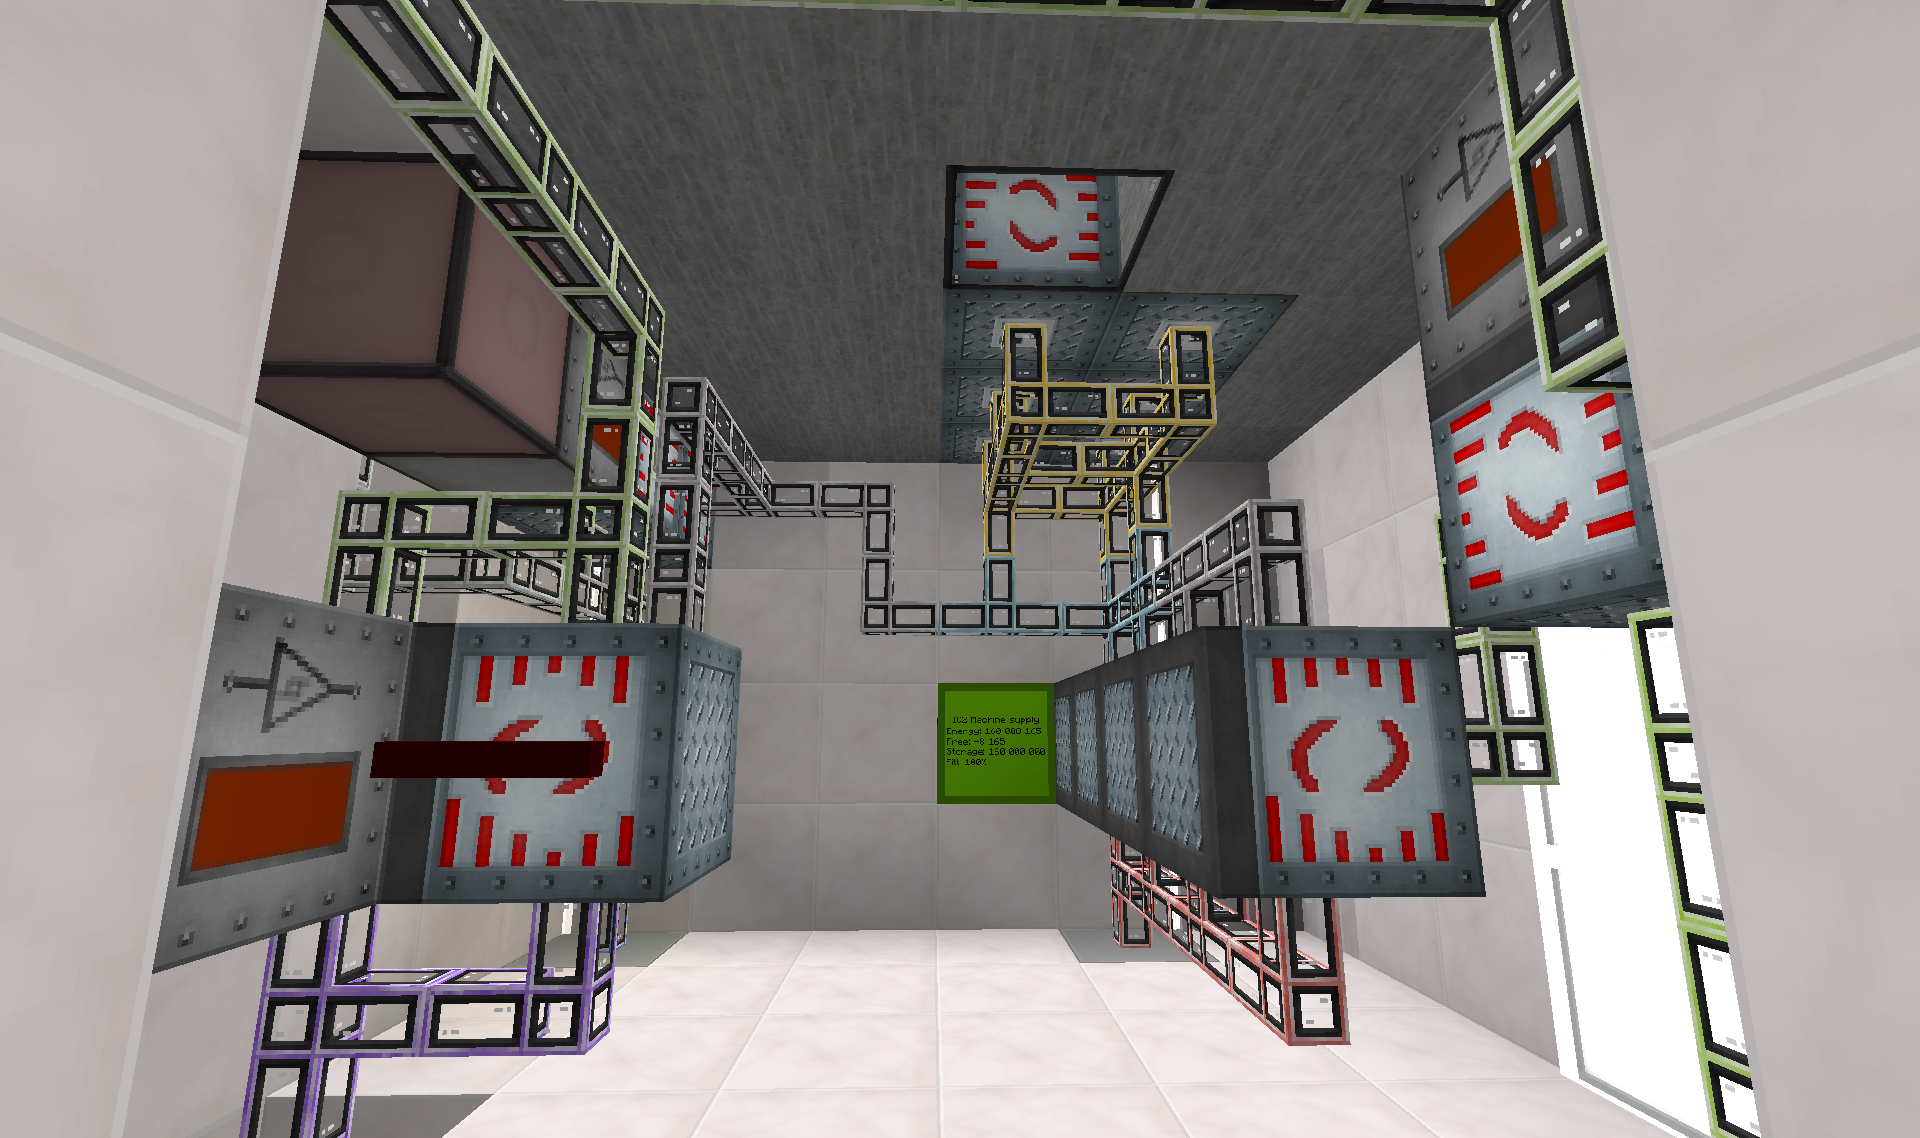
Now with lots of brightly coloured cables, MFSUs and redstone signals flashing on and off
To really explain this jumble I think I am going to need captions on the images
The 4 MFSUs in the middle of picture supplies power to pretty much all my IC2 machines(ore processing, crafting etc). These are always on and have a total bandwidth of 8192EU/t. They are being powered by the Solar Arrays above them and from 2xExtreme Voltage Compact windmills. Should this not suffice then the Range Trigger(the metal box ontop of the top left most MFSU) will activate power to flow from the Nuclear reactors to supplement. This ensures that the Nuclear reactors are not topping up the MFSUs if the windmils and solars are capable of doing it, and thereby prevents waste of fuel. The other Range trigger will send power over to the Mass Fabricator outputs should they drop too low:
The Windmill input is here being fed into 2x MFSUs purely to be able to limit their output to the rest of the system. At any time the windmills will be powering the ME and Reactor output. Should this output drop low(which I really don't want it to), one MFSU is stopped, thereby limiting the output to the rest of the network by half and the ME/Reactor output then got 2048EU/t all for itself to recharge. This way I am 100% that my ME system and reactor safety mechanisms always have power.
Windmill power is being send over to the previous picture and solar power vice versa to the Mass Fabricator outputs. The MF output is supplemented from the Nuclear reactors should it drop too low(detected by the Range Trigger on the previous picture). To ensure that the MF system doesn't hog all the power should the main machine output be running low, another Range Trigger(obscured on the picture) will turn off the MF output completely should that be the case.
Phew, hope anyone could follow that. Looking much forward to adding another level of complexity to the system when adding the MOX-fuel generators
I wish I could find a beautiful world like that, let alone be able to factorize my worlds as much as you do. As iNd3x said, you deserve a medal!
As iNd3x said, you deserve a medal!I regret that you are not part of my project whenever you post yet another media godness. So its painful and joyful at the same time. Maybe i am wrong and its just my vivid imagination to see you as builder with great mod skills and passion for huge builds with astonishing details. Maybe its just the high resolution texturepack... Maybe its the combination of microblocks and slopes... But maybe you really are what E.R.A.M. seeks so much...
Industrial builds look great with Soartex. I need Soartex in order to make a good industrial build, otherwise it looks crap.I regret that you are not part of my project whenever you post yet another media godness. So its painful and joyful at the same time. Maybe i am wrong and its just my vivid imagination to see you as builder with great mod skills and passion for huge builds with astonishing details. Maybe its just the high resolution texturepack... Maybe its the combination of microblocks and slopes... But maybe you really are what E.R.A.M. seeks so much...
Still loving this thread, rhn.So there was actually a reason why I started making this particular script at this particular moment:
I needed some setup to use use all that lovely Ethanol produced. Problem is I wanted a solution that was "on demand power", so it had to have no "heatup" periods. So Boilers etc. were out of the picture and could simply not think of anything better/more energy dense than Compression Dynamos. So I bring you 100 Compression Dynamos
Regarding on-demand power: In the past I've stored steam in tanks (railcraft steel etc) so that I'm only running my boilers when the steam itself is low. Not sure if this is viable in your pack, but its essentially on-demand at that point (for EU, MJ or RF as needed)
Ok this project have been a long time coming, but finally about to get it done. But decided to do this as a mini tutorial kind of thing:
Elevators using Enhanced portals 3 and CC touchscreen.
The main idea of this build is to create something that mimics an elevator/lift experiences without the actual moving parts and waiting time going up and down. This is where Enhanced Portals 3 comes into the picture. At the end of the build you will be able to step into an elevator, click your destination, have the door shut and you will then get teleported directly to that destination without any hassle.
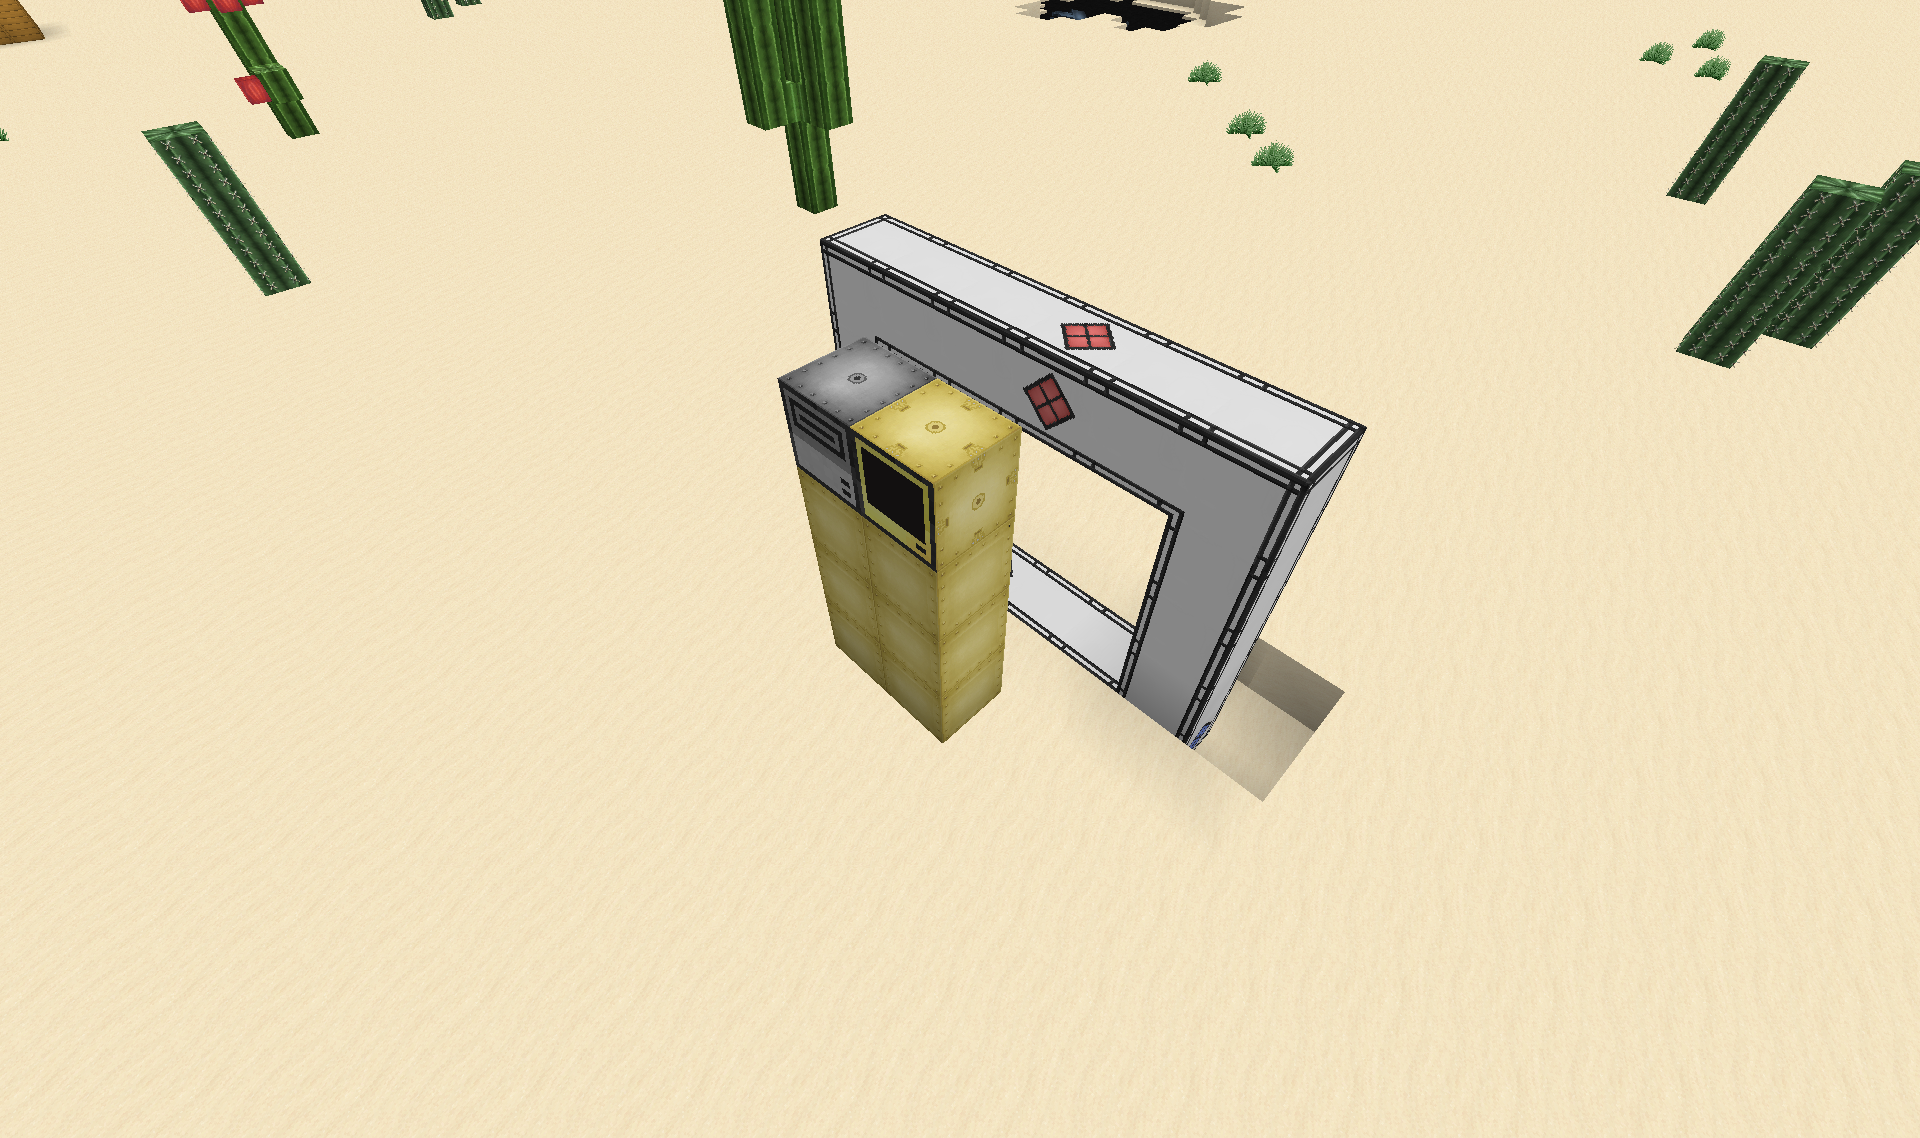
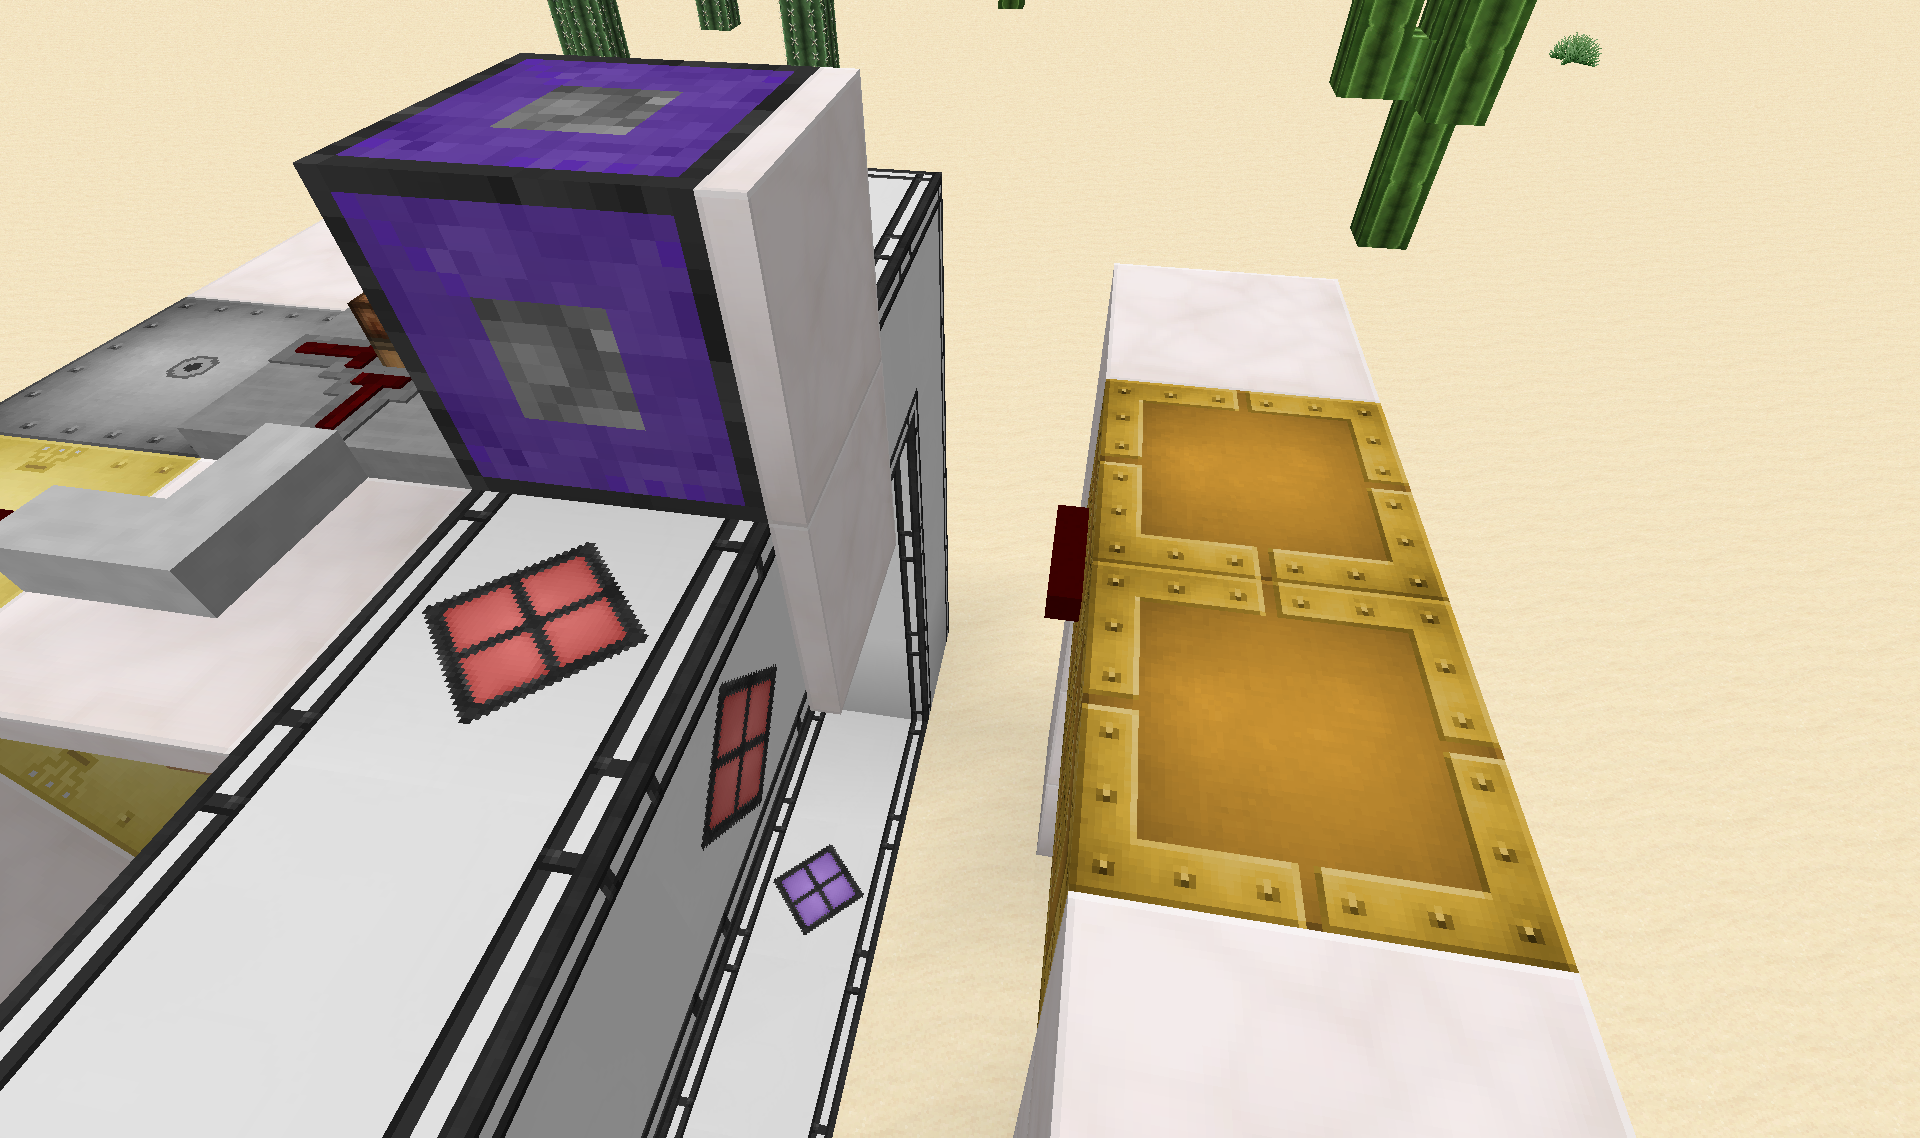
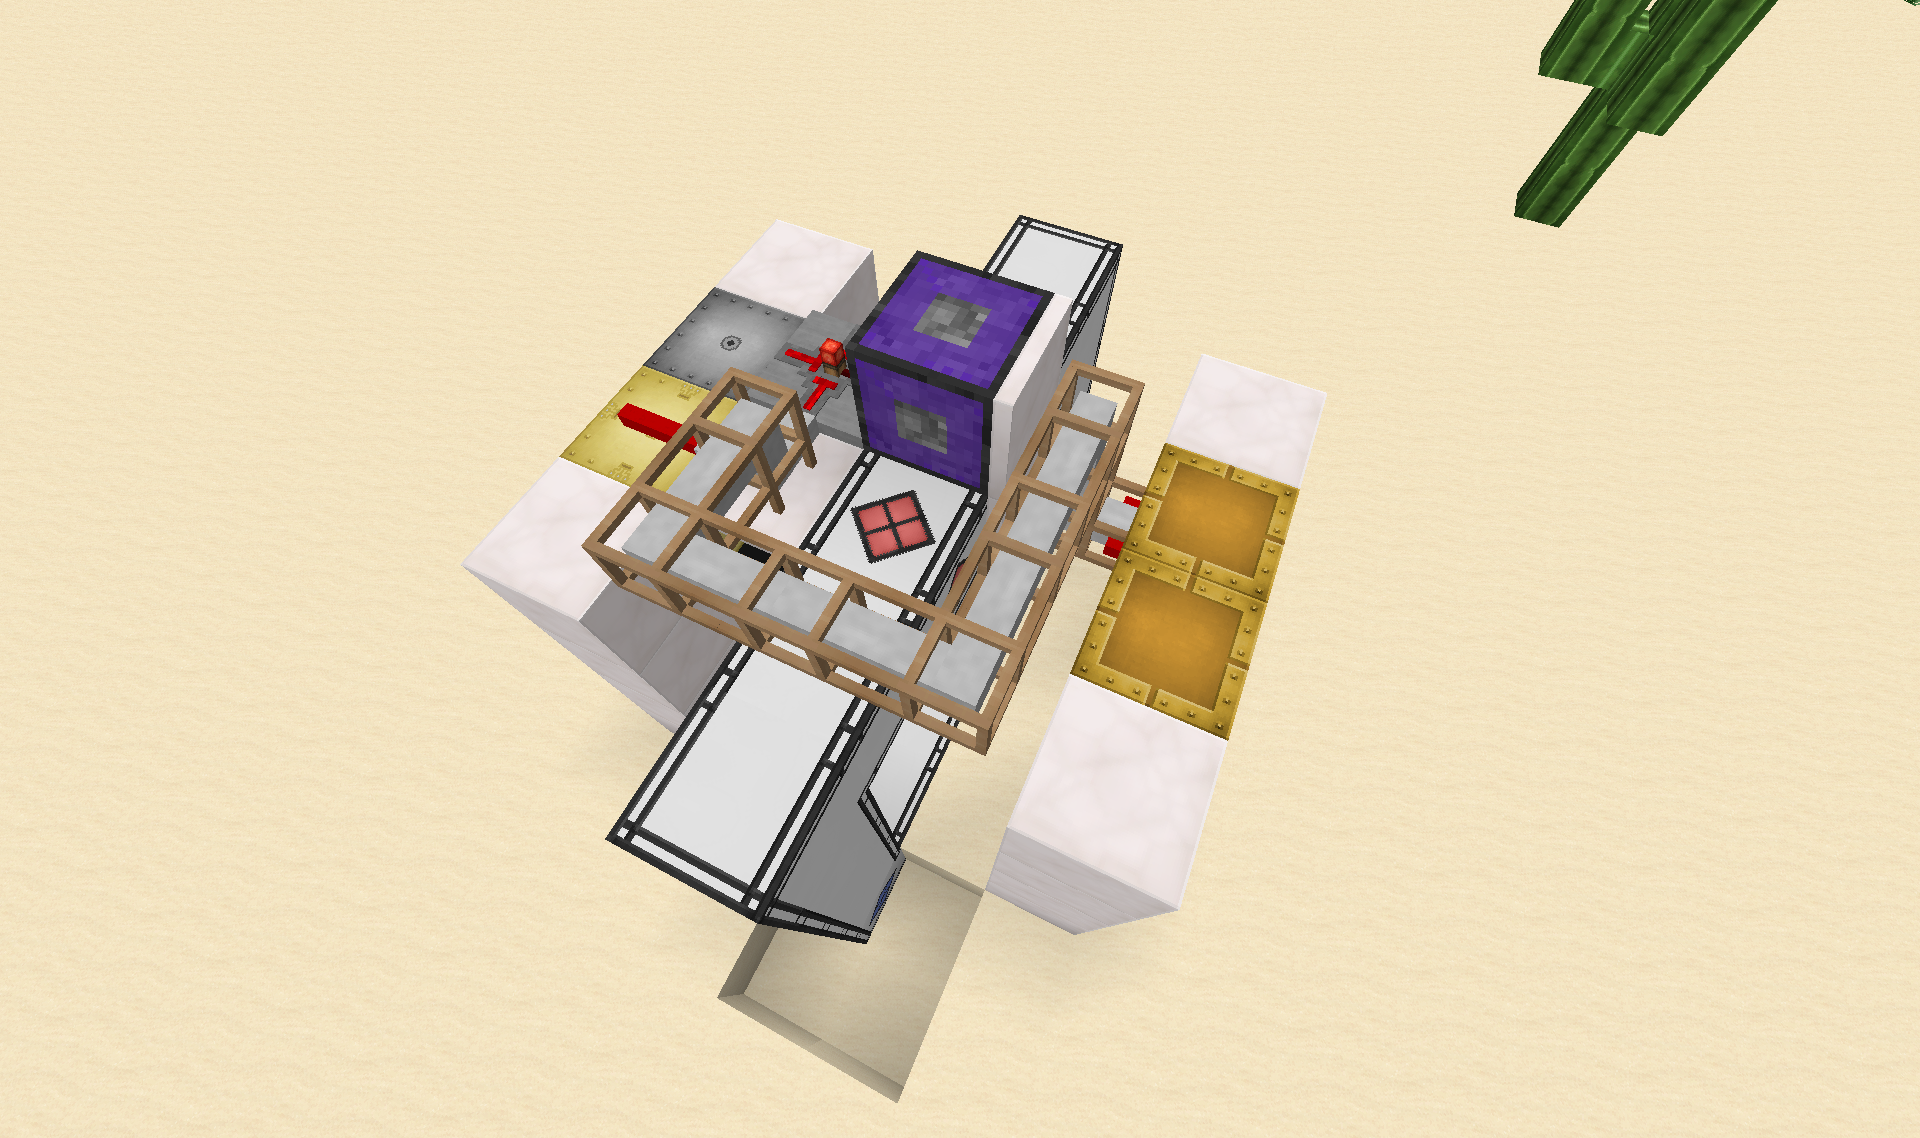
First thing we are going to need to build is the portal that will serve as the backbone of the "elevator". You will need 15 "Portal Frame"s, 1 "Portal Controller", 1 "Dialling Device" and 1 "Redstone interface":
I suggest putting on a pair of "Glasses" when building the portals to be able to see the different components. In that respect I am also hiding the Dialling device down in a corner as it stays visible without the glasses.
Now link the portal to your Dimensional Bridge Stabilizer to activate it(use a location card).
Next you will need 6 "Advanced Monitors", 1 "Advanced Computer" and a "Disk Drive":
Now take 2 "Drawbridge"s, 3 door material blocks for each Drawbridge(I suggest glass of some sort, Strengthened glass works great) and some decoration blocks of your choosing:
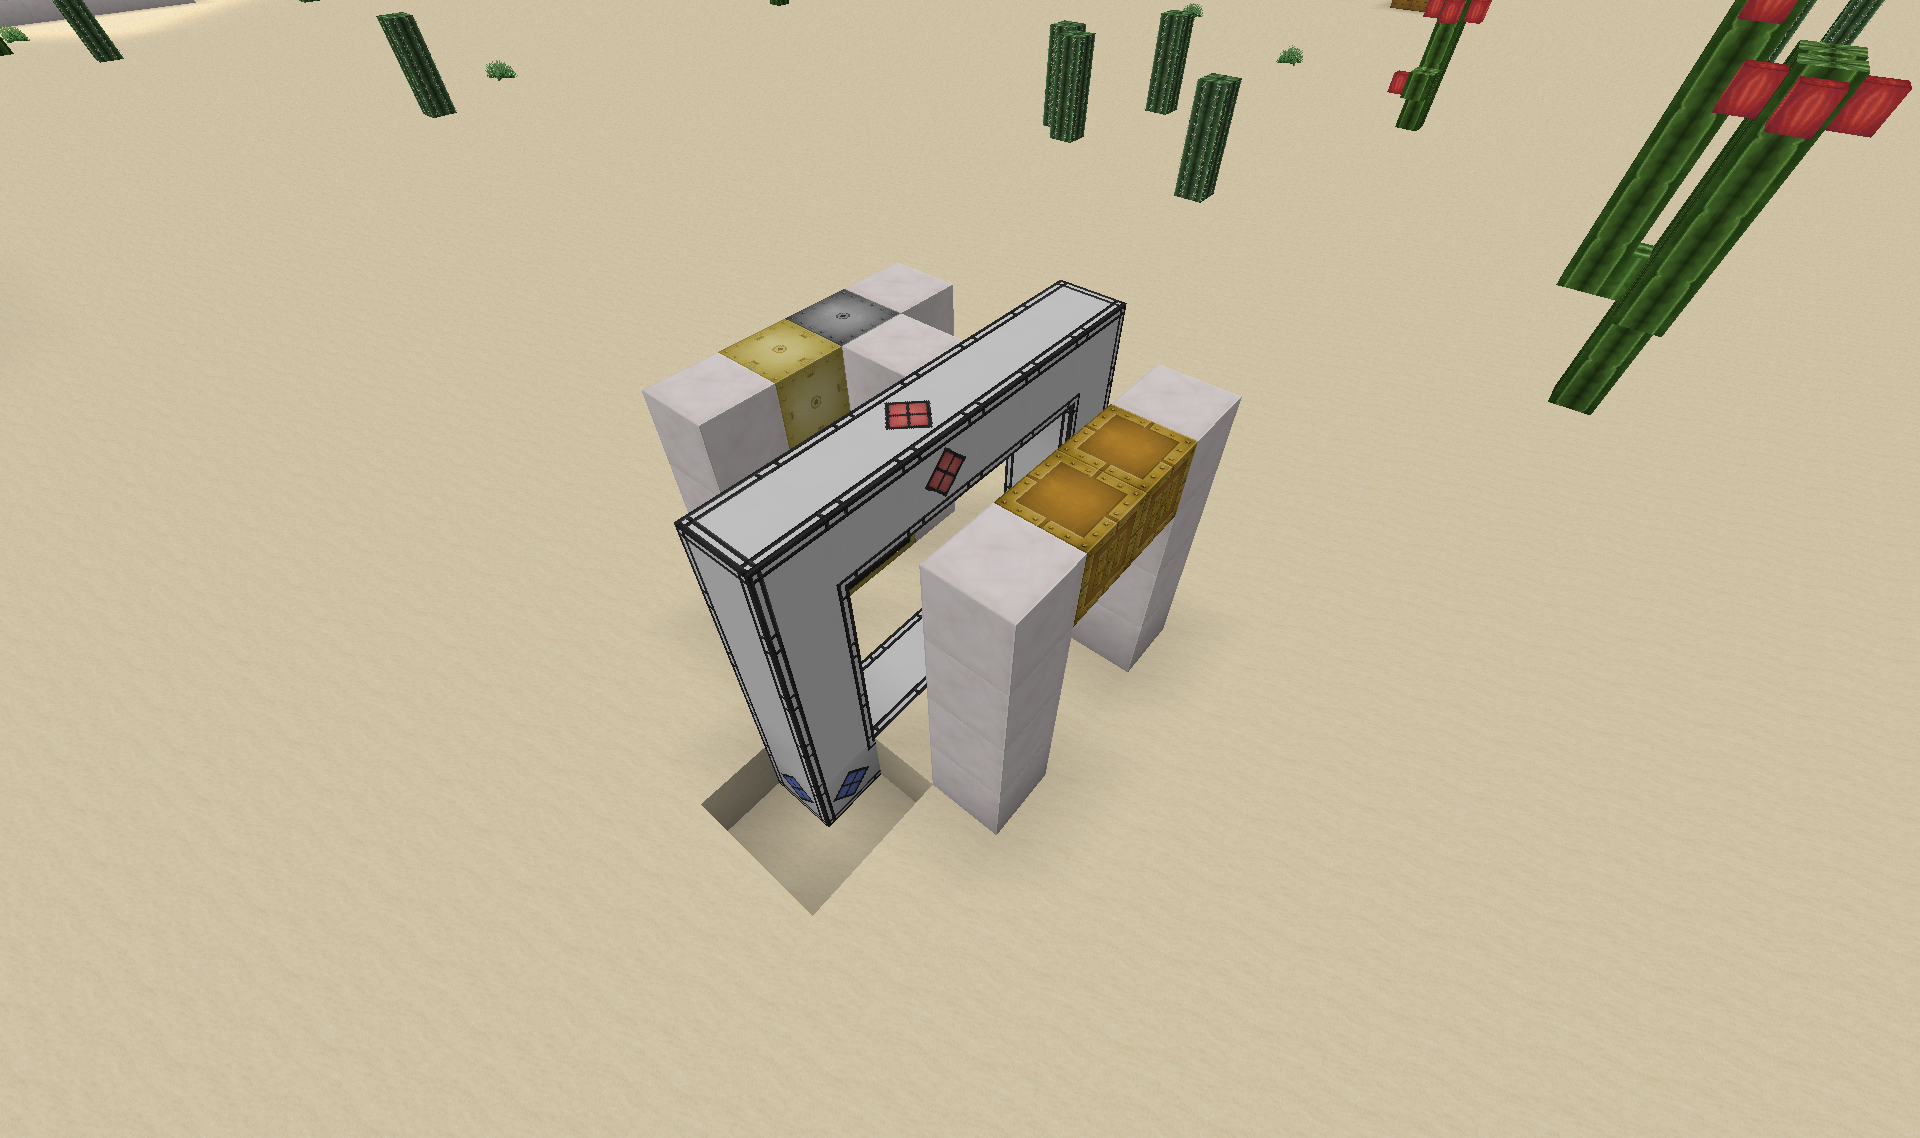
Next a "Entity Detector", "Not Gate" and Framed Insulated Wire of any colour:
Set the Entity detector to 5,3,2 "Player" if your door is facing East/West, or 2,3,5 if North/South.
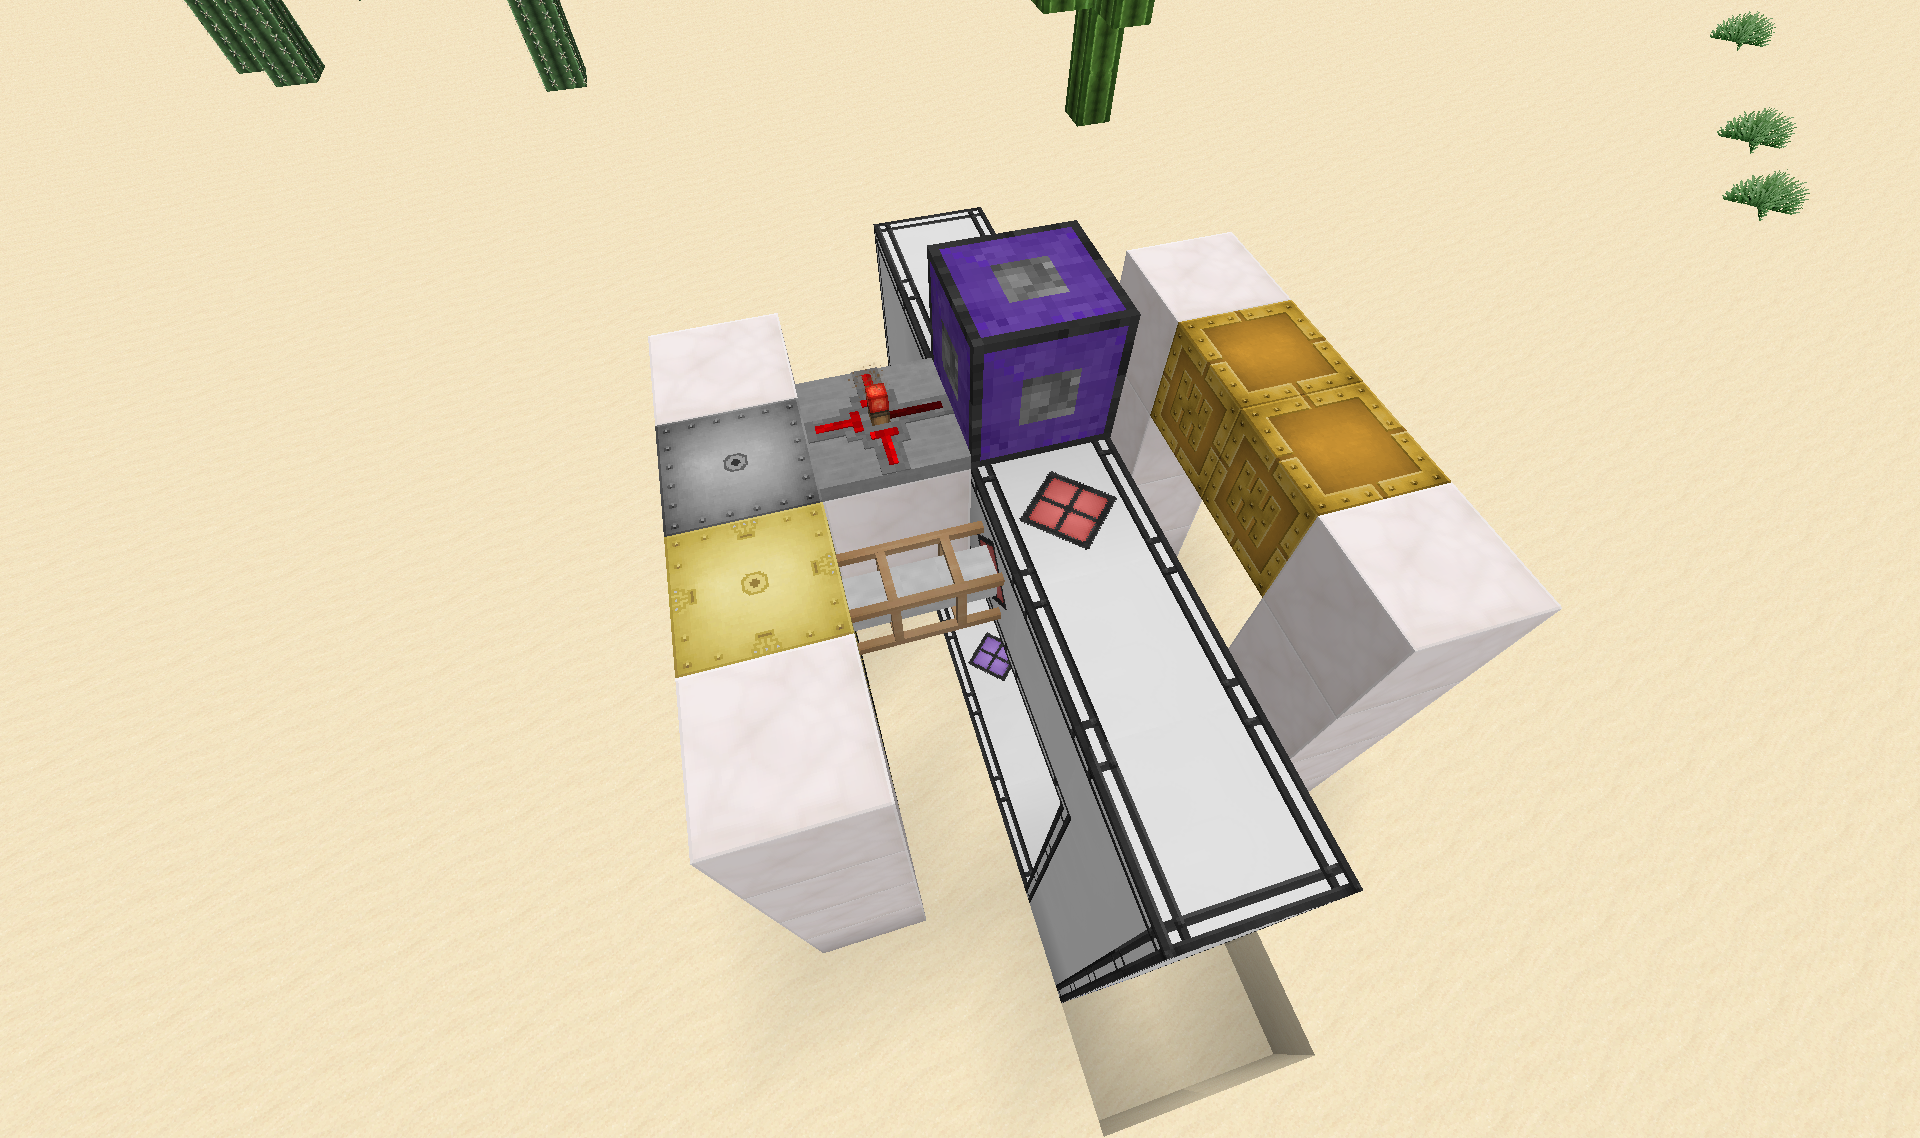
Red Alloy Wire, Insulated Wire(any colour) and microblock Cover:
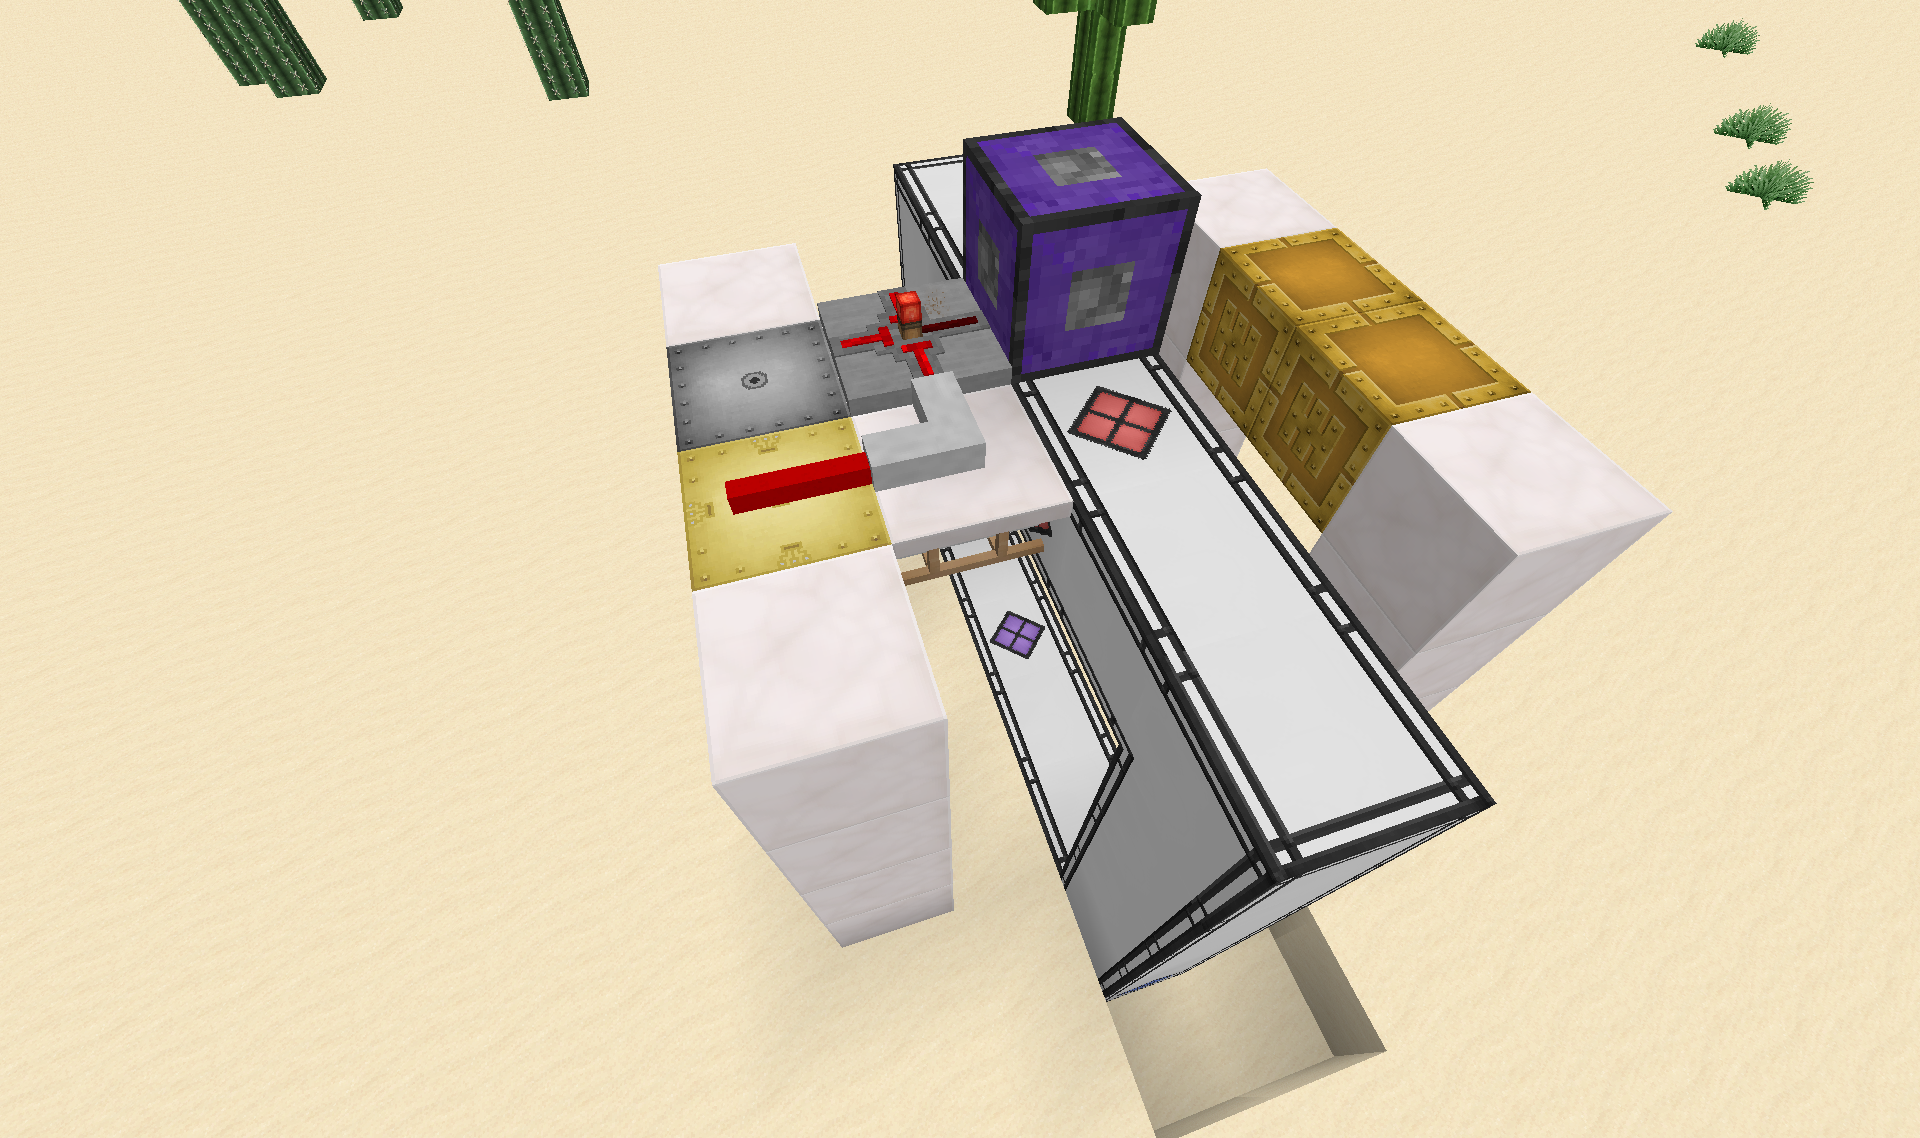
Do not place any wires(insulated or not) in a block adjacent to the Redstone Interface. It will get confused by them for some reason. Just put one Red Alloy wire on one Drawbridge.
Last building step: More Framed Insulated Wires:
The elevator mechanism is now done and we can move on to the programming and setup of the computer:
First we are going to have to tell the computer which floor it is actually on. This have to be done in a way that it can remember even after server/computer/chunk reloads etc, so we will store that data on a Floppy Disk in the Disk Drive.
Craft a "Floppy Disk" and put it in the Disk Drive next to the computer(or a Disk Drive next to any Computer). Open the Computer and type: "edit disk/floor" and hit enter. Type in the floor number that the elevator is situated on(from 1-9. Use 1,2,3.. etc. first due to the code works. This is just for the internal use in the code, you can name the floors displayed differently later if the floor 1 isn't what you would call floor 1 in your build). Type in the number of the floor(just a single digit), hit ctrl and save, hit ctrl and exit.
I wrote this little program if you want to easily label your Disks.
http://pastebin.com/XCsgdpJk
Just DL it, run it like: "programname labelname". It will automatically do the rest.
Now install the main elevator program on the computer as "startup":
http://pastebin.com/48TbDKXX
Made a new version of the elevator program, where I have separated the core of the program into an API. This allows you to simply copy and modify the startup script only for each elevator needed.
So make a copy for the elevator in Building A and a copy for Bunker B etc. so you can individually adapt it to have the right number of floors/buttons and the proper text on on the buttons(all 1-9 floors on the same elevator uses the same startup script, you only need multiple scripts if you have multiple elevators in your world(s)). The customized scripts will then automatically download and use the current up to date elevator API.
Default startup script:
http://pastebin.com/kKdbx3Ty
Follow instructions in the header of the script on how to customize the touch screen button text.
Elevator "API" for the curious:
http://pastebin.com/1M5sgXpT
Now there is one thing left to do, and this can be a bit complicated. We need to pick "Identifiers" for all the portals and then store the other portals Identifiers in the Dialling device in the proper order.
Example: lets say we are setting up Floor 4s elevator. To make it easier for myself I would then pick the 4th Identifier symbol on the lift for this portal:
Click the Portal controller with a Wrench:
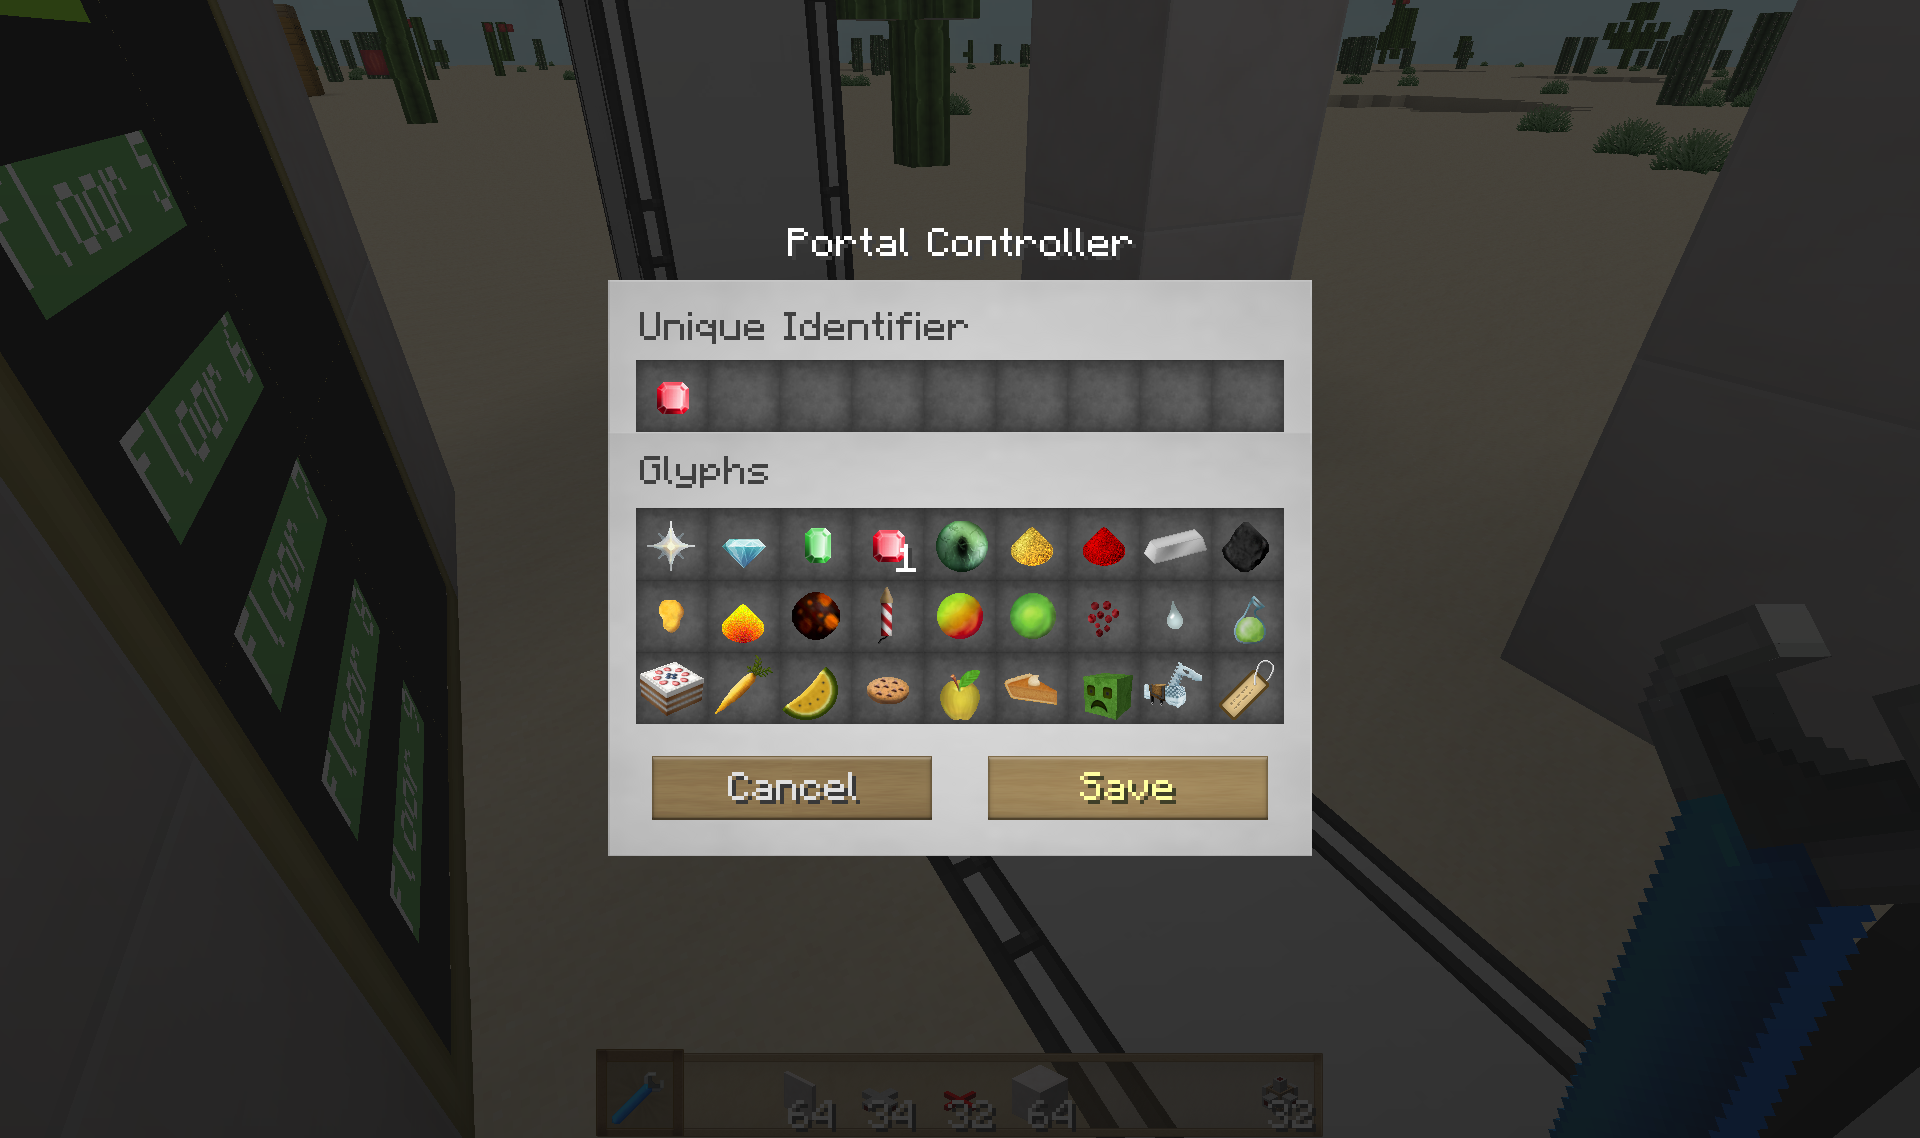
And save.
Now go to your Dialling device and start Adding stored Identifiers starting with the first one being for Floor 1 with the first Identifier and so on. (Add the identifier for the Portal itself as well just to keep the list in the right order, the computer will use redstone strength signals to dial a certain stored destination. Signal strength of 2 will dial the second on the list). Populate the list with all the portals/floors you have.
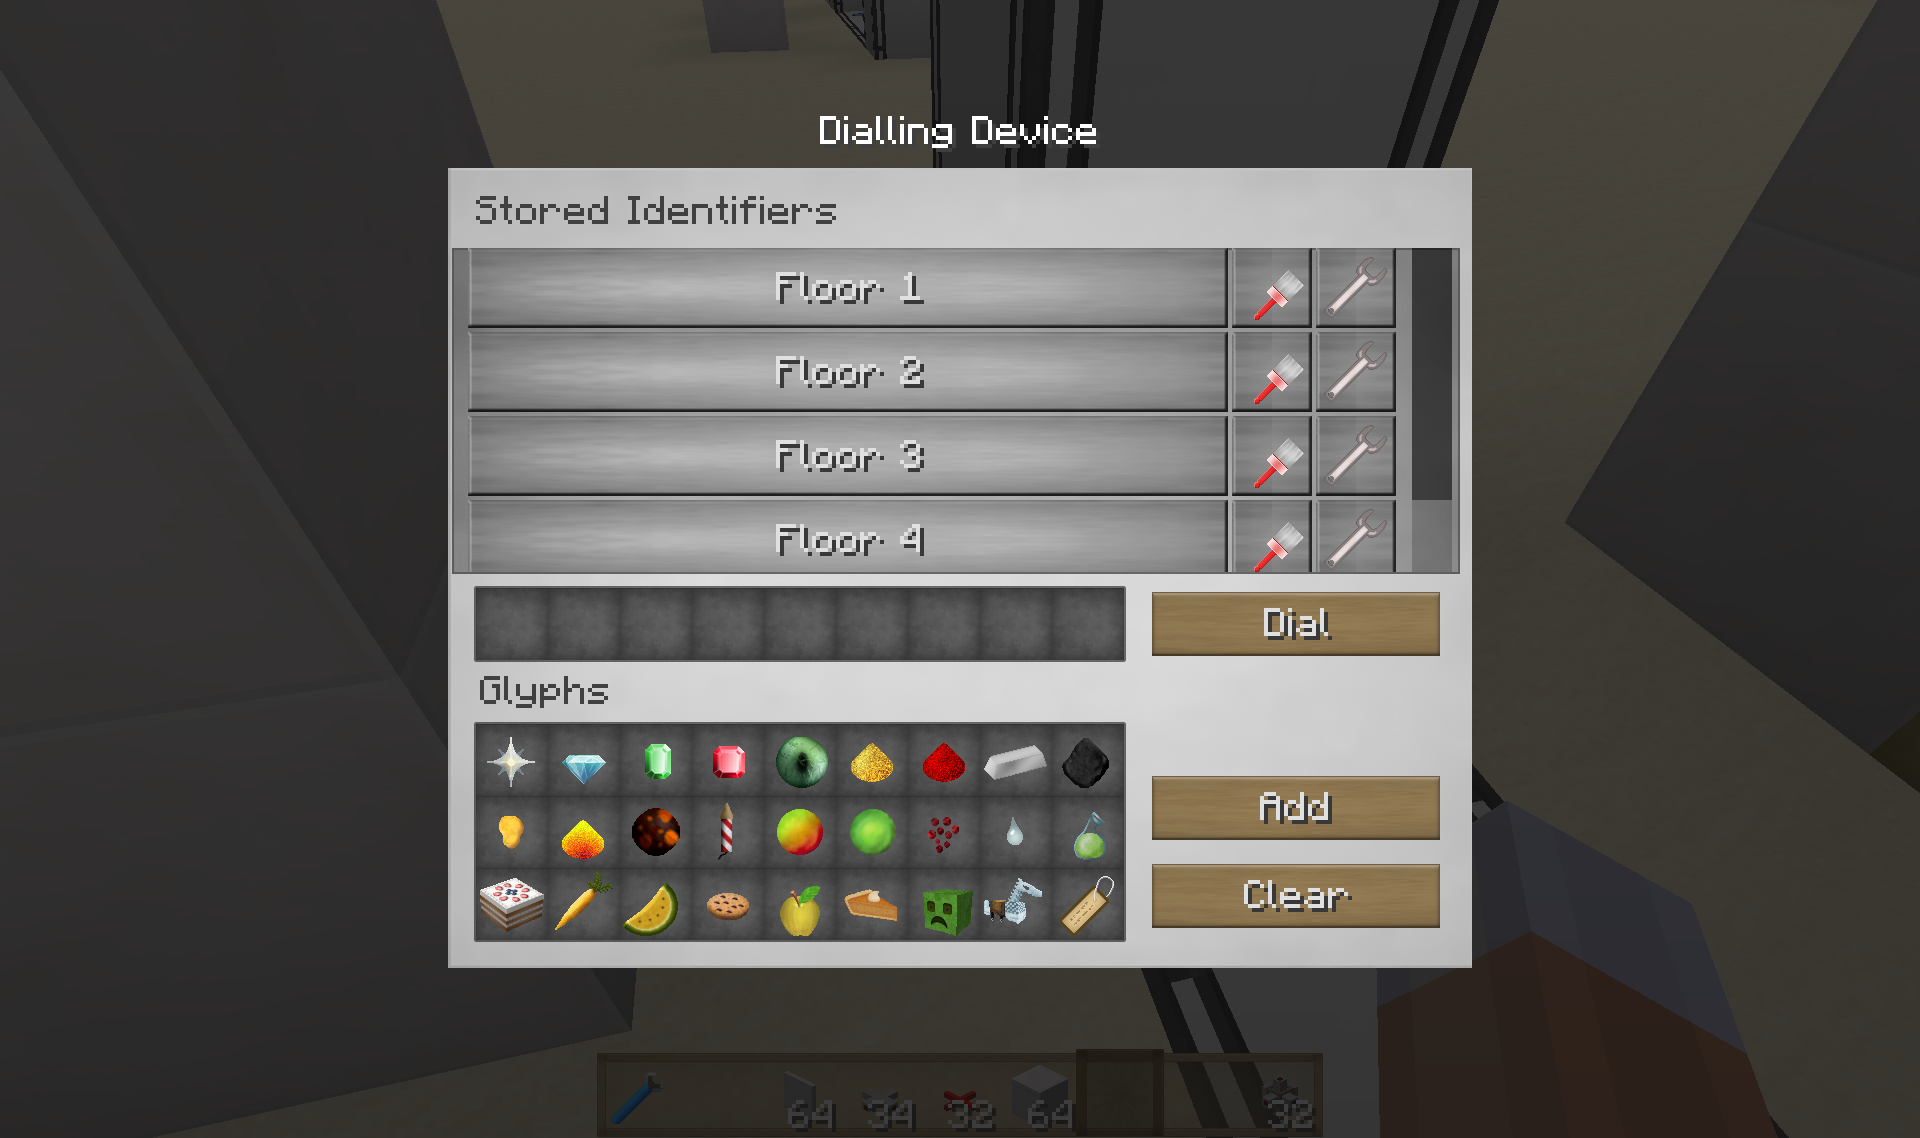
Very last thing you need to do is click the Redstone Interface with a Wrench and change the setting to:
"Input, Dial specific identifier (2)"
And you are now all done!
Step into your elevator, click your destination and see yourself transported to the destination in a stylish fashion!
Now ofc all this looks rather raw, but there are several things you can do about that. Build a nice facade up around the elevator, use some of Enhanced portals many features, like camouflage the frame as another block, make the portal invisible, remove sounds and particles etc.
A little addition:
The code is not totally fininshed yet I think, I will probably polish it along the way.
In the code there is a section where you can specify what you want the buttons on the Touchscreen to say:
You can edit these to suit whatever you want it to say. Just make sure to keep it 16 characters long(by adding spaces) to ensure the lengths of the buttons are as they should.
Also the code by default supports 9 floors as maximum. If you want/need less just delete >buttontext[9]="Floor 9 "< for example and the code should adapt to only use 8 floors.
Elevators using Enhanced portals 3 and CC touchscreen.
The main idea of this build is to create something that mimics an elevator/lift experiences without the actual moving parts and waiting time going up and down. This is where Enhanced Portals 3 comes into the picture. At the end of the build you will be able to step into an elevator, click your destination, have the door shut and you will then get teleported directly to that destination without any hassle.
First thing we are going to need to build is the portal that will serve as the backbone of the "elevator". You will need 15 "Portal Frame"s, 1 "Portal Controller", 1 "Dialling Device" and 1 "Redstone interface":
I suggest putting on a pair of "Glasses" when building the portals to be able to see the different components. In that respect I am also hiding the Dialling device down in a corner as it stays visible without the glasses.
Now link the portal to your Dimensional Bridge Stabilizer to activate it(use a location card).
Next you will need 6 "Advanced Monitors", 1 "Advanced Computer" and a "Disk Drive":
Now take 2 "Drawbridge"s, 3 door material blocks for each Drawbridge(I suggest glass of some sort, Strengthened glass works great) and some decoration blocks of your choosing:
Next a "Entity Detector", "Not Gate" and Framed Insulated Wire of any colour:
Set the Entity detector to 5,3,2 "Player" if your door is facing East/West, or 2,3,5 if North/South.
Red Alloy Wire, Insulated Wire(any colour) and microblock Cover:
Do not place any wires(insulated or not) in a block adjacent to the Redstone Interface. It will get confused by them for some reason. Just put one Red Alloy wire on one Drawbridge.
Last building step: More Framed Insulated Wires:
The elevator mechanism is now done and we can move on to the programming and setup of the computer:
First we are going to have to tell the computer which floor it is actually on. This have to be done in a way that it can remember even after server/computer/chunk reloads etc, so we will store that data on a Floppy Disk in the Disk Drive.
Craft a "Floppy Disk" and put it in the Disk Drive next to the computer(or a Disk Drive next to any Computer). Open the Computer and type: "edit disk/floor" and hit enter. Type in the floor number that the elevator is situated on(from 1-9. Use 1,2,3.. etc. first due to the code works. This is just for the internal use in the code, you can name the floors displayed differently later if the floor 1 isn't what you would call floor 1 in your build). Type in the number of the floor(just a single digit), hit ctrl and save, hit ctrl and exit.
I wrote this little program if you want to easily label your Disks.
http://pastebin.com/XCsgdpJk
Just DL it, run it like: "programname labelname". It will automatically do the rest.
http://pastebin.com/48TbDKXX
Made a new version of the elevator program, where I have separated the core of the program into an API. This allows you to simply copy and modify the startup script only for each elevator needed.
So make a copy for the elevator in Building A and a copy for Bunker B etc. so you can individually adapt it to have the right number of floors/buttons and the proper text on on the buttons(all 1-9 floors on the same elevator uses the same startup script, you only need multiple scripts if you have multiple elevators in your world(s)). The customized scripts will then automatically download and use the current up to date elevator API.
Default startup script:
http://pastebin.com/kKdbx3Ty
Follow instructions in the header of the script on how to customize the touch screen button text.
Elevator "API" for the curious:
http://pastebin.com/1M5sgXpT
Now there is one thing left to do, and this can be a bit complicated. We need to pick "Identifiers" for all the portals and then store the other portals Identifiers in the Dialling device in the proper order.
Example: lets say we are setting up Floor 4s elevator. To make it easier for myself I would then pick the 4th Identifier symbol on the lift for this portal:
Click the Portal controller with a Wrench:
And save.
Now go to your Dialling device and start Adding stored Identifiers starting with the first one being for Floor 1 with the first Identifier and so on. (Add the identifier for the Portal itself as well just to keep the list in the right order, the computer will use redstone strength signals to dial a certain stored destination. Signal strength of 2 will dial the second on the list). Populate the list with all the portals/floors you have.
Very last thing you need to do is click the Redstone Interface with a Wrench and change the setting to:
"Input, Dial specific identifier (2)"
And you are now all done!
Step into your elevator, click your destination and see yourself transported to the destination in a stylish fashion!
Now ofc all this looks rather raw, but there are several things you can do about that. Build a nice facade up around the elevator, use some of Enhanced portals many features, like camouflage the frame as another block, make the portal invisible, remove sounds and particles etc.
A little addition:
The code is not totally fininshed yet I think, I will probably polish it along the way.
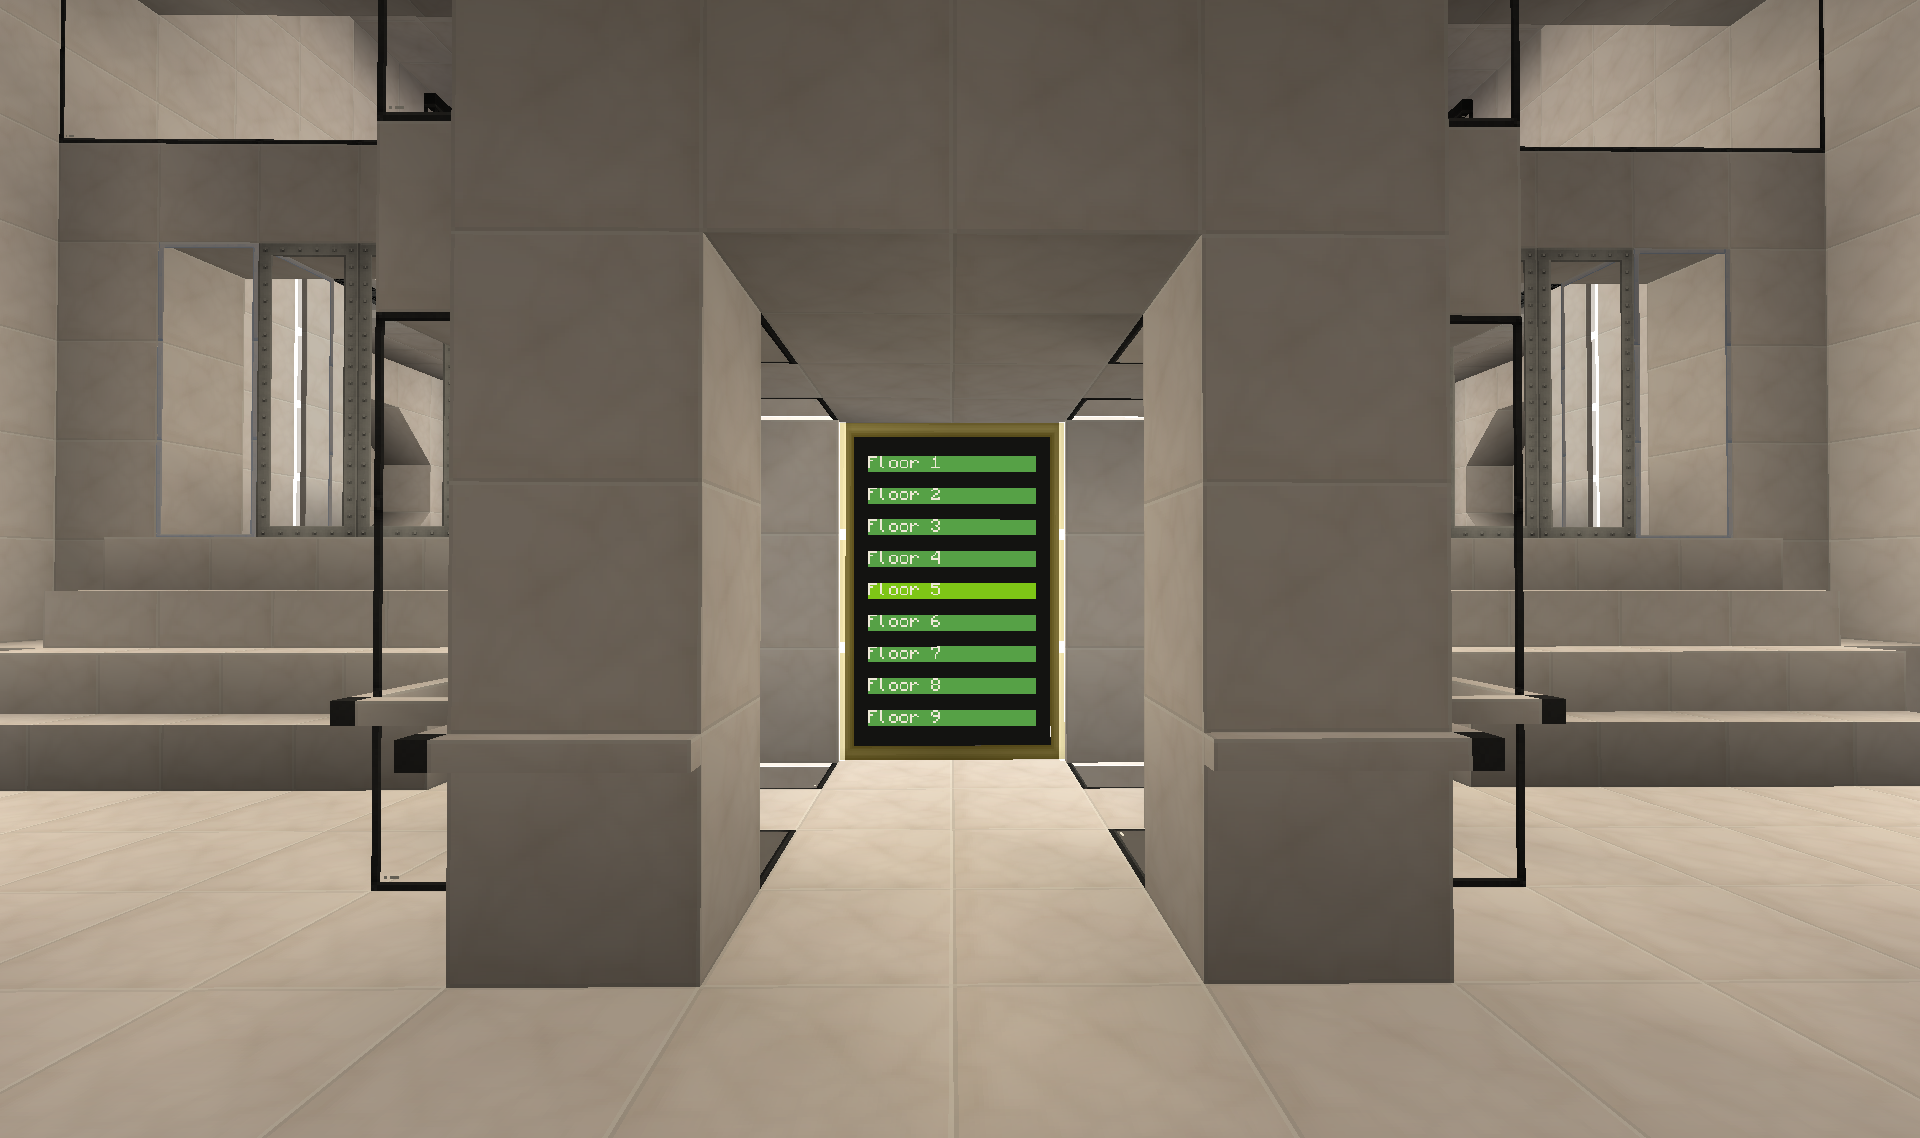
In the code there is a section where you can specify what you want the buttons on the Touchscreen to say:
Code:
local buttontext = {}
buttontext[1]="Floor 1         "
buttontext[2]="Floor 2         "
buttontext[3]="Floor 3         "
buttontext[4]="Floor 4         "
buttontext[5]="Floor 5         "
buttontext[6]="Floor 6         "
buttontext[7]="Floor 7         "
buttontext[8]="Floor 8         "
buttontext[9]="Floor 9 "Also the code by default supports 9 floors as maximum. If you want/need less just delete >buttontext[9]="Floor 9 "< for example and the code should adapt to only use 8 floors.
Last edited:
Yeah wouldn't be too hard. Would require a bit of rewrite of the monitor locating part to actually look for multiple monitors. Right now it just stops once if finds the first one.(or actually if multiple are attached by wired modem, it will use the last one on the list I think).
Well... make a list of all peripherals connected and a list of all screens connected and make a "setup" where to choose what peripheral goes on what screen.
Is this the Monster 1.1.11 or 1.1.12 pack? Can you post a current list of mods that were added/disabled.
I noticed carpenter blocks, but nowhere was it mentioned that this mod was added.
I noticed carpenter blocks, but nowhere was it mentioned that this mod was added.
The modlist is still the same as in this post:Is this the Monster 1.1.11 or 1.1.12 pack? Can you post a current list of mods that were added/disabled.
I noticed carpenter blocks, but nowhere was it mentioned that this mod was added.
http://forum.feed-the-beast.com/thr...nd-guide-collection.42664/page-11#post-687312
except the addition of Carpenter's Blocks. I am not using 1.1.2 as this is not a recommended version and there have been several severe bugs reported in it.
I might shortly replace the version of Enhanced Portals 3 used in Monster with a newer version(block IDs were changed, so cannot just update.).
Last edited:
Right, time for a long overdue update.
I had some issues with updating Enhanced Portals to the newest version(newest version uses new Item IDs, but I simply couldent get the pack to launch with it). So decided to use the second newest update: EnhancedPortals-1.6.4-3.0.0b5e. That fixed the problem the version in Monster is having with causing a Inventory desync issue when using the portals GUIs. It is also possible to update directly from earlier versions with this update and keep all your portals etc.
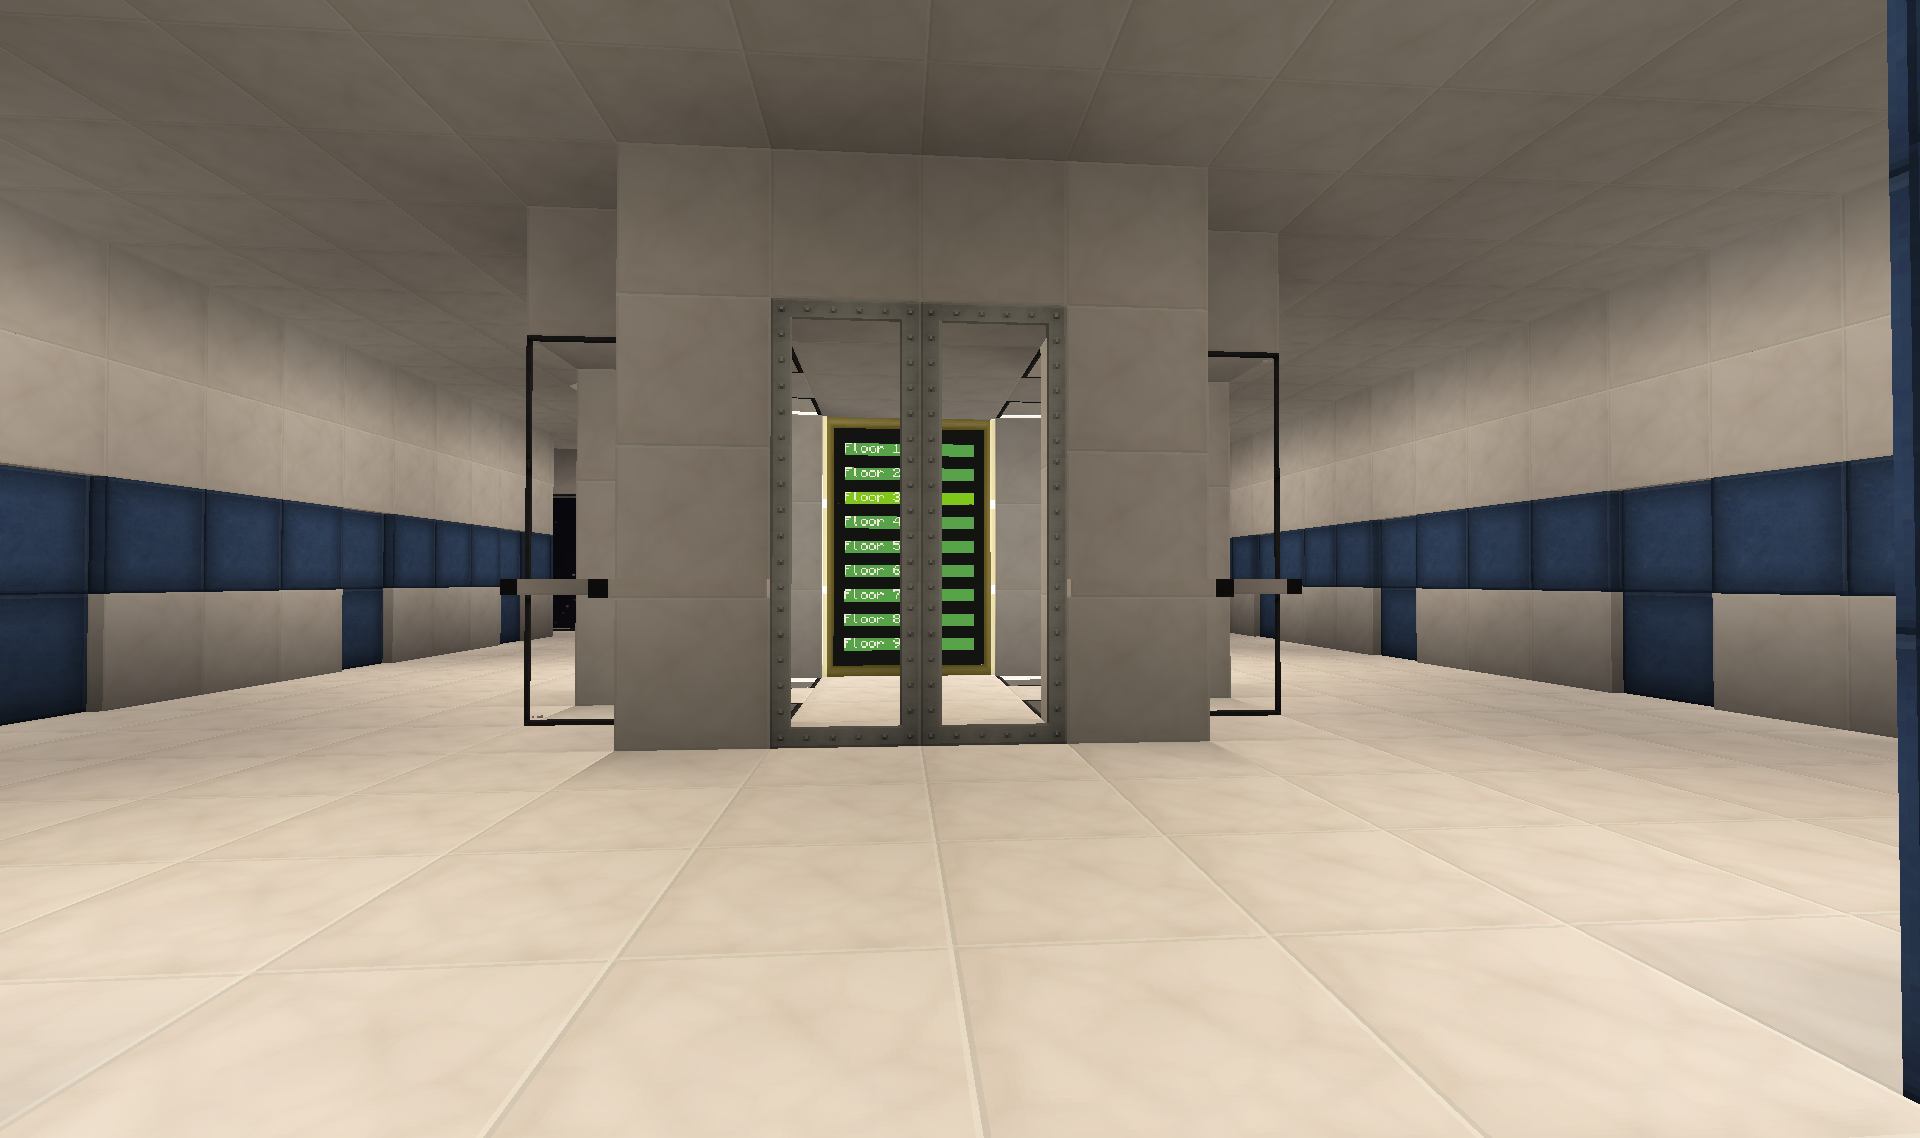
So it was time to FINALLY get those elevators up and running:
So far floor 3-7 are all installed and work. For the rest the floors or elevators are not yet built(Going to have to properly name the floors and fix the numeration. It is in the wrong order now and I might actually make the floor aligned with the hull floor 0).
Going up to what right now is designated floor 3 in the main tower of the ship:
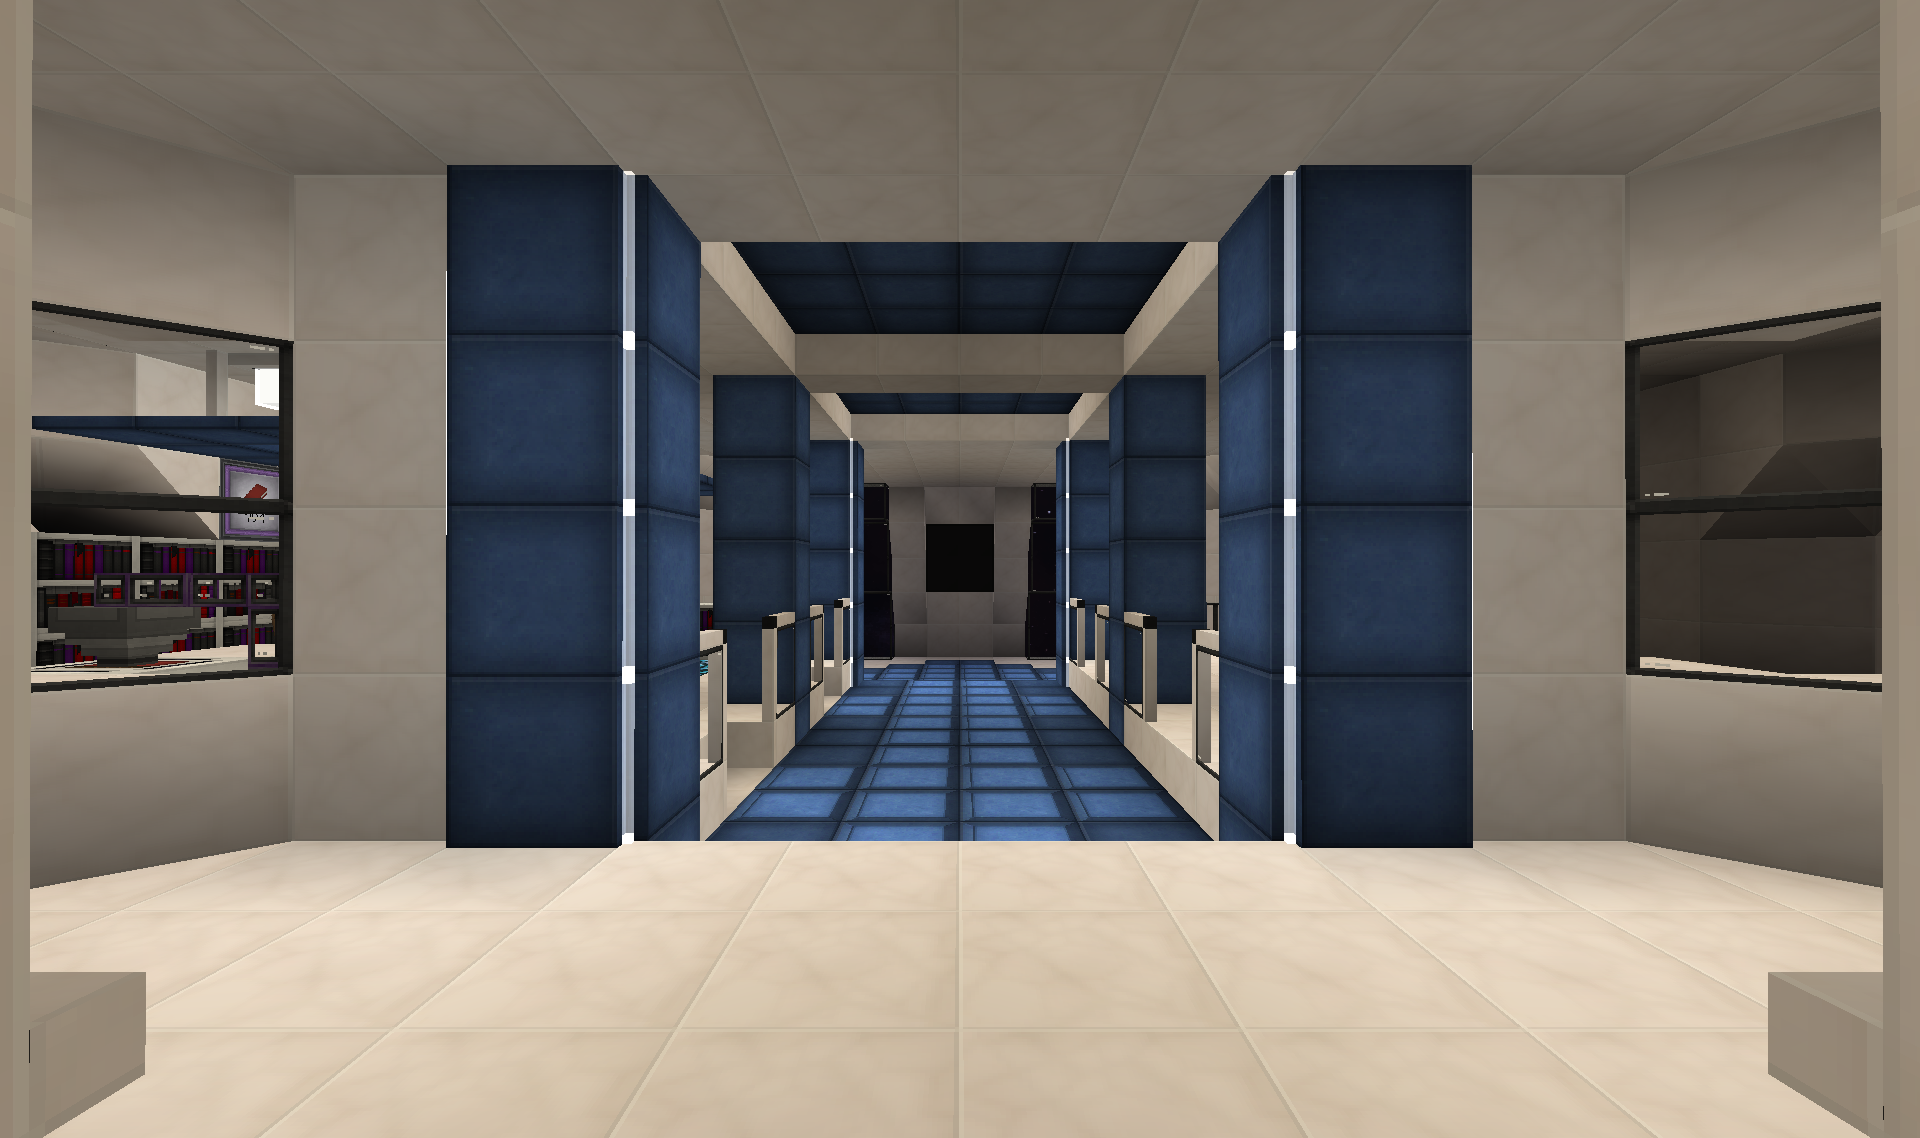
Decided to try and throw in some colour into the build.
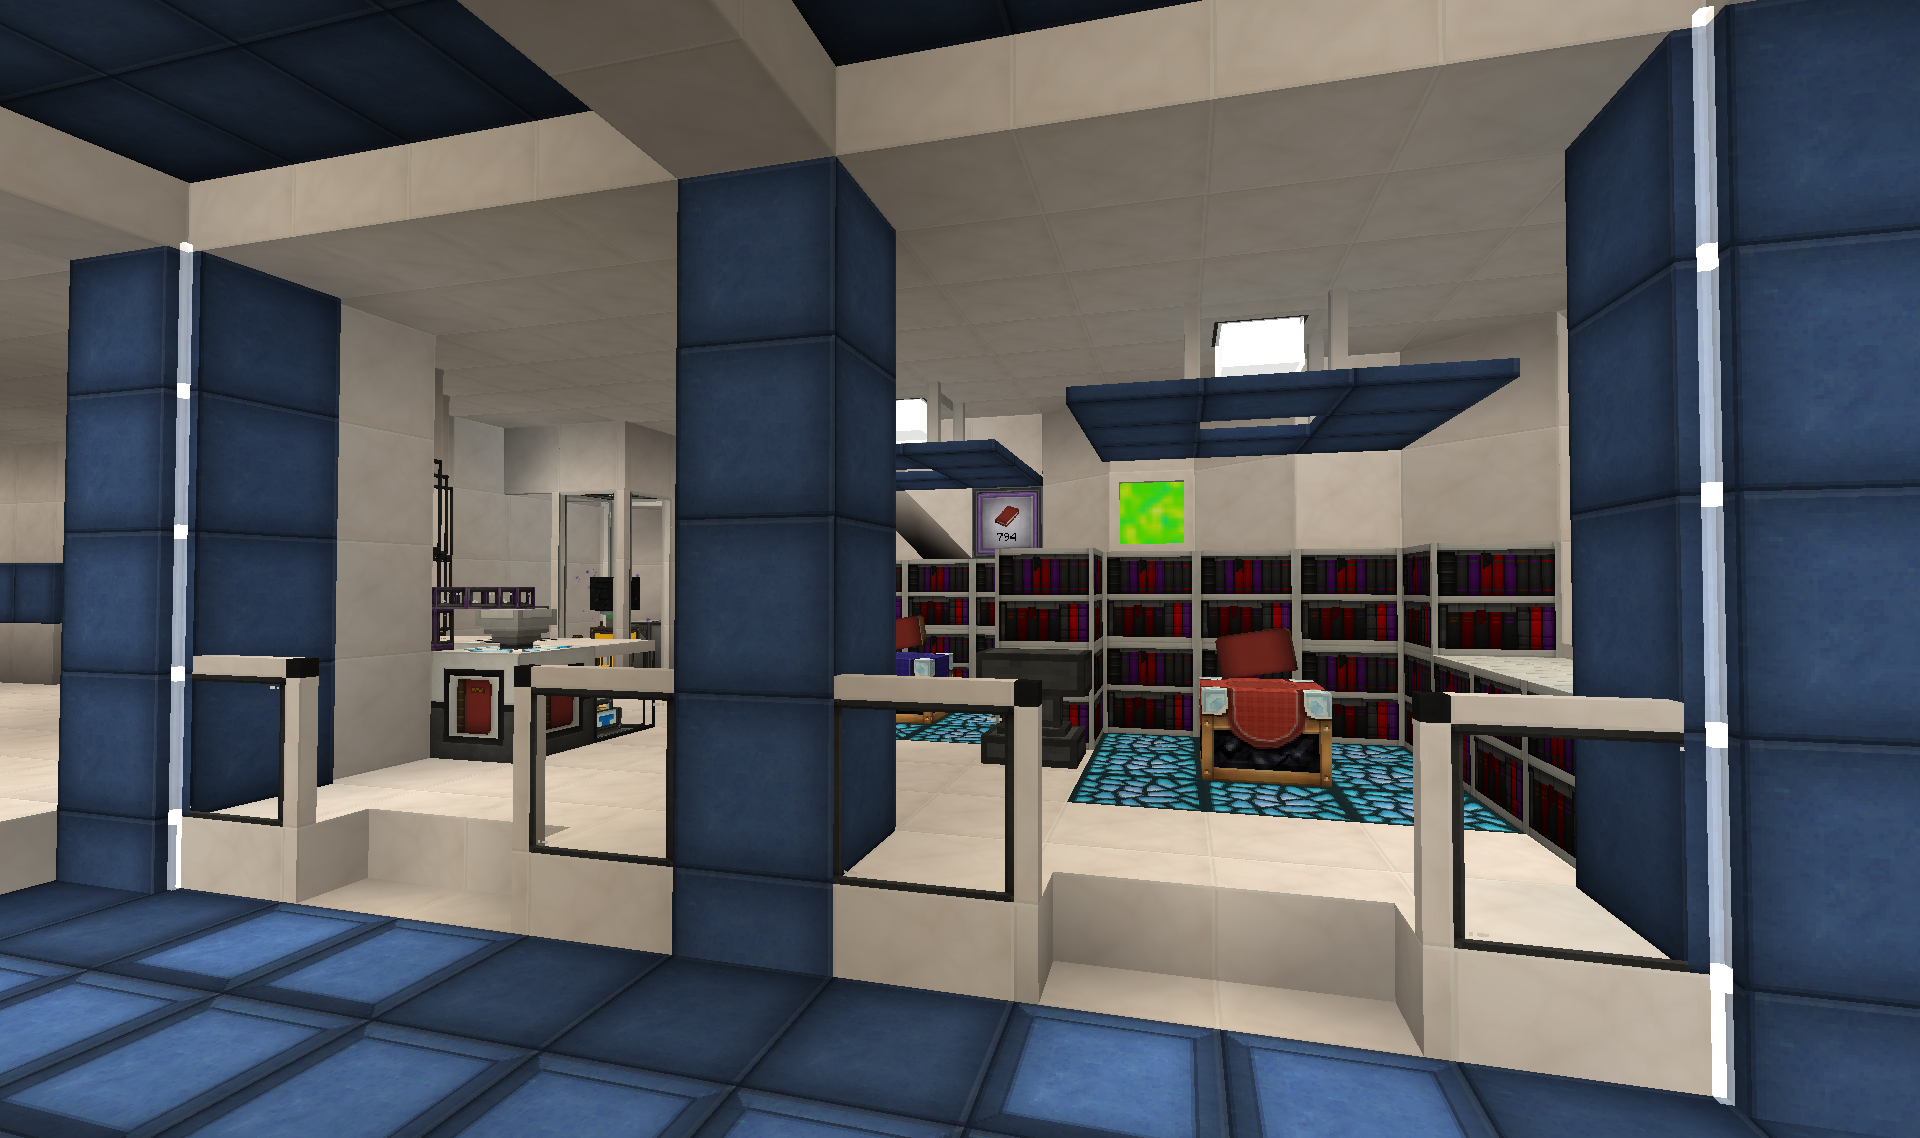
The corridor immediately in front of the elevator leads down to the front of the structure to a lounge or sorts(still to be decided):
On the left side of the hall is an Enchanting area:
Designated this space for a few different enchanting solutions such as the vanilla Enchantment table, Openblocks Auto Enchantment table, Openblocks Auto Anvil:
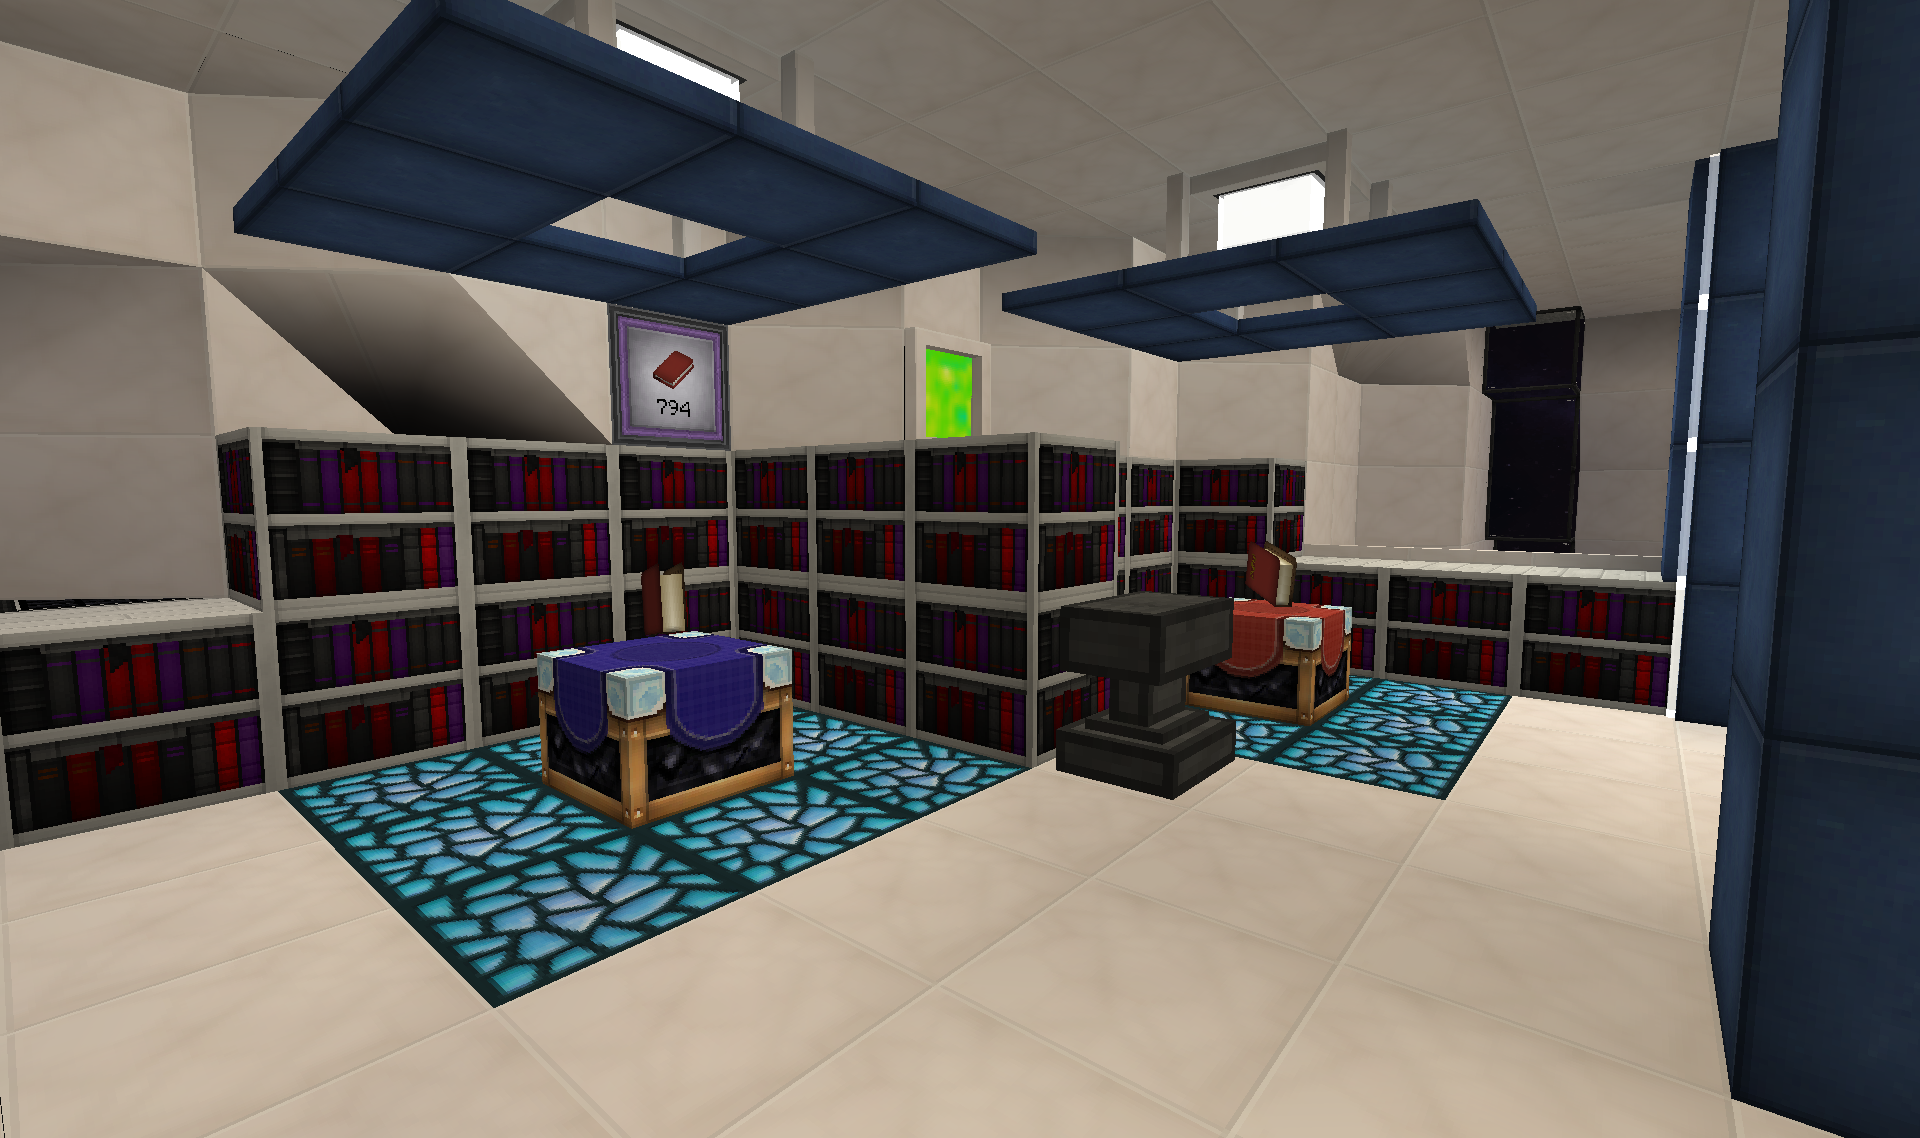
MFR Auto-disenchanter and Auto-enchanter and a Liquid XP "converter" rig(creating liquid xp from TiCo Essence berries):
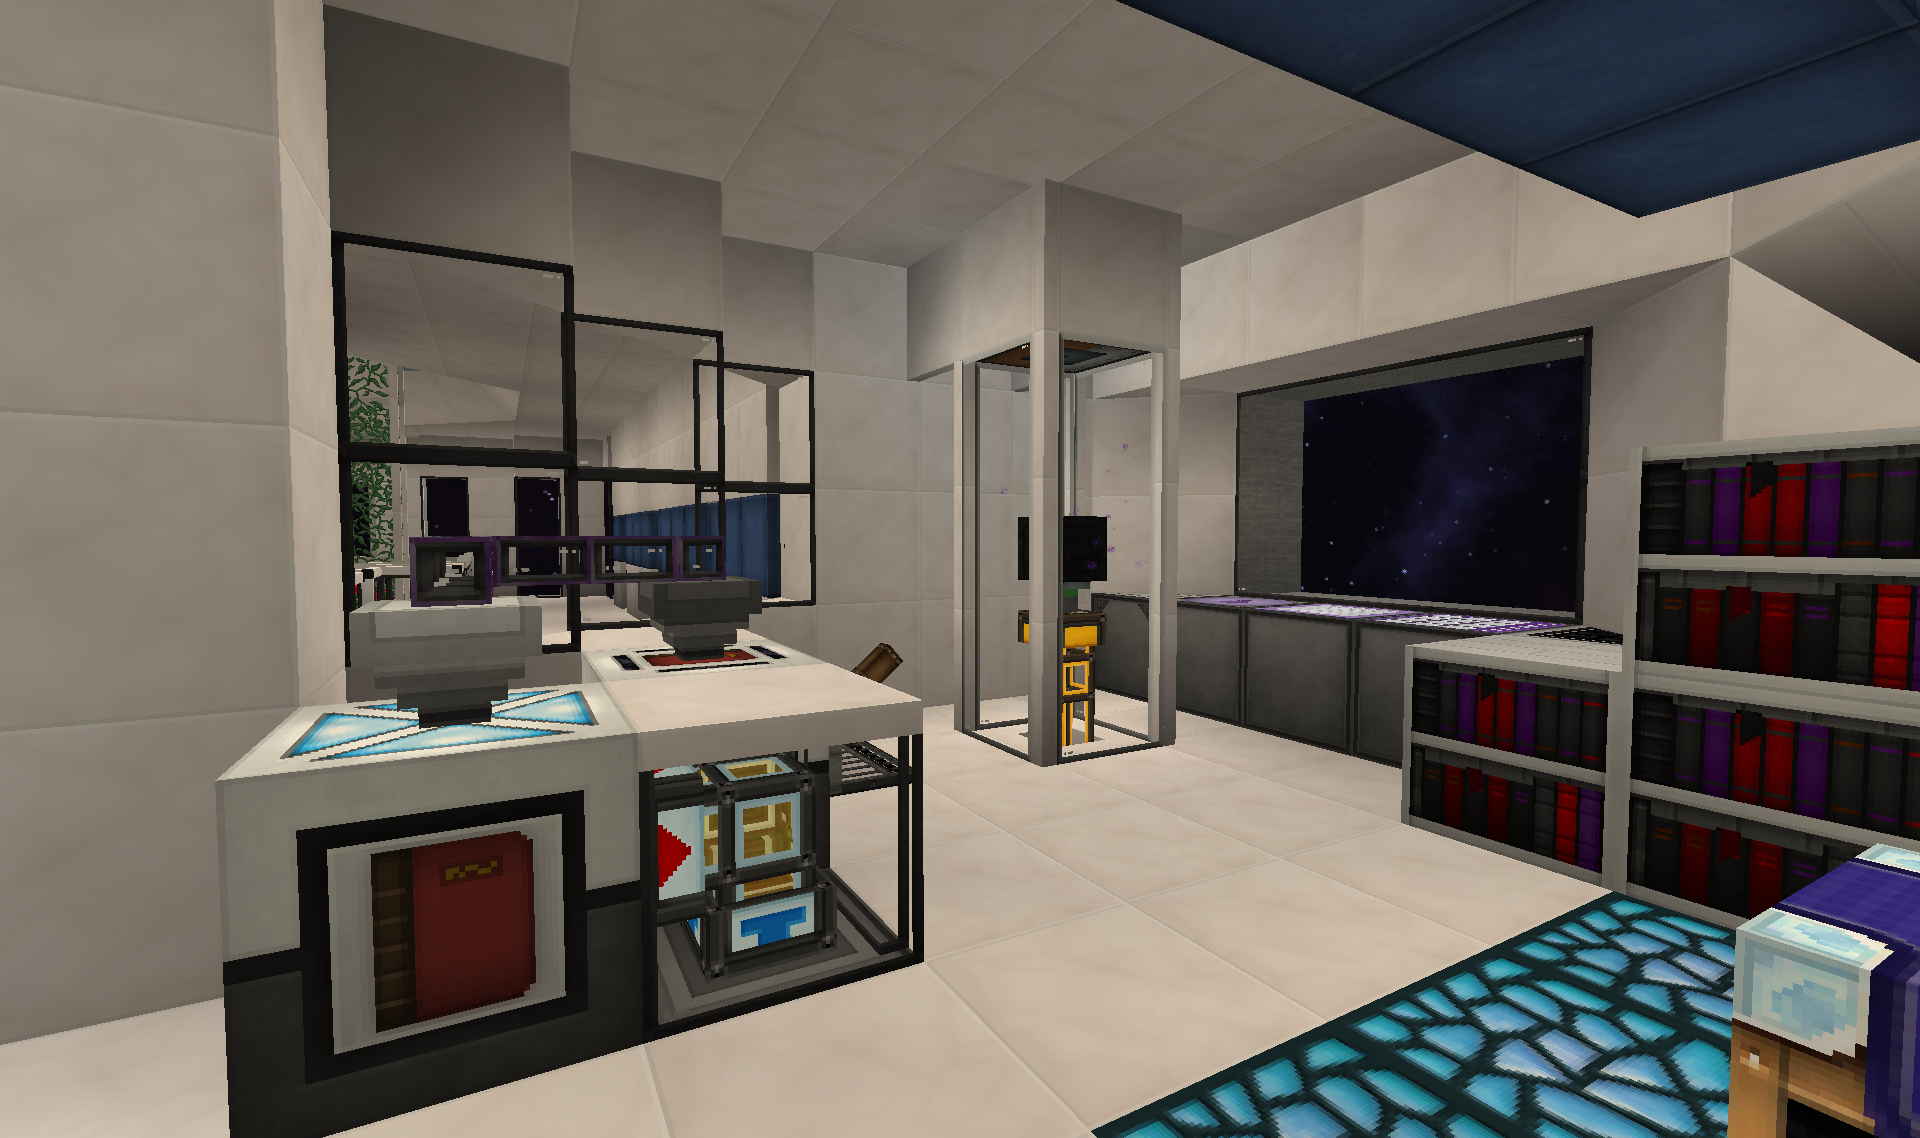
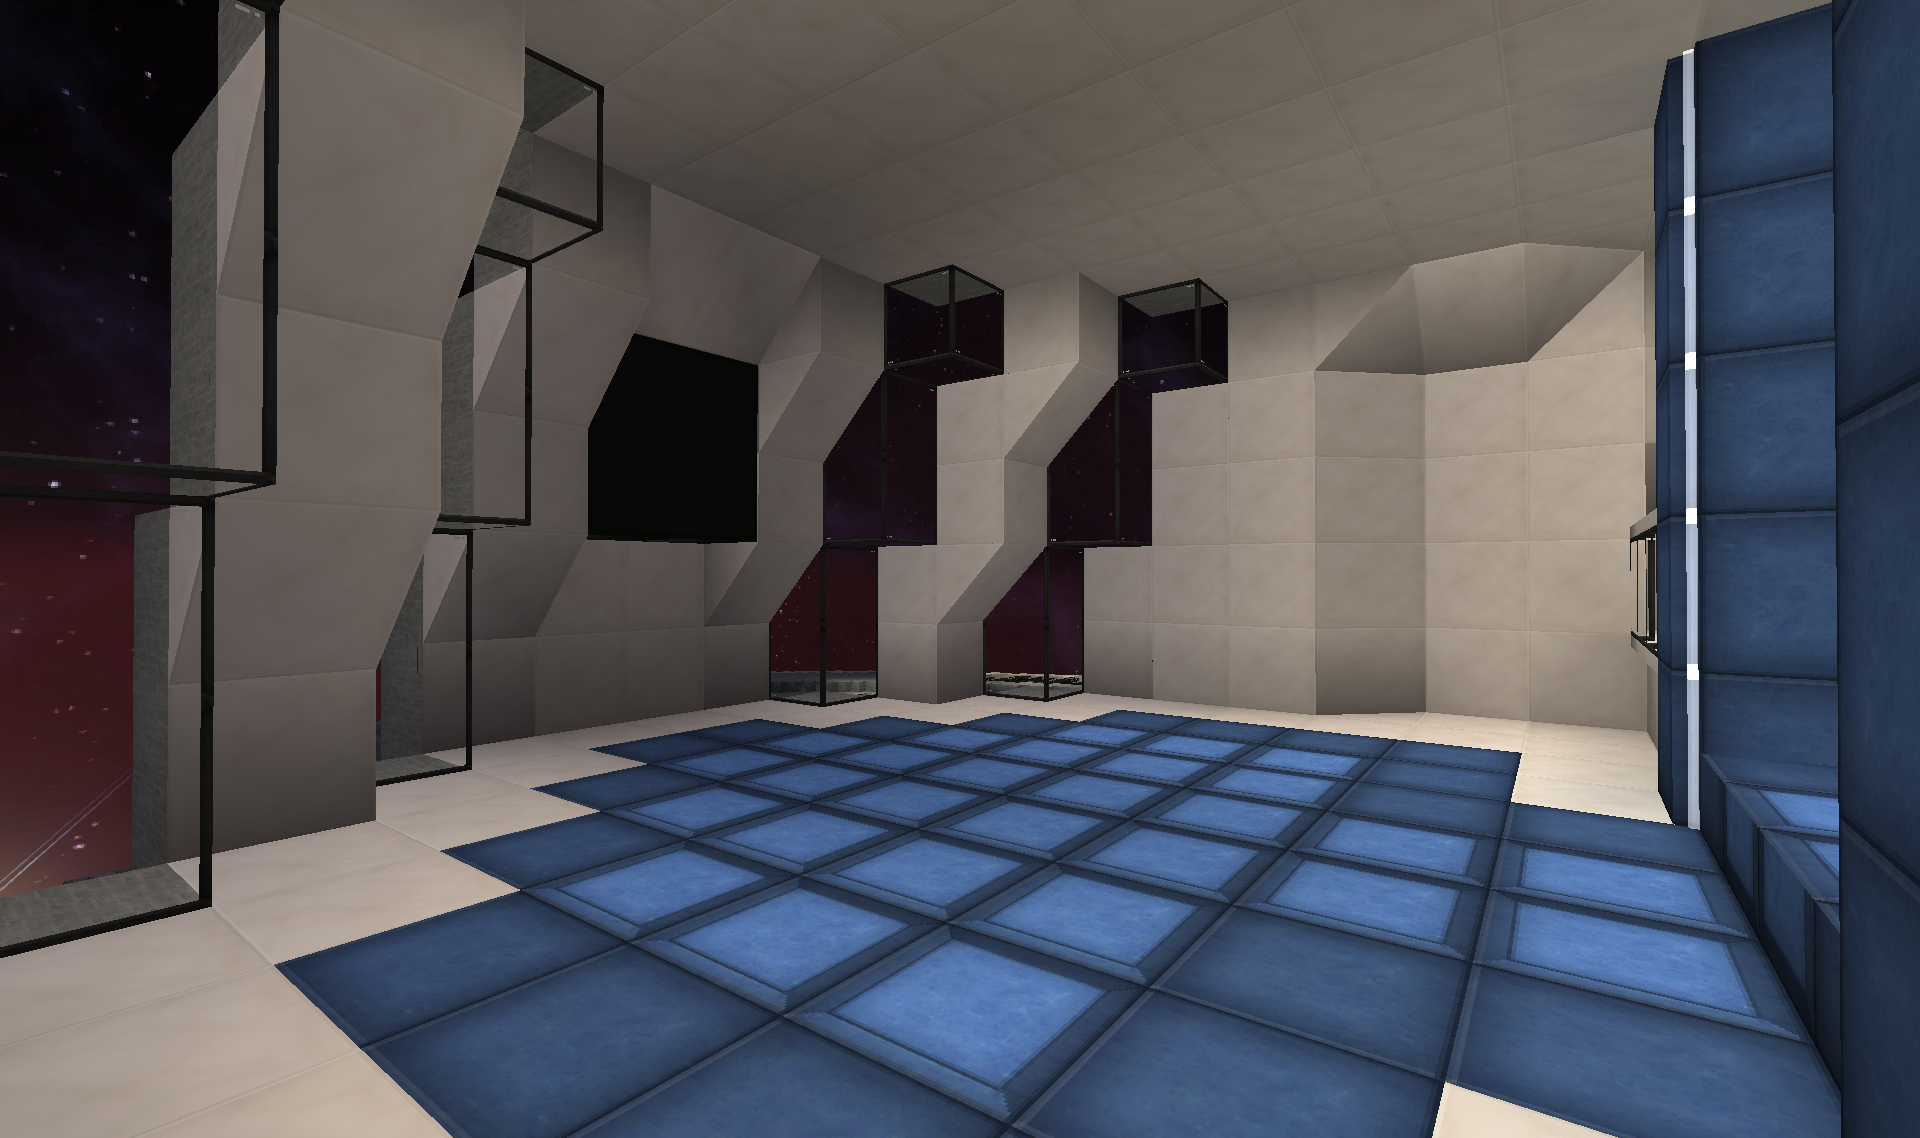
Back out into the hall and looking back at the elevator and the halls leading to the back of the tower:
Decided to use this space for another purely cosmetic feature: Crew cabins:
So far just "furnished" one of the cabins:
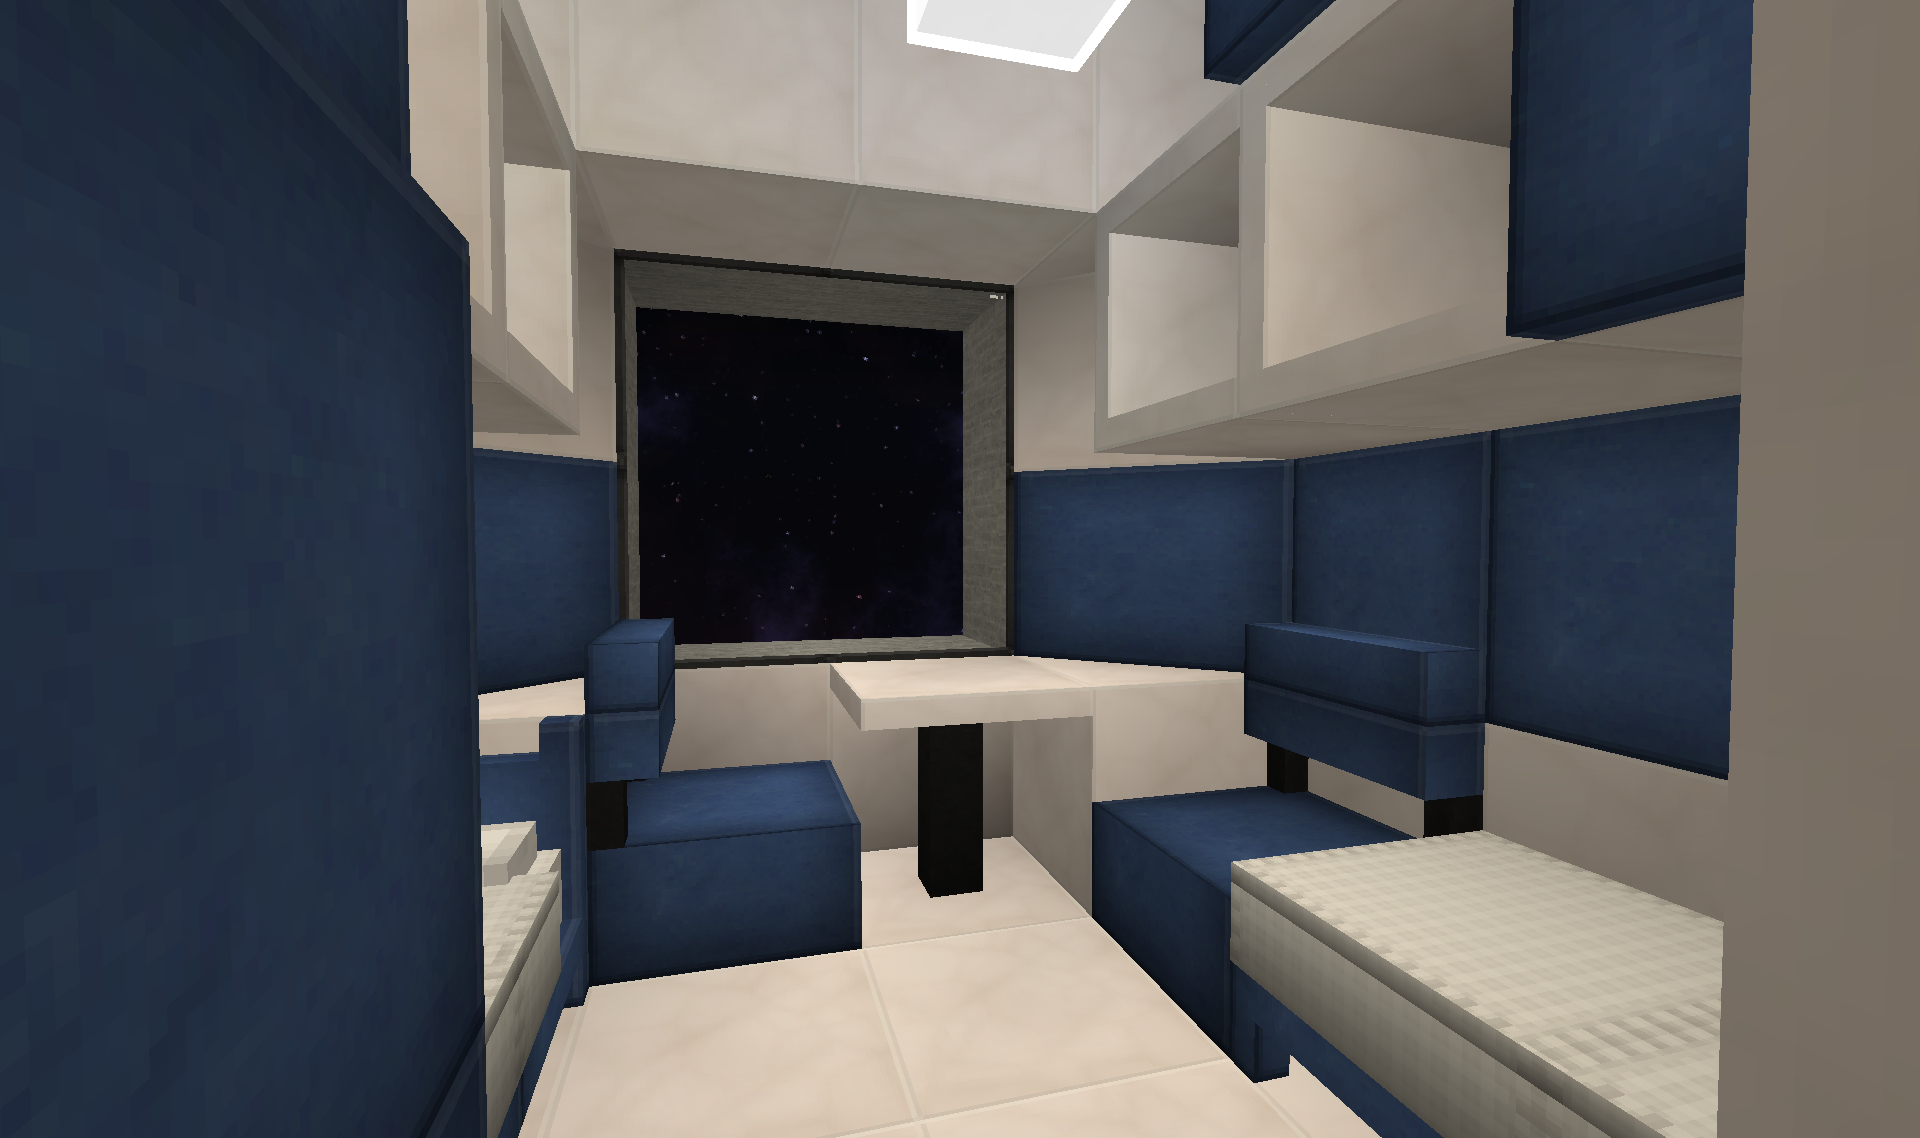
I might stick random stuff that needs to be put out of the way in some of the other cabins or just furnish them similar later.
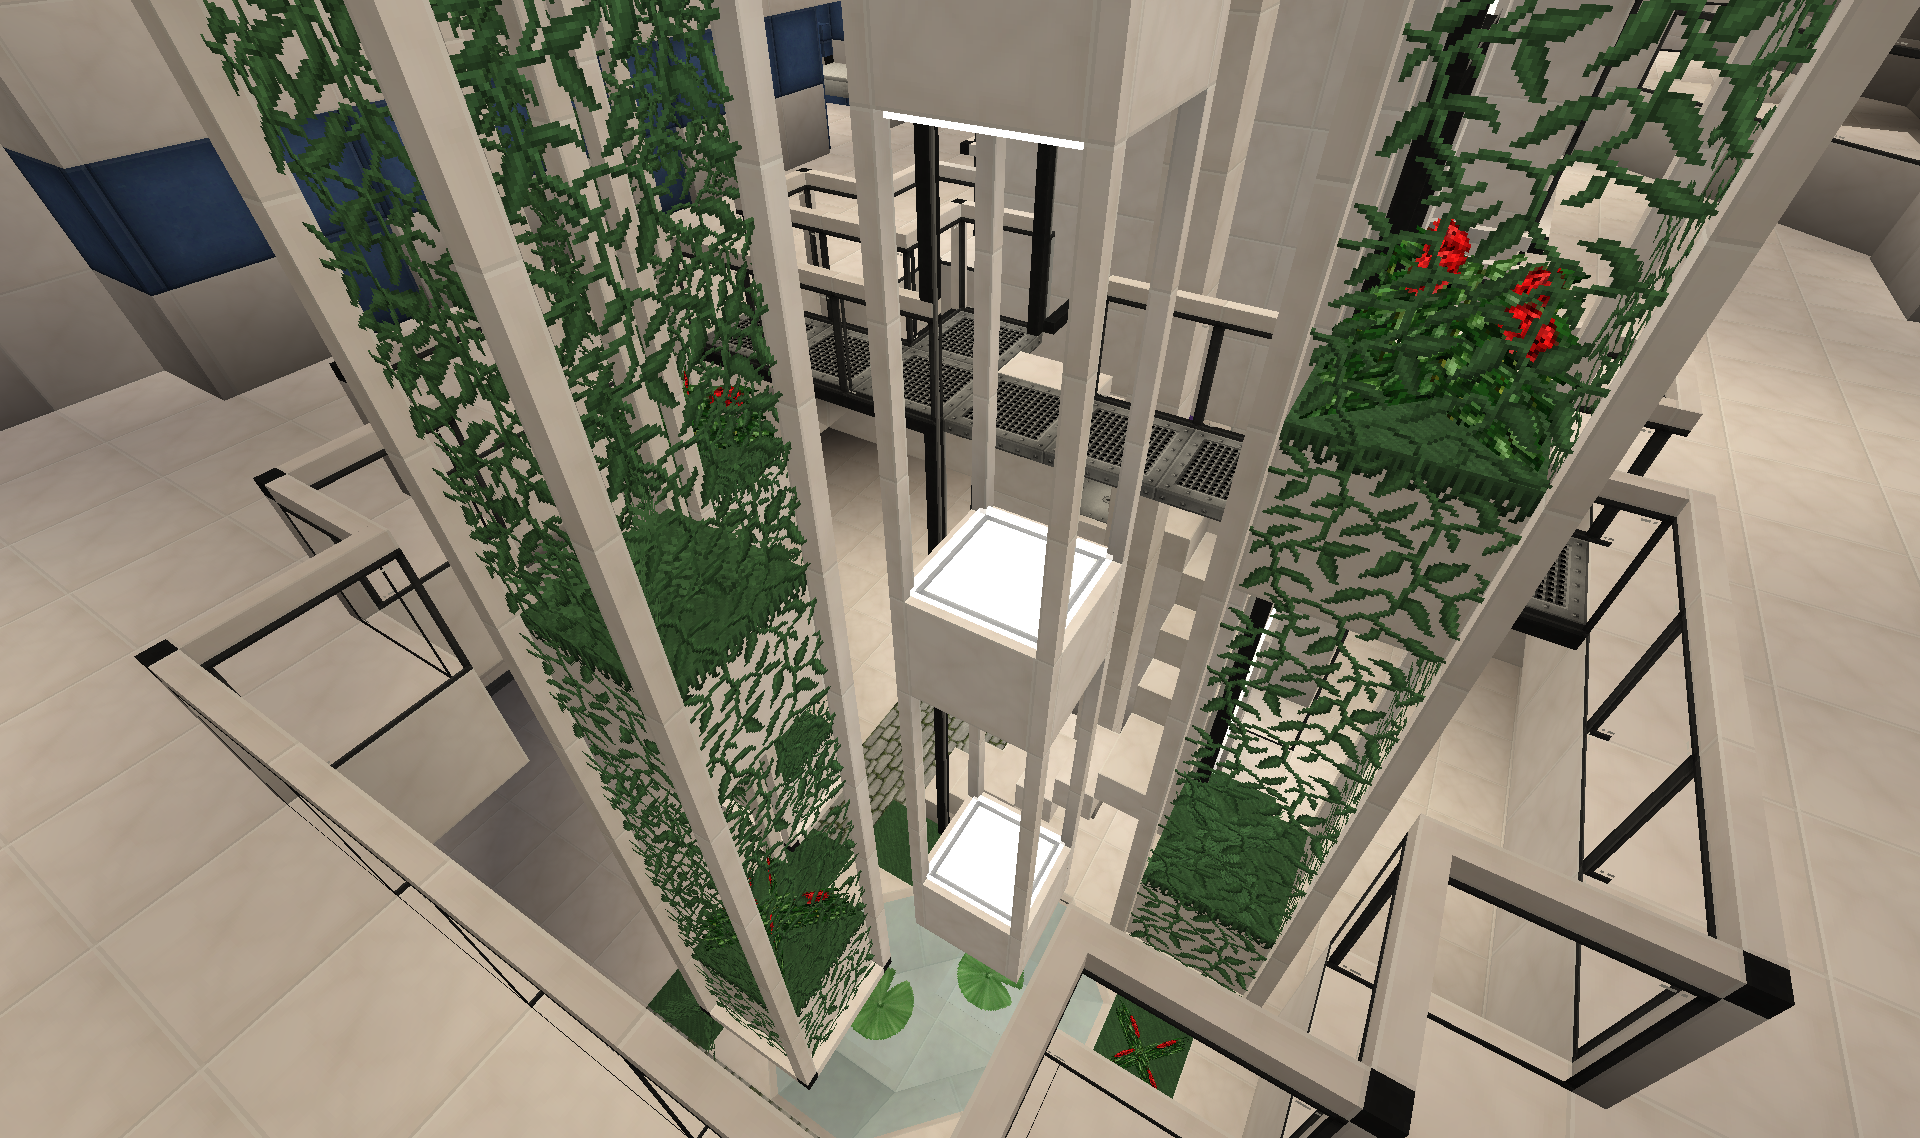
At the back of the tower a small "hanging garden" feature with spiral stairs for access to floor below(if you cba to take the elevator):
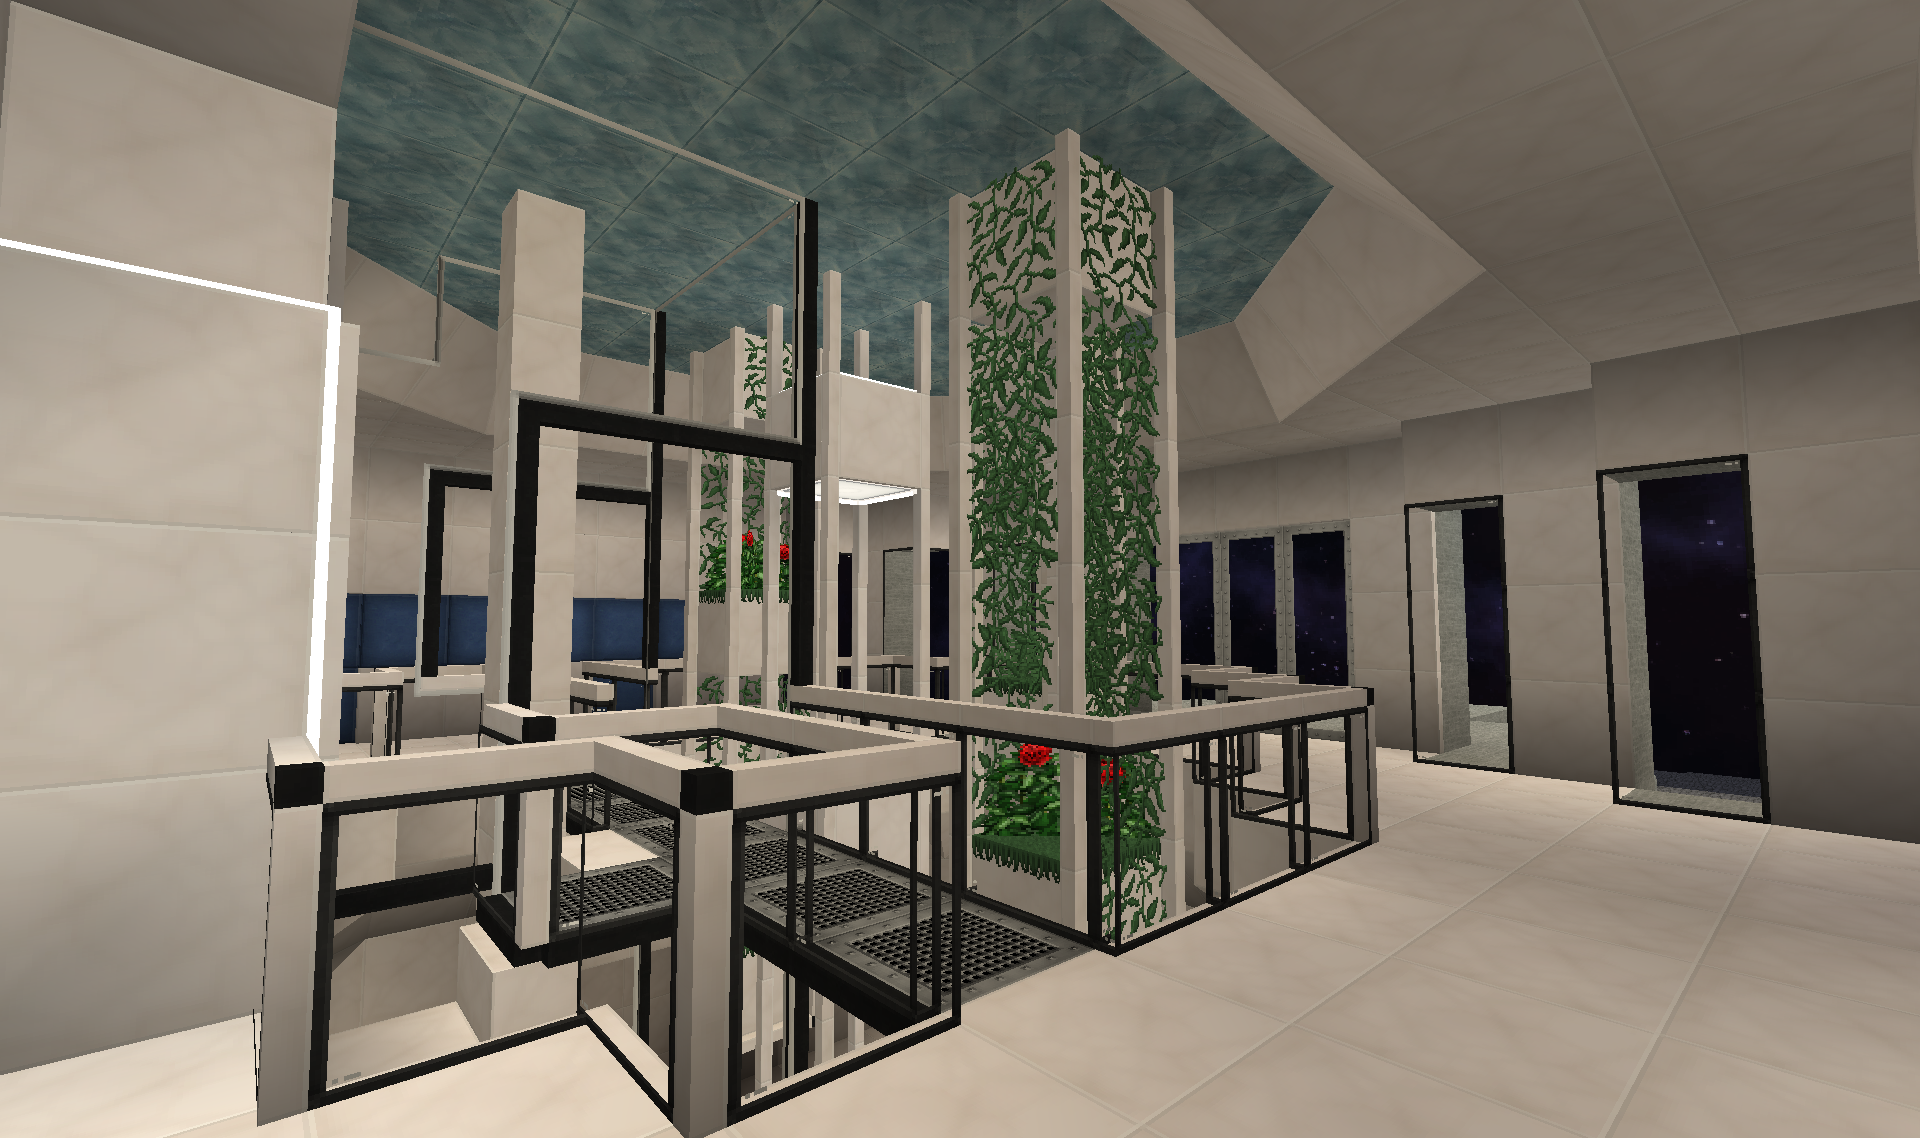
Really wanted this idea of a green garden area spanning two decks, but space didn't really allow for trees etc. So came up with this hanging arrangement:
At the far back is an automatic door(entity detector activated) that opens up to the outside:
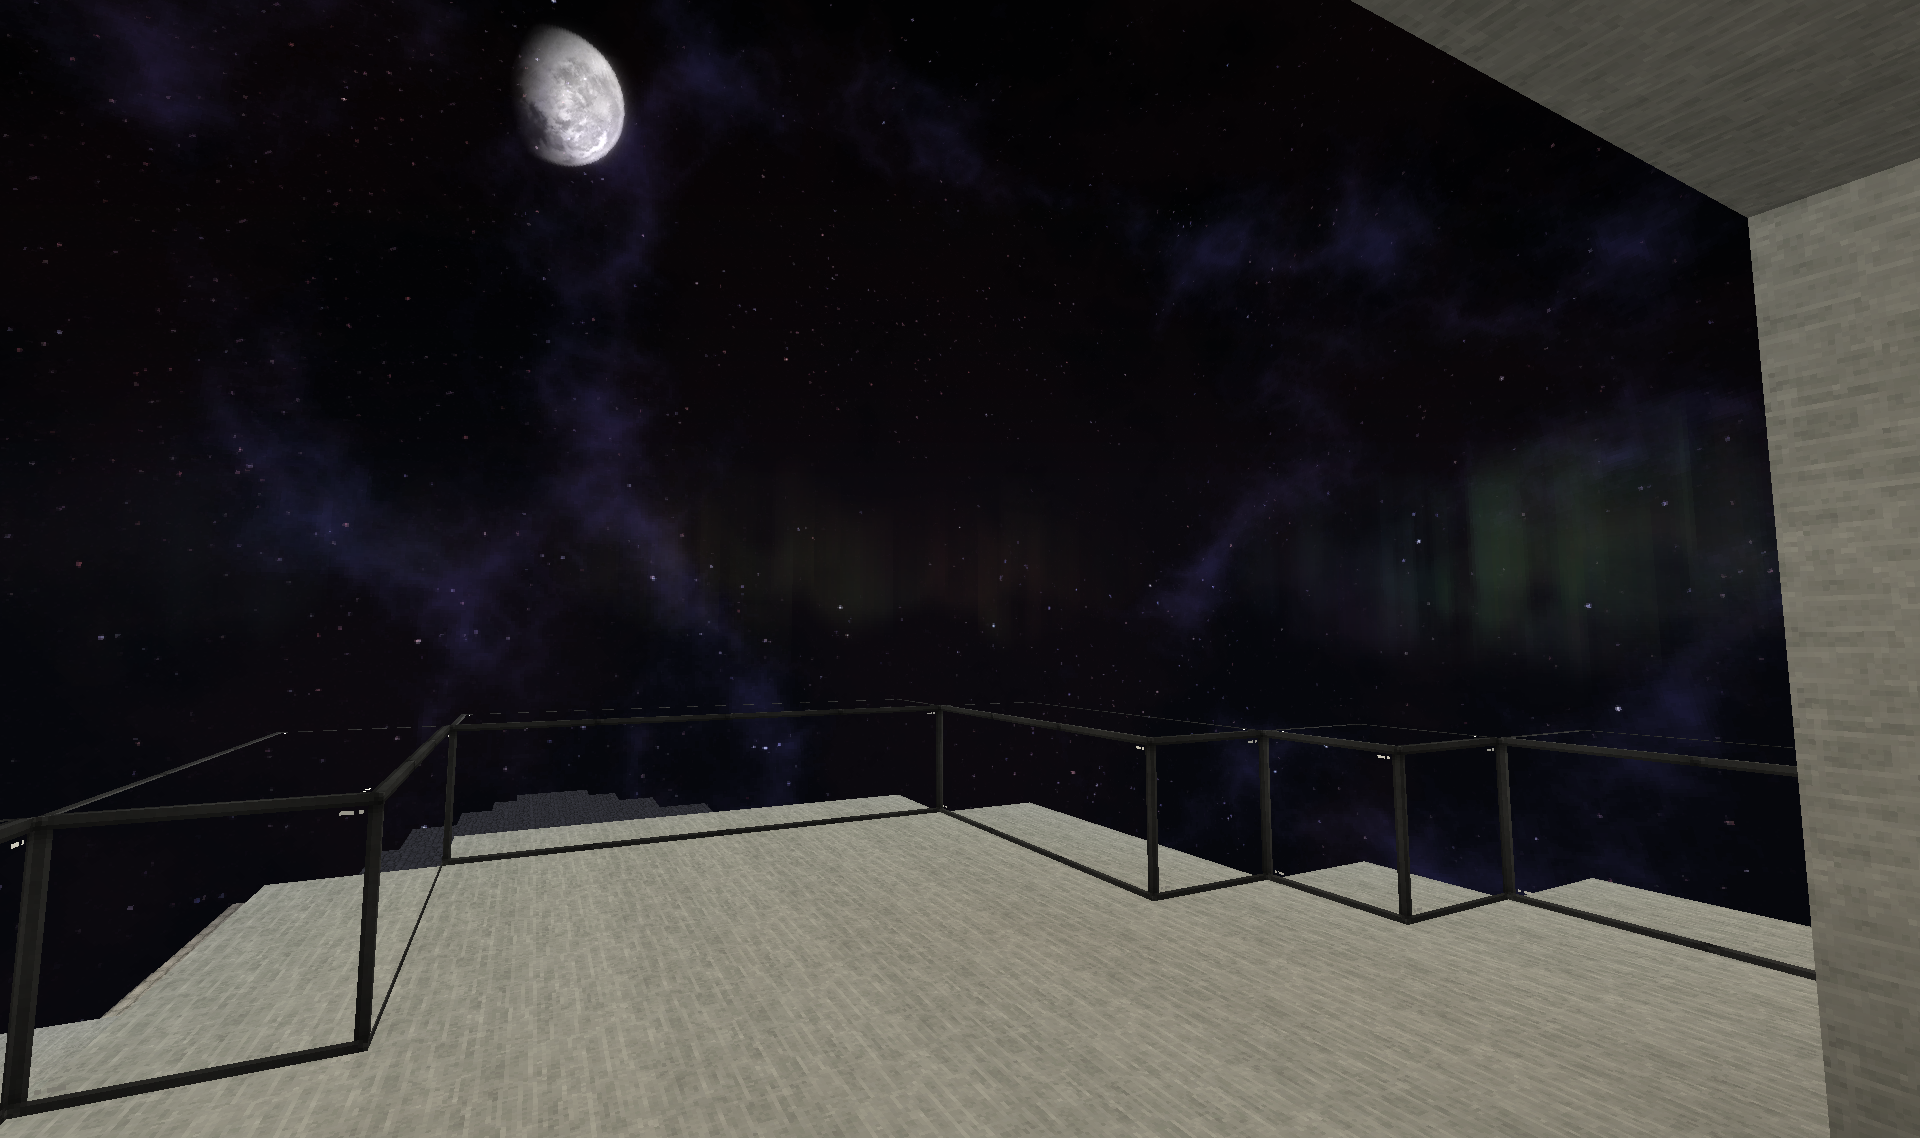
When it opens up to the outside it also raises/expands the terrace outside and puts up the glass fencing. When you go inside again it closes doors and lowers the terrace/fence to reduce drag during flight
Still needs a lot of cosmetic work.
Lower floor with the bottom of the "hanging garden" feature.
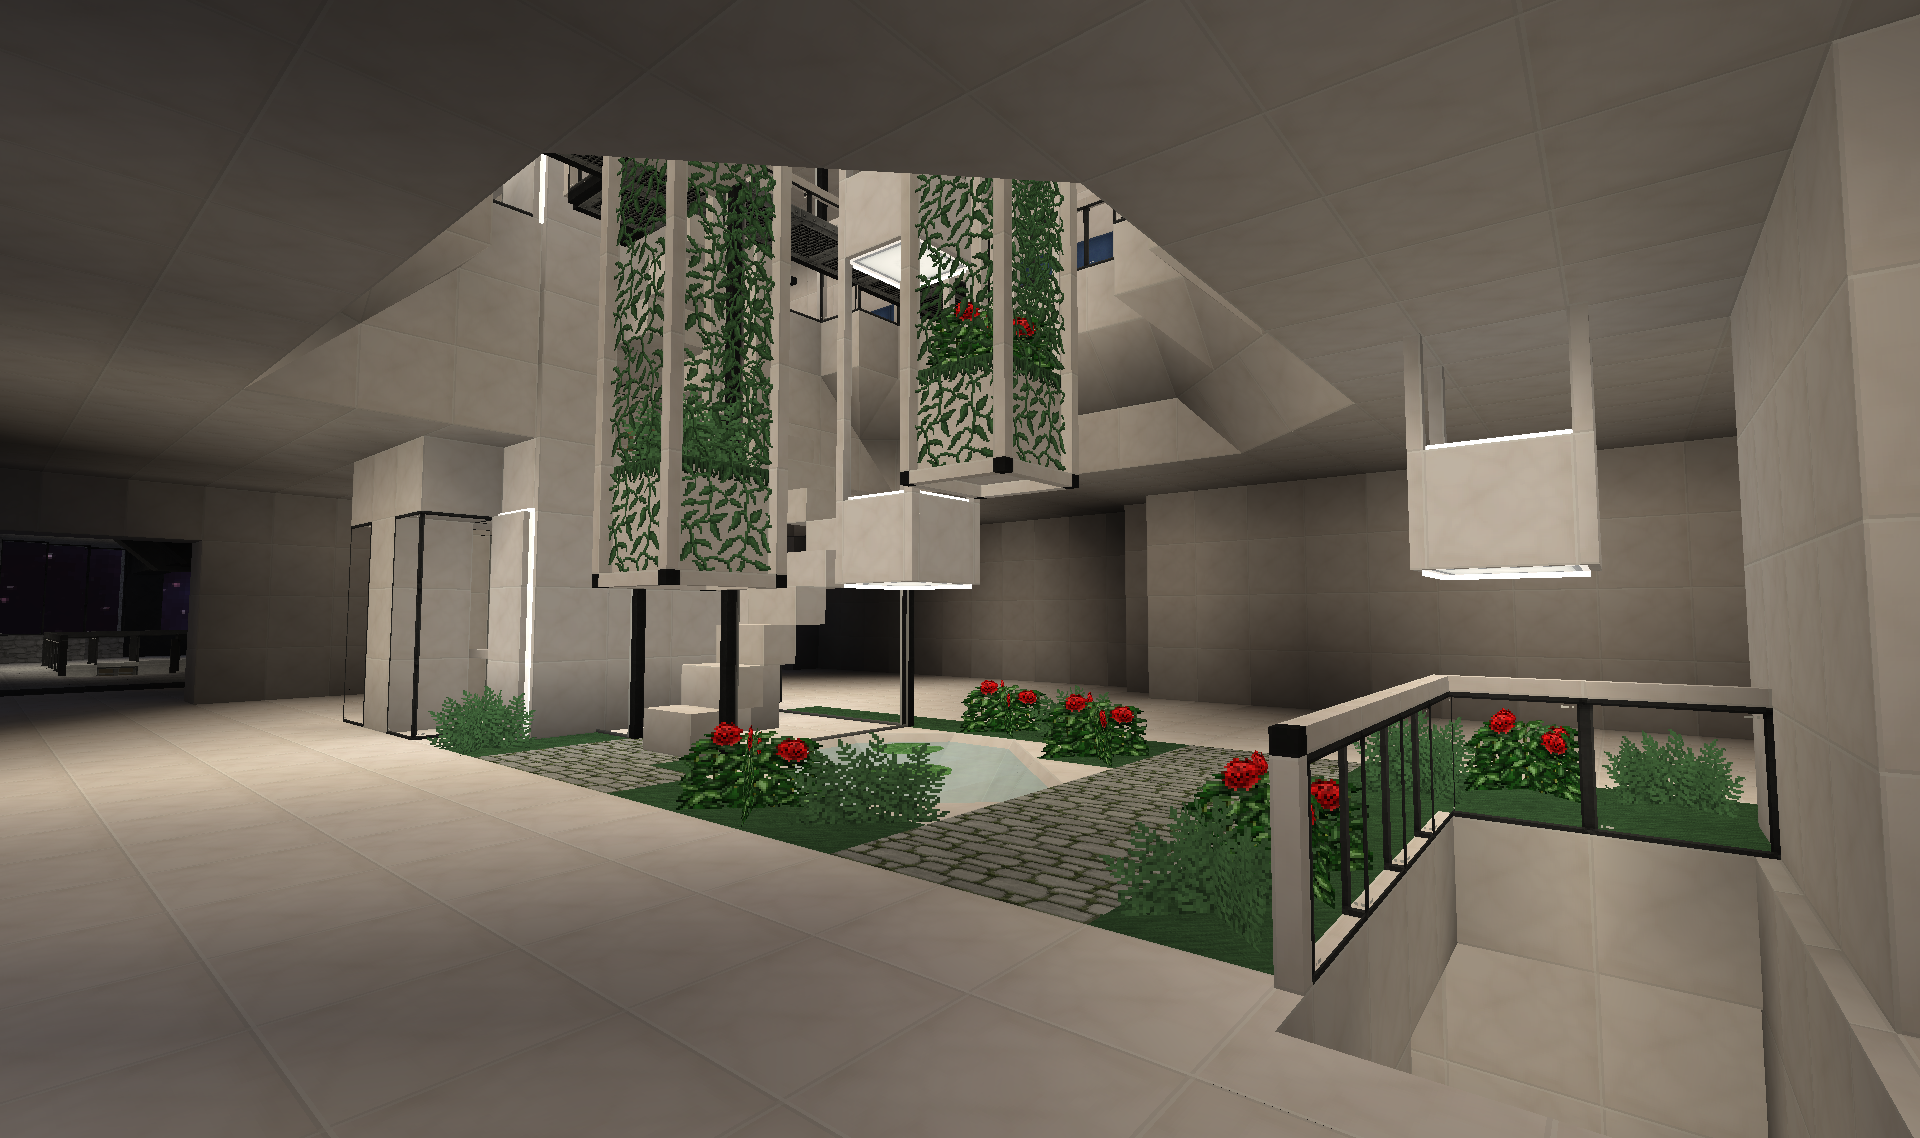
(The staircase to the right on the picture is the same one as on the last picture in the post further up this page.)
I had some issues with updating Enhanced Portals to the newest version(newest version uses new Item IDs, but I simply couldent get the pack to launch with it). So decided to use the second newest update: EnhancedPortals-1.6.4-3.0.0b5e. That fixed the problem the version in Monster is having with causing a Inventory desync issue when using the portals GUIs. It is also possible to update directly from earlier versions with this update and keep all your portals etc.
So it was time to FINALLY get those elevators up and running:
So far floor 3-7 are all installed and work. For the rest the floors or elevators are not yet built(Going to have to properly name the floors and fix the numeration. It is in the wrong order now and I might actually make the floor aligned with the hull floor 0).
Going up to what right now is designated floor 3 in the main tower of the ship:
Decided to try and throw in some colour into the build.
The corridor immediately in front of the elevator leads down to the front of the structure to a lounge or sorts(still to be decided):
On the left side of the hall is an Enchanting area:
Designated this space for a few different enchanting solutions such as the vanilla Enchantment table, Openblocks Auto Enchantment table, Openblocks Auto Anvil:
MFR Auto-disenchanter and Auto-enchanter and a Liquid XP "converter" rig(creating liquid xp from TiCo Essence berries):
Back out into the hall and looking back at the elevator and the halls leading to the back of the tower:
Decided to use this space for another purely cosmetic feature: Crew cabins:
So far just "furnished" one of the cabins:
I might stick random stuff that needs to be put out of the way in some of the other cabins or just furnish them similar later.
At the back of the tower a small "hanging garden" feature with spiral stairs for access to floor below(if you cba to take the elevator
):
Really wanted this idea of a green garden area spanning two decks, but space didn't really allow for trees etc. So came up with this hanging arrangement:
At the far back is an automatic door(entity detector activated) that opens up to the outside:
When it opens up to the outside it also raises/expands the terrace outside and puts up the glass fencing. When you go inside again it closes doors and lowers the terrace/fence to reduce drag during flight
Still needs a lot of cosmetic work.
Lower floor with the bottom of the "hanging garden" feature.
(The staircase to the right on the picture is the same one as on the last picture in the post further up this page.)
I give up, I'm really giving up

*goes back to his little dirt hut*
*goes back to his little dirt hut*
Yeha having some small issues with Imgur not loading the images fully sometimes as well. Dunno if there is some hidden bandwidth thing going on or what. Refreshing the page usually helps of the half loaded images.Very nicejust a page that takes forever too load
