rhn's continued adventures: a build journal, guide collection etc.
- Thread starter rhn
- Start date
-
The FTB Forum is now read-only, and is here as an archive. To participate in our community discussions, please join our Discord! https://ftb.team/discord
You are using an out of date browser. It may not display this or other websites correctly.
You should upgrade or use an alternative browser.
You should upgrade or use an alternative browser.
One of these days I might check out Big Reactors. Not sure what my big hang up is.
Perhaps this?

yeah but I dunno if I'll ever build one of those either (for different reasons  )
)
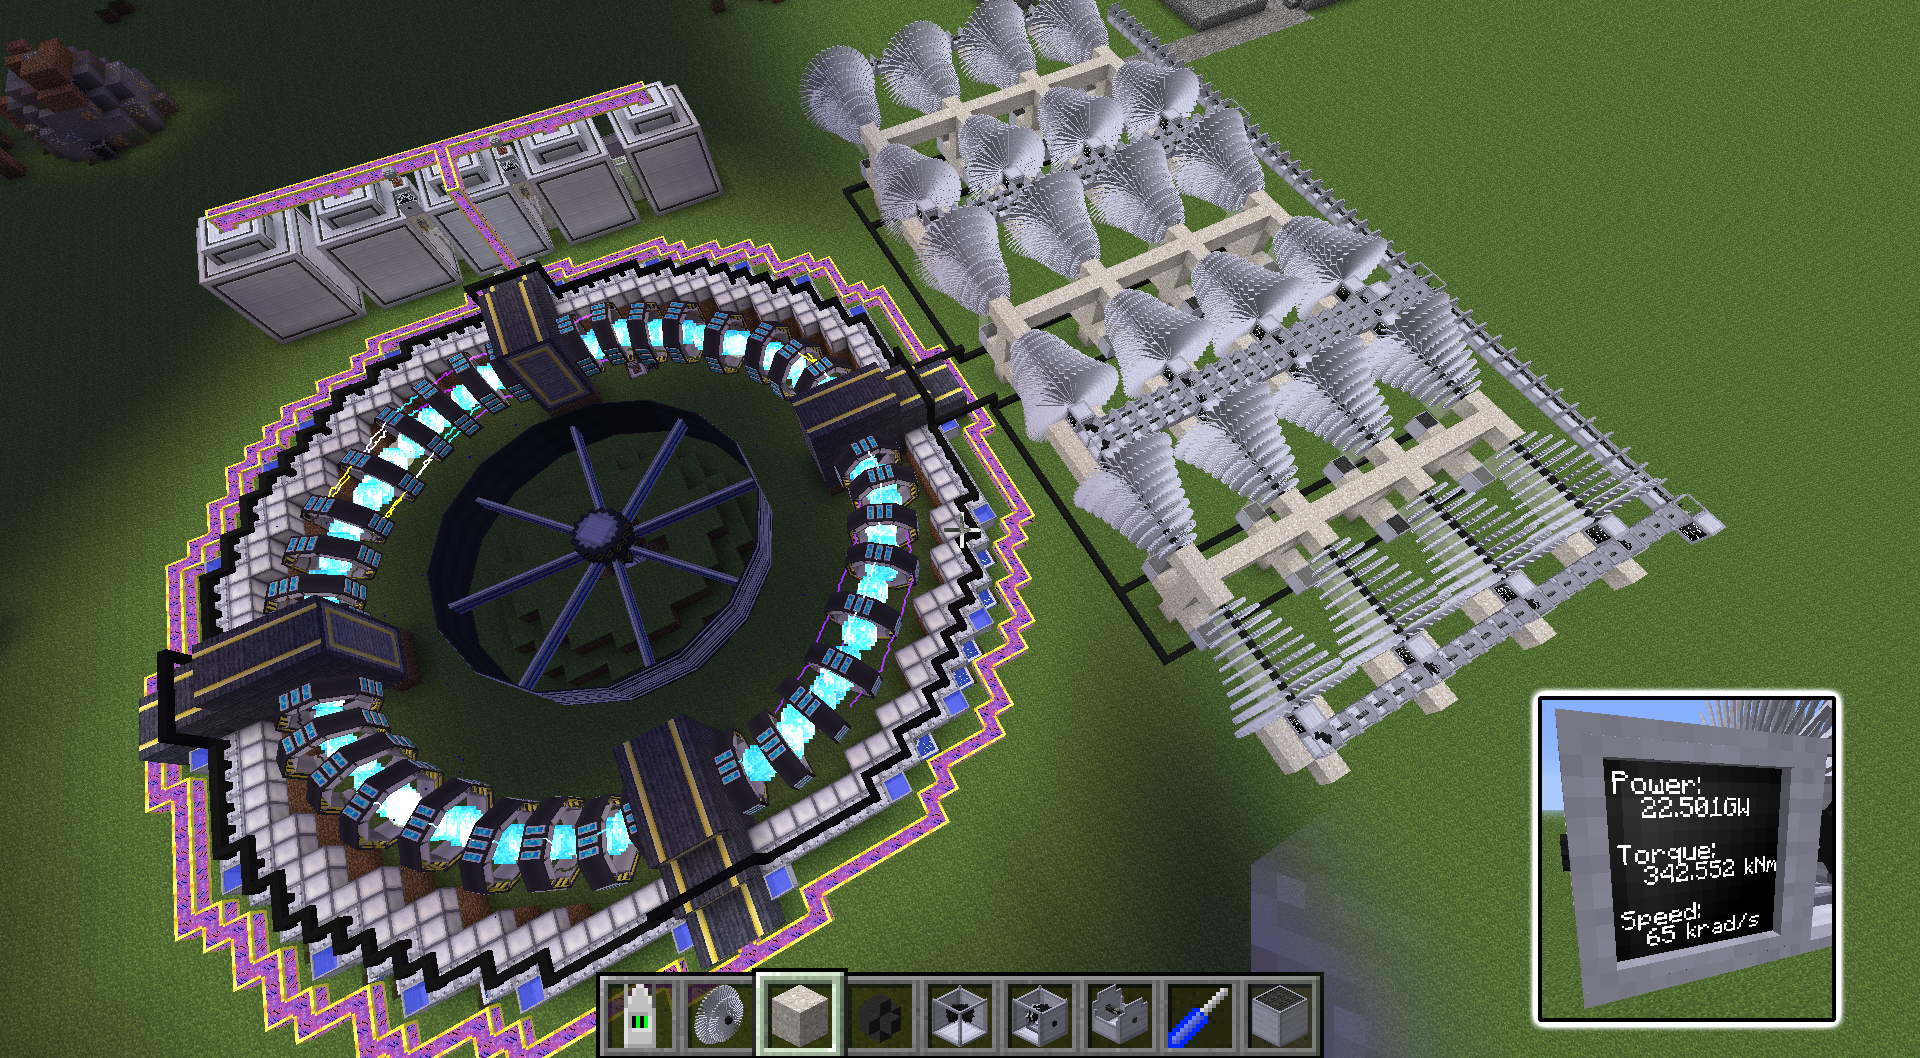
Honestly, a single fission turbine (ReC) produces more power than I need.
)Honestly, a single fission turbine (ReC) produces more power than I need.
Convert it all to EU and run a few fully overclocked machines with it. And by a few, I mean ten million.yeah but I dunno if I'll ever build one of those either (for different reasons
Honestly, a single fission turbine (ReC) produces more power than I need.
In a perfect world I'd use it to power a space-frigate with sufficient firepower to over-come rhn's defenses and conquer his much nicer-looking vehicle and take it for my own.Convert it all to EU and run a few fully overclocked machines with it. And by a few, I mean ten million.
In a perfect world you wouldn't need to because everything would be nice-looking.In a perfect world I'd use it to power a space-frigate with sufficient firepower to over-come rhn's defenses and conquer his much nicer-looking vehicle and take it for my own.
...and have no reason to conquer anything? That's no perfect world.In a perfect world you wouldn't need to because everything would be nice-looking.
In a perfect world you conquer because you feel like it....and have no reason to conquer anything? That's no perfect world.
")
Ok I promised to go over the ComputerCraft code I found and am using to control my Big Reactor, so here goes:
The code is written by Lolmer/Eric Sandall and you can find it along with descriptions and more here:
https://github.com/sandalle/minecraft_bigreactor_control
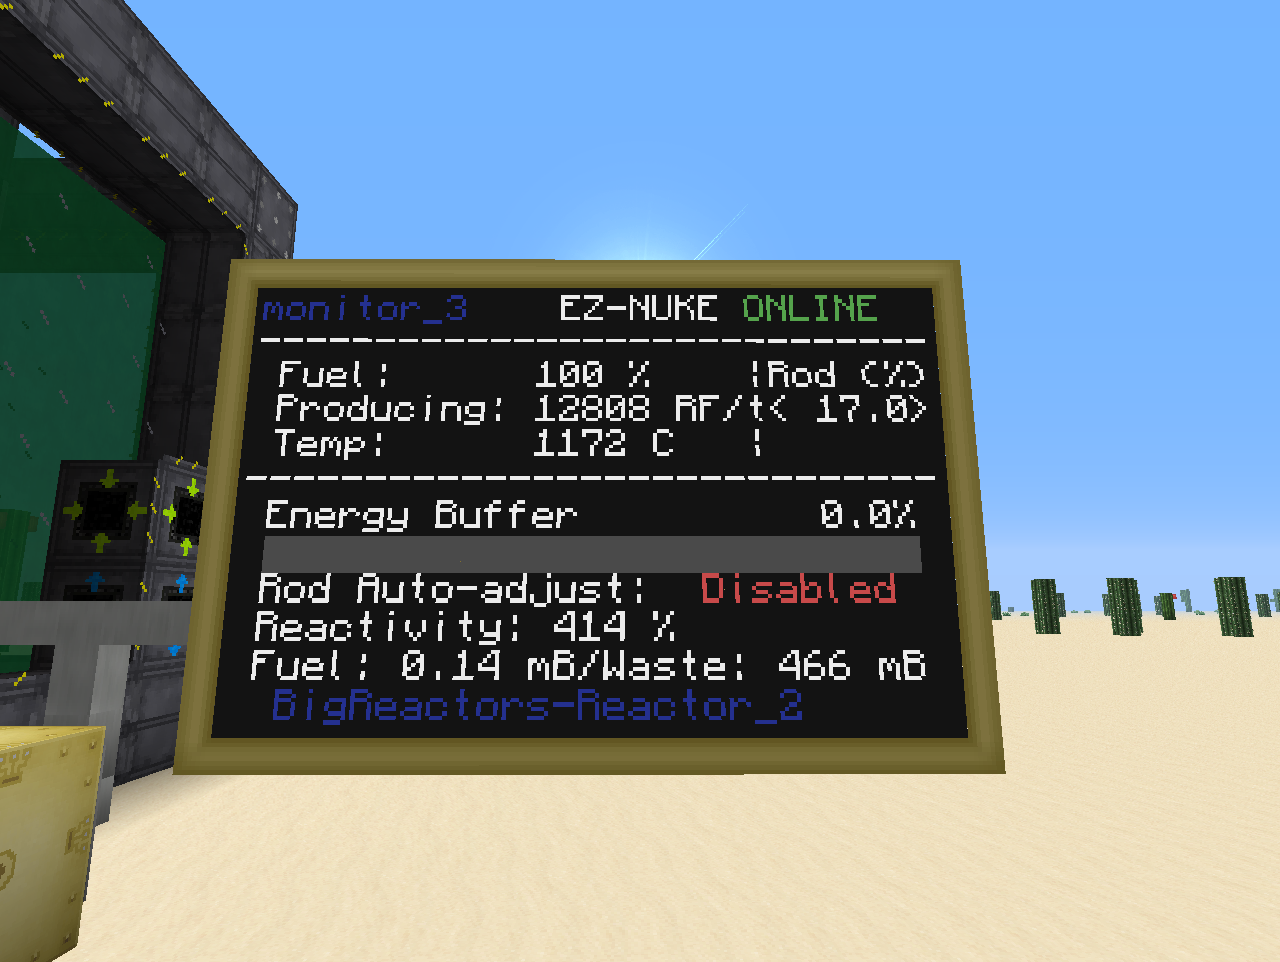
What it does is to monitor any reactor(s) and turbines connected to the computer and adjust them according to set parameters. For example for reactors the parameter is to try and keep the temperature between 850C and 950C(highest power while staying below 1000C and therefore highest possible fuel efficiency), and the program will then automatically adjust the control rods to match that interval. The program will also disable the reactor if the internal power buffer exceeds 85% and turn it back on once it drops lower than 15%, effectively managing the reactor completely on its own. While doing all this it gives you a neat overview of the reactors stats on a connected monitor, which also serves as input for several functions of the program(manual override, manual adjustment of fuel rods).
If you are completely comfortable with ComputerCraft and Big Reactors then you can at this point just go get the code from the site linked above. There should be plenty documentation there and in the header of the code to get you started. BEAR IN MIND! that the code in the link above is written for ComputerCraft 1.6+ and will not work on lower versions. If you are using a lower version of ComputerCraft(Like in Monster 1.1.1 and lower) all occurrences of "term.native()" needs to be changed into "term.restore()". Now I have done that for the following two links and hope I don't get into any trouble for sharing them(I take no credit for anything in this code, only done a search and replace of the above mentioned terms):
Lolmer's EZ-NUKE, modified to CC<1.6
Lolmer's EZ-NUKE startup code, modified to CC<1.6
Now for the rest of this guide I am going to assume that you have watched some basic Big Reactor guides but otherwise don't necessarily know anything about ComputerCraft etc.
The code is capable of handling several reactors and turbines at once, but for this demonstration I am just going to focus on one reactor. Setting it up with more should not be any different except you will need another monitor for each connected device plus one monitor for main overview for anything above one reactor. More detailed description on how this is done can be found in the readme on Lolmers site and in the header of the code.
The first thing you are going to need is a Big Reactor reactor of any size and shape.
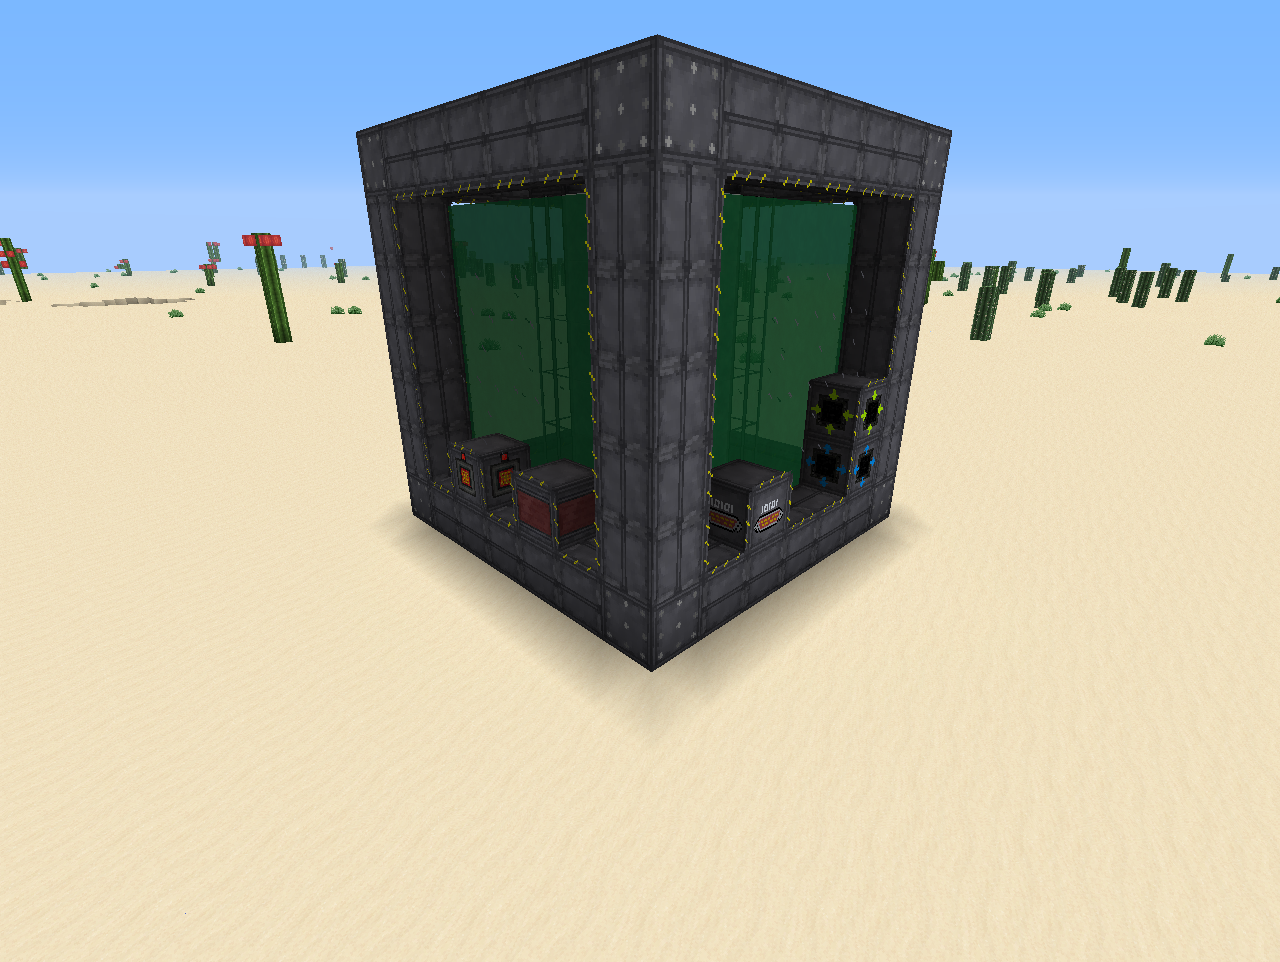
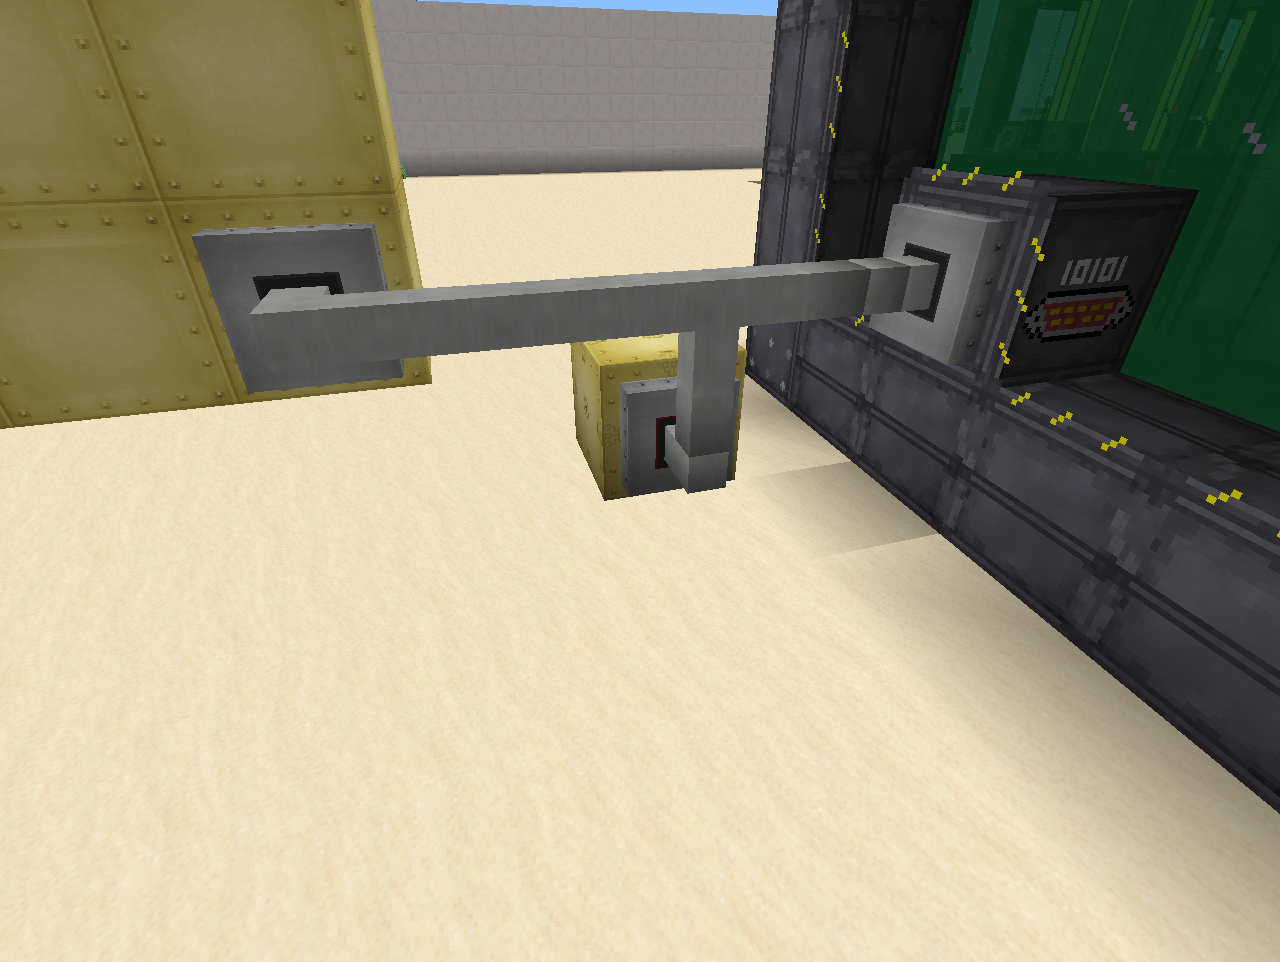
The only thing special you are going to keep in mind when building it is to include a Reactor Computer Port in the frame. Here it is the second "special" block from the right.
Next you are going to need an Advanced Computer and 6 Advanced Monitors from ComputerCraft. Place these down anywhere you want, they do not need to be touching each other or the reactor.
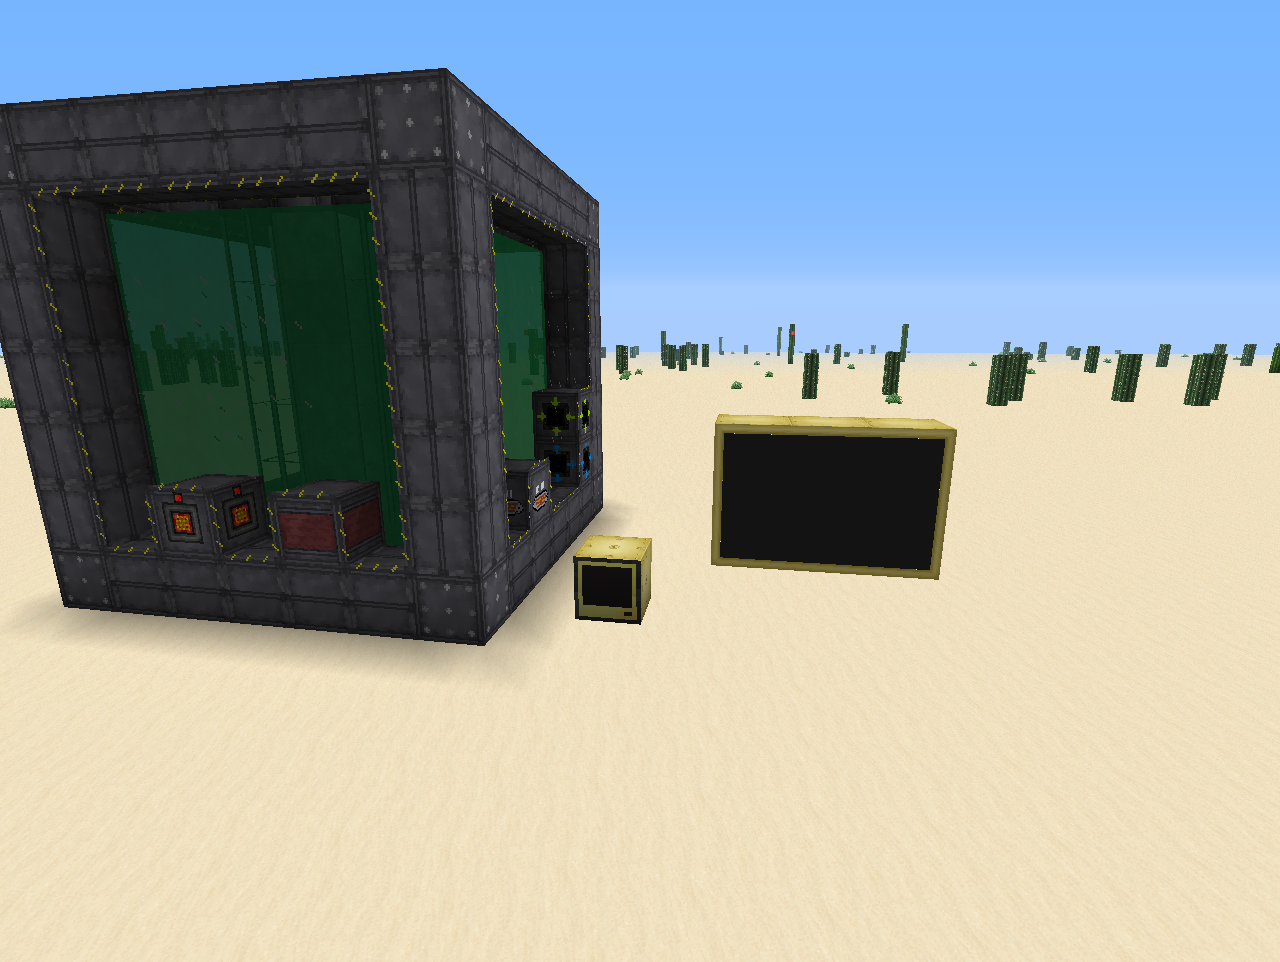
Now the Monitor needs to be in the shape shown above: 2 high and 3 wide. You can place lots of monitors next to each other to make a much bigger monitor, but fonts etc. does not scale if you do and you would end up with using the same area of the monitor, just up in the left corner.
Next you will need to craft 3 Wired Modems and some Networking Cable also from ComputerCraft. You place one Modem on the Monitor, one Modem on the Computer and the last Modem on the Reactor Computer Port. You then connect the modems up with the Networking cable.
Now very important is that you rightclick each modem once. Doing so they should change colour(with Soartex they get a red ring) and you will see a message in the chat window. Once this is done the modems are activated and ready to communicate.
Now all the "physical" parts are in place and all we need is to get the program loaded up. Luckely this is very simple, but you do need to figure out which version of ComputerCraft you are running so you can choose the right program. If you are using a FTB pack, go Here and find the version of the modpack you are using and see which CC version it has. Else look in your launcher/ingame "Mods" menu etc.
Now that you know which version of ComputerCraft you are using go to your Advanced Computer, rightclick it to open it up. It should look like this:
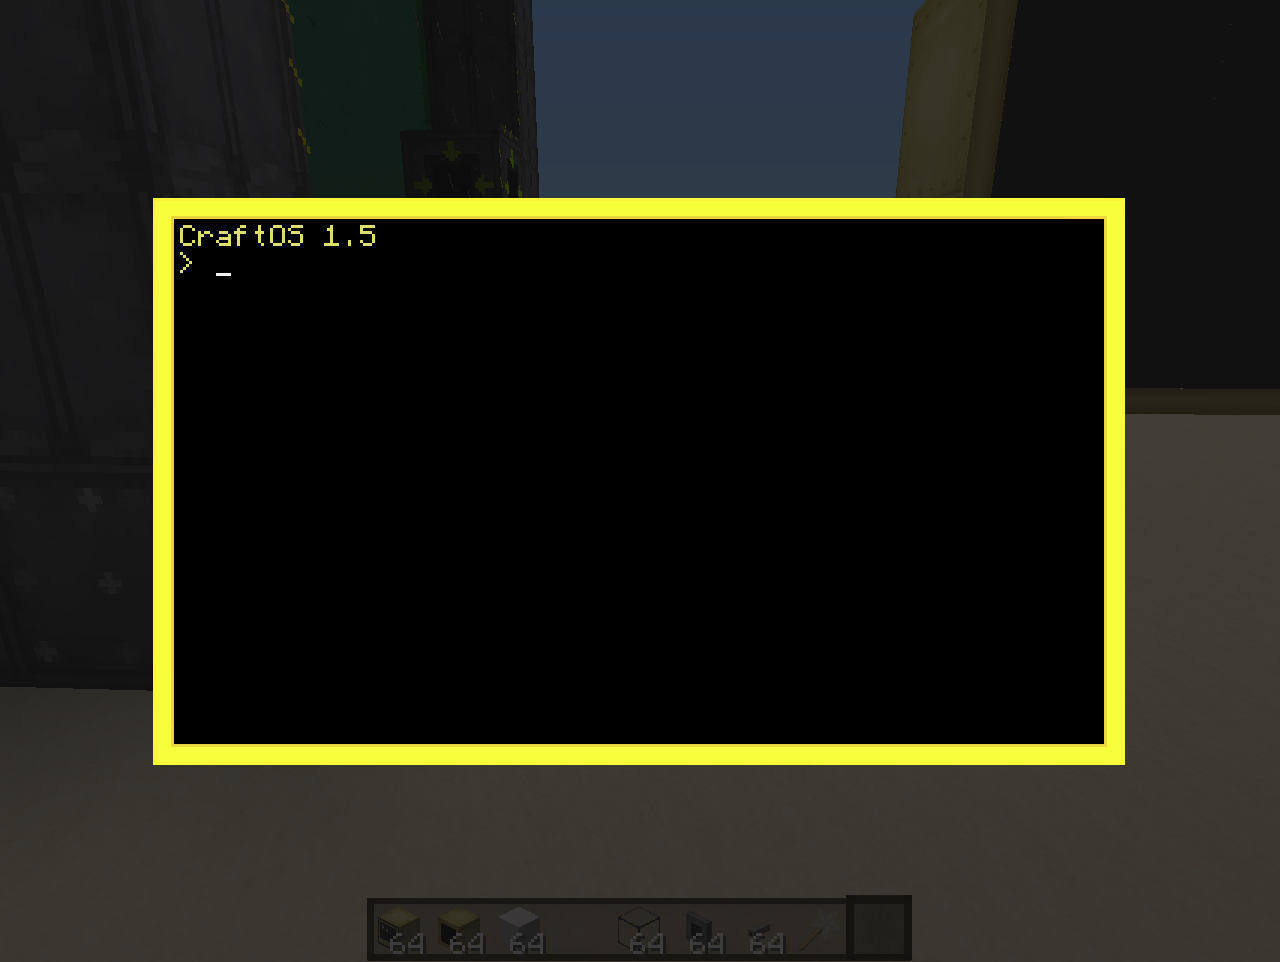
(actually that version number up top might tell you which version of CC you have Not sure).
Now all you have to do is type in the following(or copy+paste):
CC 1.6+: pastebin get ZTMzRLez startup
CC<1.6: pastebin get jXgkfhfW startup
Hit Enter and the computer will automatically download the program and store it under the name "startup"(the program named startup automatically be run when the computer gets loaded and thereby starting the program again after restarts etc.).
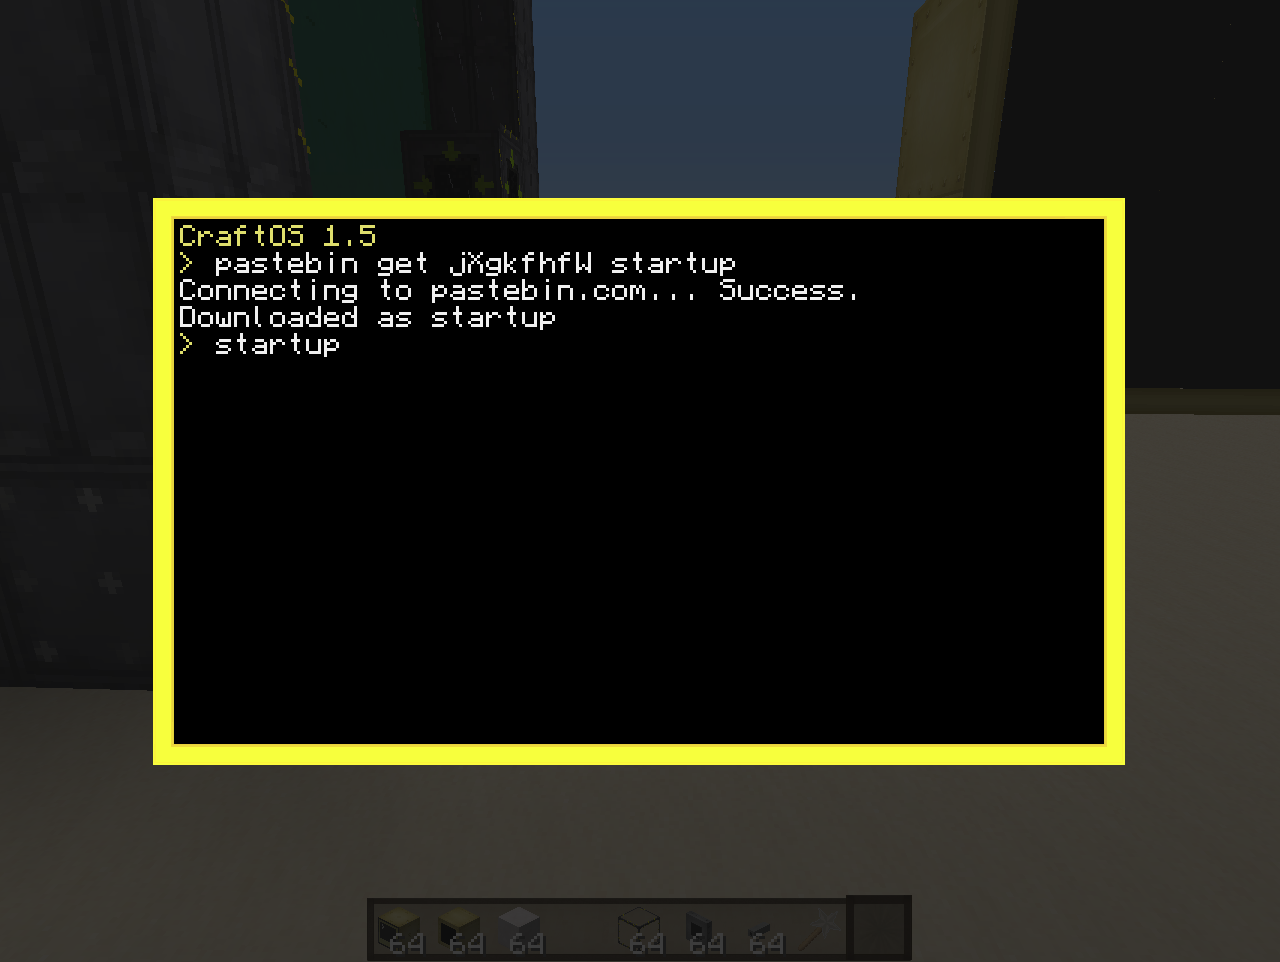
Once it is done downloading type in "startup" and hit Enter and the program will run for its first time.
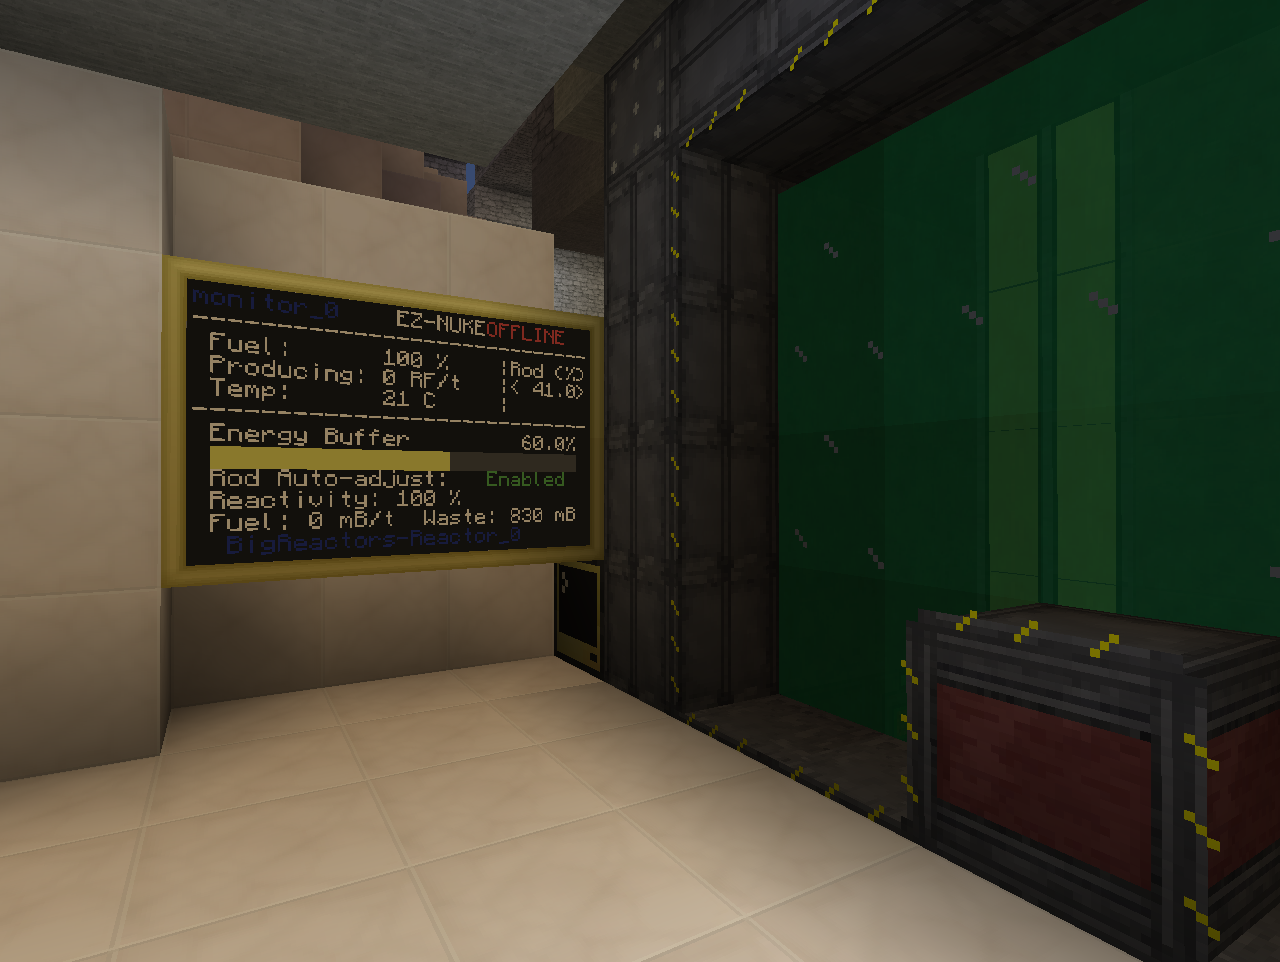
And BEHOLD! the reactor starts up, the monitor lights up with information and the program starts to dial in the fuel rods to match the temperature interval.
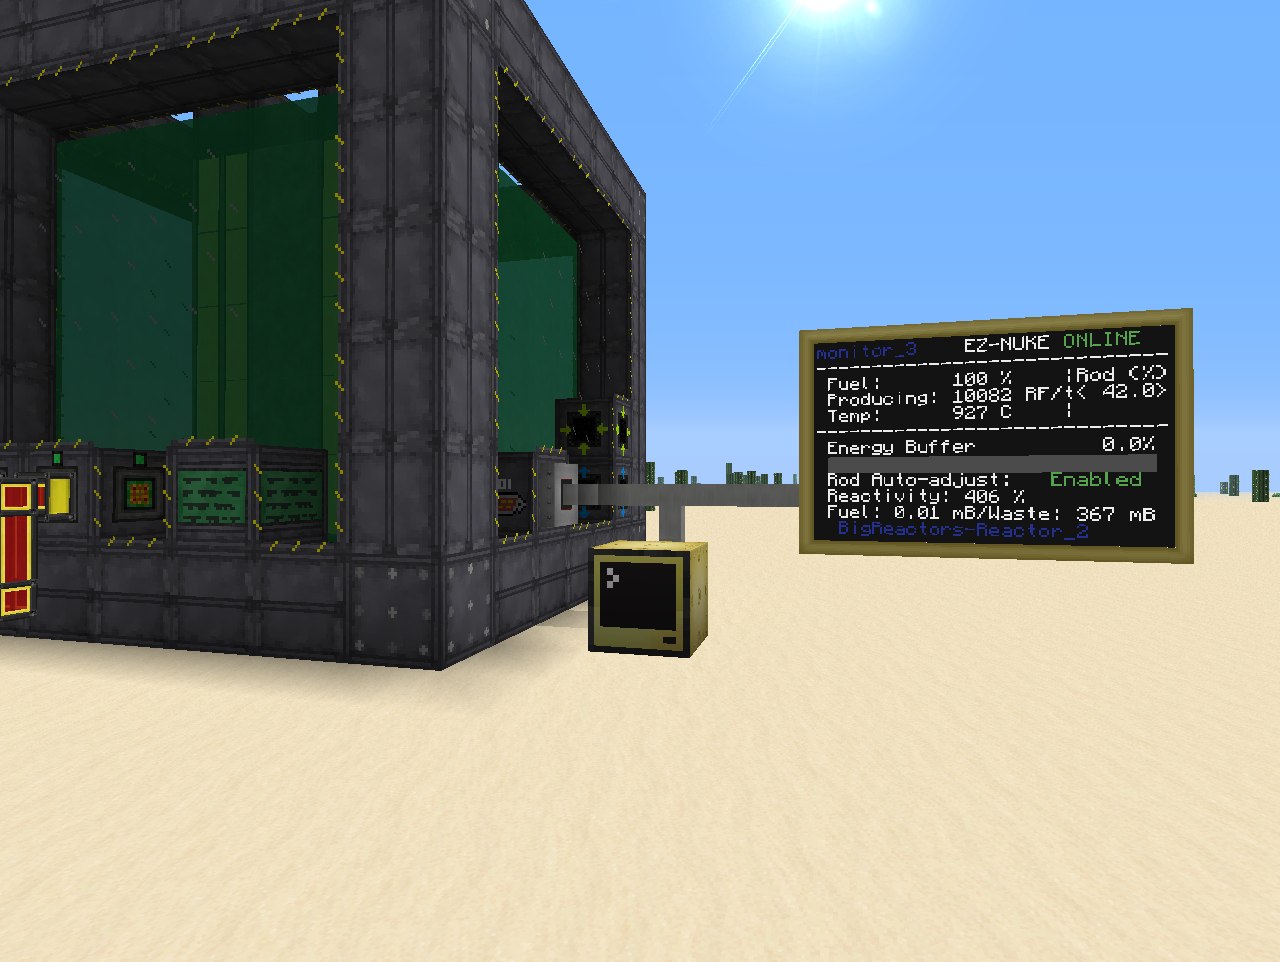
(Connected up some storage and let it run a bit for this image. Here it is balanced out at a temperature of 927C).
Now some bonus information. The monitor is actually a Touch screen and you can use it as such. Walk up to it and rightclick on the "Enabled" bit for example to turn off the auto-adjust. Then click the "<" or ">" to manually adjust the fuel rods to your liking. Or turn the reactor off by clicking on the "Online" part.
The code is written by Lolmer/Eric Sandall and you can find it along with descriptions and more here:
https://github.com/sandalle/minecraft_bigreactor_control
What it does is to monitor any reactor(s) and turbines connected to the computer and adjust them according to set parameters. For example for reactors the parameter is to try and keep the temperature between 850C and 950C(highest power while staying below 1000C and therefore highest possible fuel efficiency), and the program will then automatically adjust the control rods to match that interval. The program will also disable the reactor if the internal power buffer exceeds 85% and turn it back on once it drops lower than 15%, effectively managing the reactor completely on its own. While doing all this it gives you a neat overview of the reactors stats on a connected monitor, which also serves as input for several functions of the program(manual override, manual adjustment of fuel rods).
If you are completely comfortable with ComputerCraft and Big Reactors then you can at this point just go get the code from the site linked above. There should be plenty documentation there and in the header of the code to get you started. BEAR IN MIND! that the code in the link above is written for ComputerCraft 1.6+ and will not work on lower versions. If you are using a lower version of ComputerCraft(Like in Monster 1.1.1 and lower) all occurrences of "term.native()" needs to be changed into "term.restore()". Now I have done that for the following two links and hope I don't get into any trouble for sharing them(I take no credit for anything in this code, only done a search and replace of the above mentioned terms):
Lolmer's EZ-NUKE, modified to CC<1.6
Lolmer's EZ-NUKE startup code, modified to CC<1.6
Now for the rest of this guide I am going to assume that you have watched some basic Big Reactor guides but otherwise don't necessarily know anything about ComputerCraft etc.
The code is capable of handling several reactors and turbines at once, but for this demonstration I am just going to focus on one reactor. Setting it up with more should not be any different except you will need another monitor for each connected device plus one monitor for main overview for anything above one reactor. More detailed description on how this is done can be found in the readme on Lolmers site and in the header of the code.
The first thing you are going to need is a Big Reactor reactor of any size and shape.
The only thing special you are going to keep in mind when building it is to include a Reactor Computer Port in the frame. Here it is the second "special" block from the right.
Next you are going to need an Advanced Computer and 6 Advanced Monitors from ComputerCraft. Place these down anywhere you want, they do not need to be touching each other or the reactor.
Now the Monitor needs to be in the shape shown above: 2 high and 3 wide. You can place lots of monitors next to each other to make a much bigger monitor, but fonts etc. does not scale if you do and you would end up with using the same area of the monitor, just up in the left corner.
Next you will need to craft 3 Wired Modems and some Networking Cable also from ComputerCraft. You place one Modem on the Monitor, one Modem on the Computer and the last Modem on the Reactor Computer Port. You then connect the modems up with the Networking cable.
Now very important is that you rightclick each modem once. Doing so they should change colour(with Soartex they get a red ring) and you will see a message in the chat window. Once this is done the modems are activated and ready to communicate.
Now all the "physical" parts are in place and all we need is to get the program loaded up. Luckely this is very simple, but you do need to figure out which version of ComputerCraft you are running so you can choose the right program. If you are using a FTB pack, go Here and find the version of the modpack you are using and see which CC version it has. Else look in your launcher/ingame "Mods" menu etc.
Now that you know which version of ComputerCraft you are using go to your Advanced Computer, rightclick it to open it up. It should look like this:
(actually that version number up top might tell you which version of CC you have
Not sure).Now all you have to do is type in the following(or copy+paste):
CC 1.6+: pastebin get ZTMzRLez startup
CC<1.6: pastebin get jXgkfhfW startup
Hit Enter and the computer will automatically download the program and store it under the name "startup"(the program named startup automatically be run when the computer gets loaded and thereby starting the program again after restarts etc.).
Once it is done downloading type in "startup" and hit Enter and the program will run for its first time.
And BEHOLD! the reactor starts up, the monitor lights up with information and the program starts to dial in the fuel rods to match the temperature interval.
(Connected up some storage and let it run a bit for this image. Here it is balanced out at a temperature of 927C).
Now some bonus information. The monitor is actually a Touch screen and you can use it as such. Walk up to it and rightclick on the "Enabled" bit for example to turn off the auto-adjust. Then click the "<" or ">" to manually adjust the fuel rods to your liking. Or turn the reactor off by clicking on the "Online" part.
Another update, this one in the "sign" of mob spawning:
Was starting to run low on stuff like Ender pearls and was getting tired of constantly nursing my Ender Lillies for the meagre rewards from them. And would probably also be good to have a source of other mob drops. Due to space concerns I opted for using a single MFR setup and then automating switching it to whichever mob I wanted to spawn. But in order to spawn things with MFR I need Mob Essence.
Nothing fancy. 5x15 Cursed earth darkroom spawner(Really hard to take screenshots of, even boosted brightness but you might be able to spot a some spider eyes). The Cursed Earth is extended/retracted by TiCo drawbridges and the mobs are killed off by 3 MFR Grinders. Dark glass from Extra Utilities. Classic setup, nothing special.
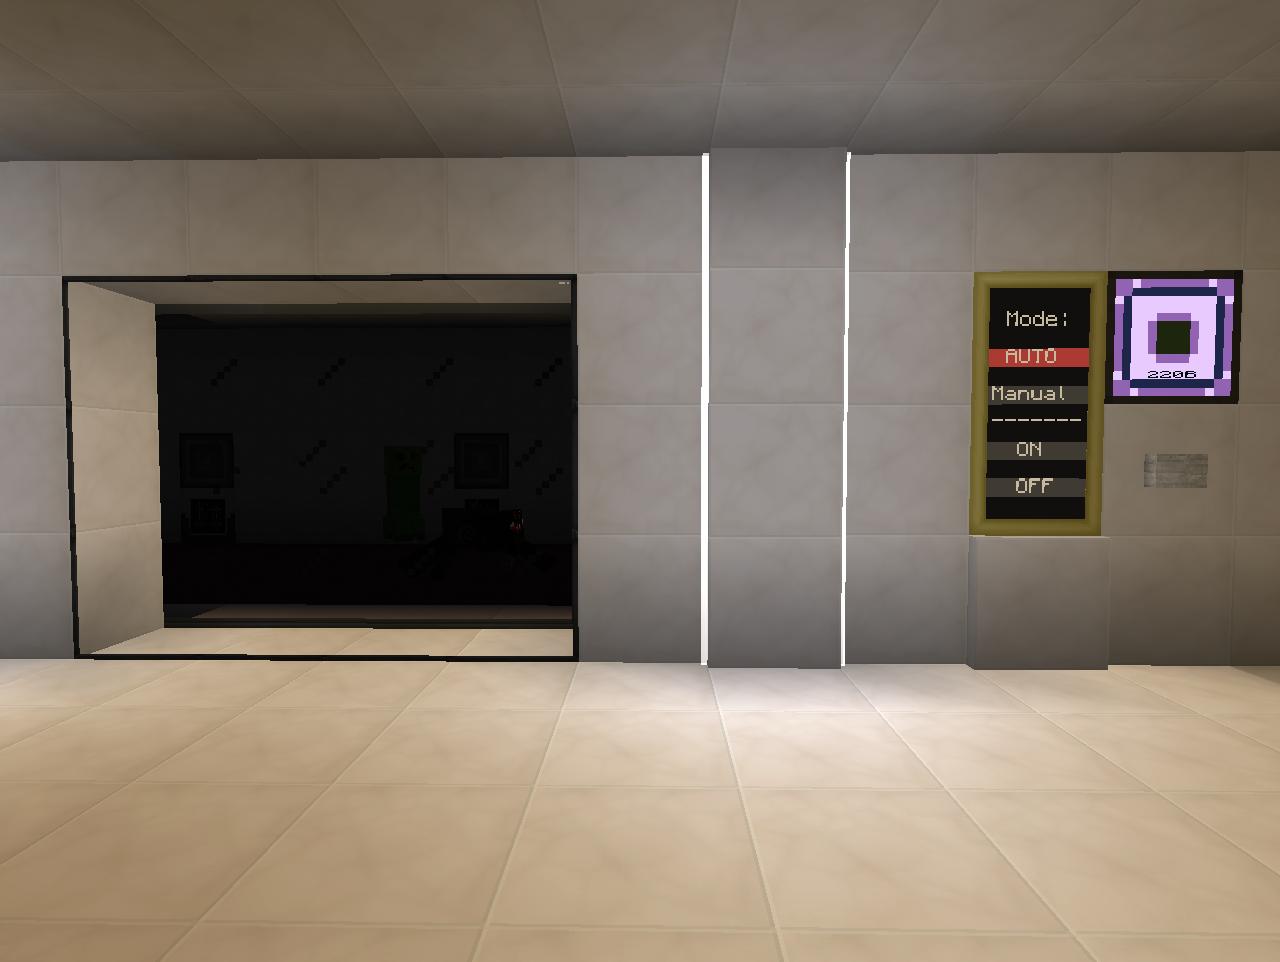
I decided however that I wanted the option of both having the farm run automatically depending on fluid levels in the ME system(extra cells) and have a manual override. After fiddling a bit with redstone circuits I decide that CC was the better choice. The choice of Auto/Manual is still kept to a redstone device however(I like buttons, but it is basically just a lever. Toggle Latch under the floor) so that it remembers its state during restarts etc.(yeah I know you can program CC to write such things to/load from files, but I am way to big a noob to do that).
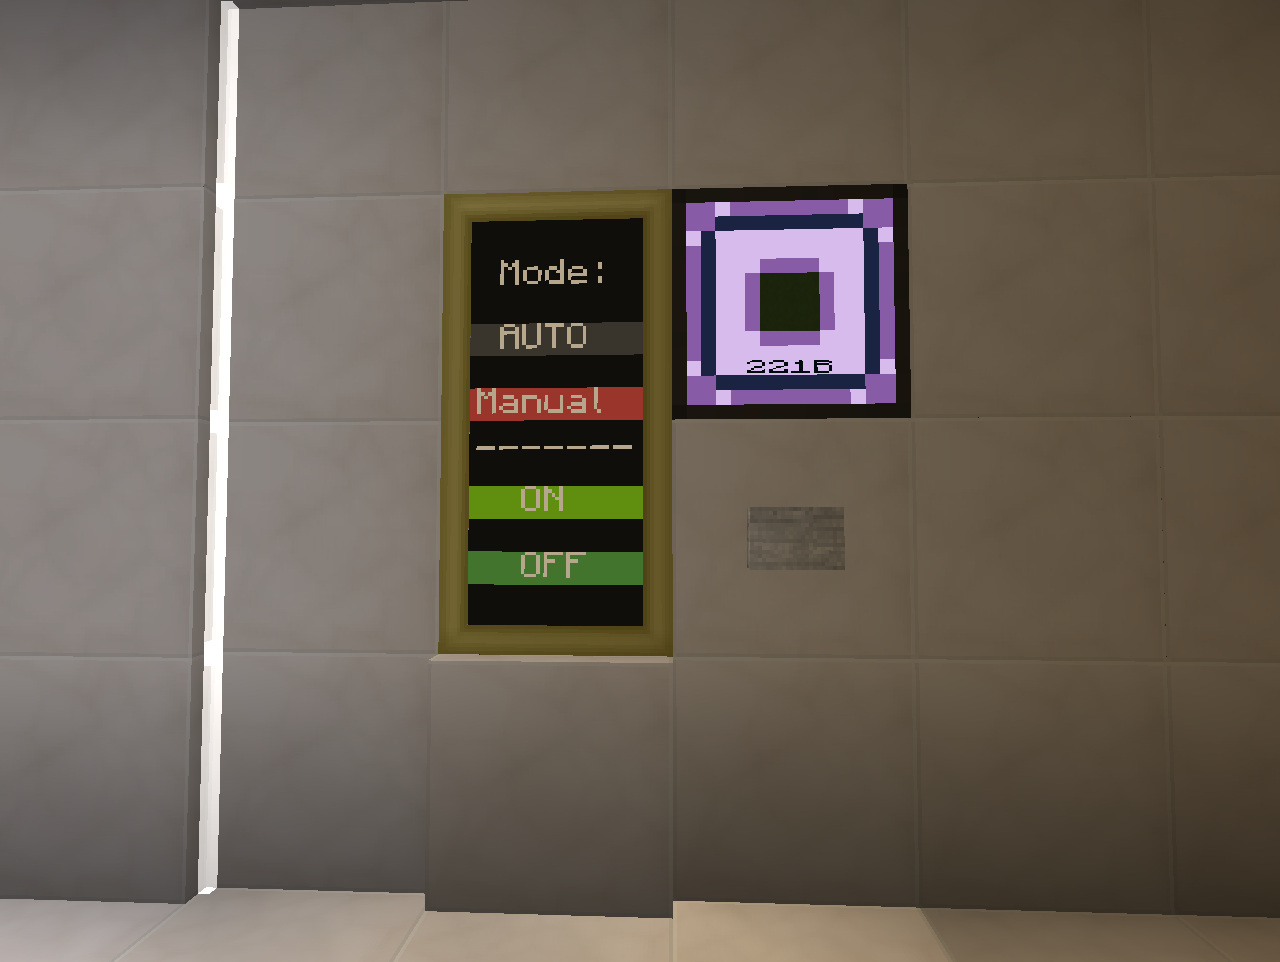
So in Auto mode the farm will run depending on a ME Fluid Level Emitter. When hitting the button it will switch to Manual mode and you can freely choose on and off as you like.
It is pretty crude, but if anyone can use it for anything(doesn't have to be cursed earth farms), the code can be found here: http://pastebin.com/w3w1BLu3
Jotted down a short description on how to use it in the beginning of the code so I also remember it tomorrow
Ok now I got Mob Essence we are ready for the main attraction:
(again sorry for dark pictures. It is intentionally build to be dark, but brightened the pictures and placed extra light sources for the following screenshots).
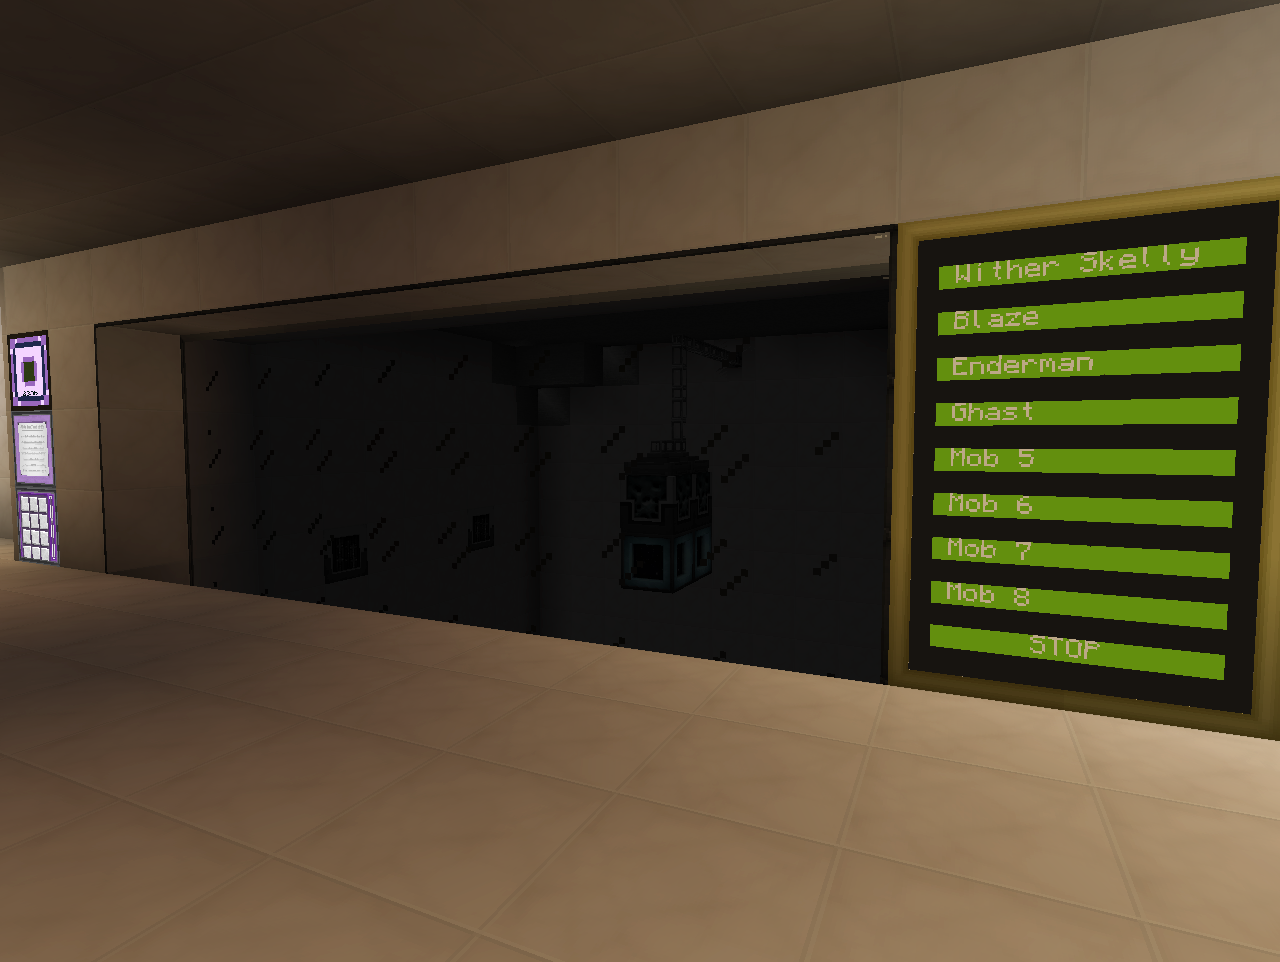
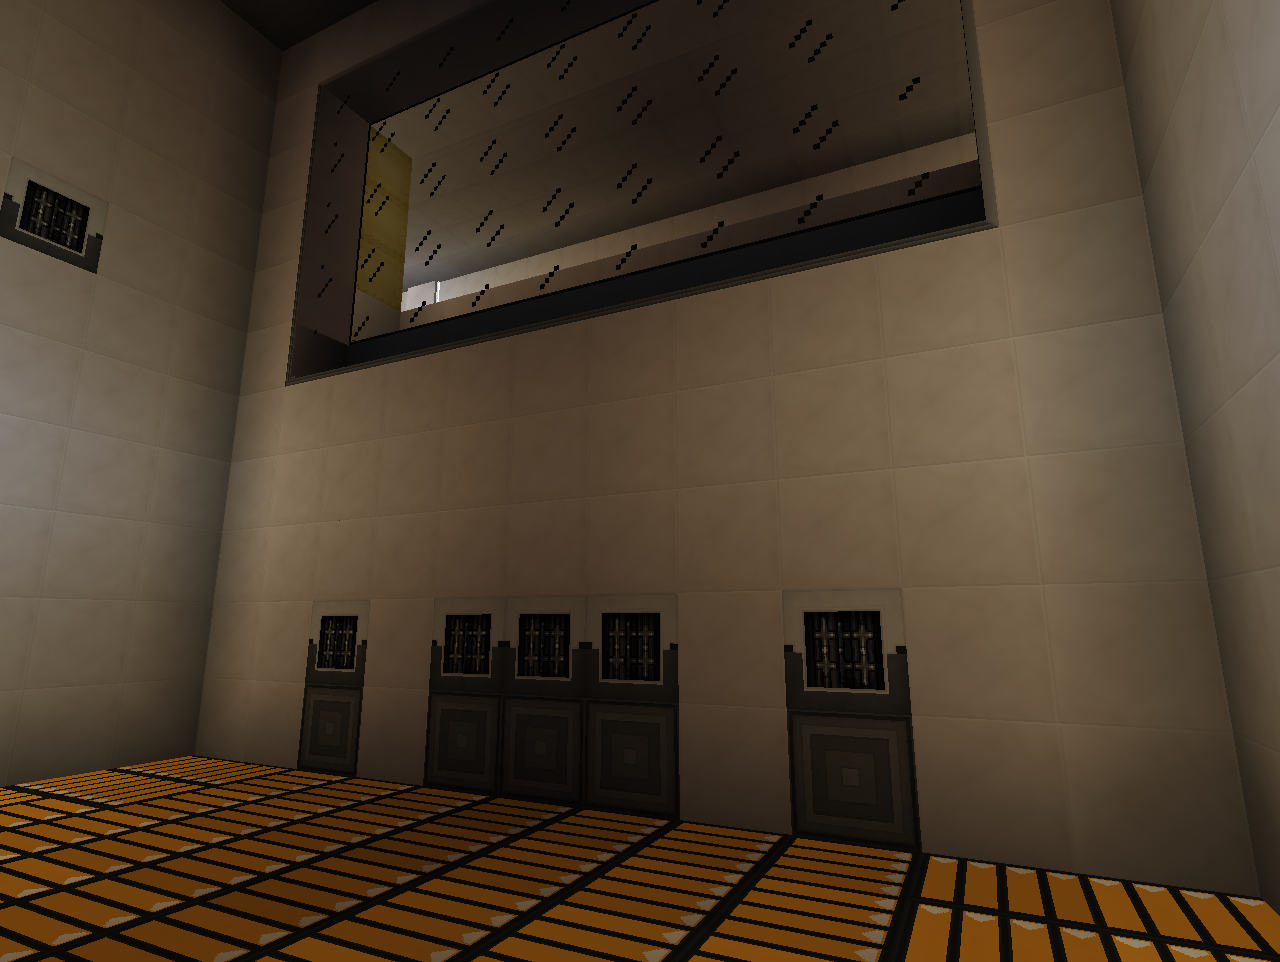
A 9x11x11(w x h x d) spawning room with Conveyor belts on the floor and Grinders along one side and up on the wall(for Ghasts):
and 2 MFR Auto-spawners hanging from the ceiling:
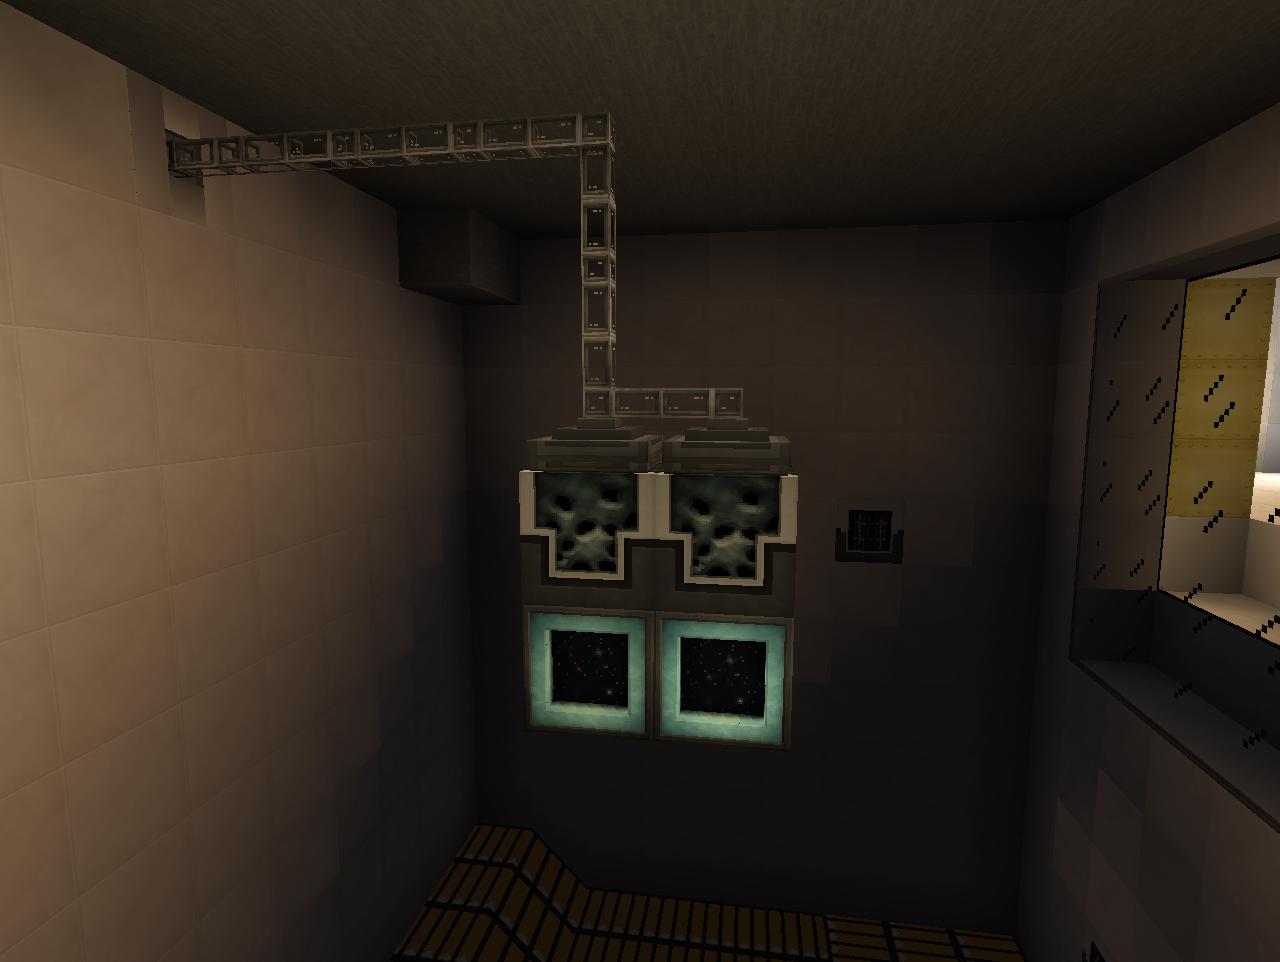
Had to have two spawners opposed to the planned one due to needing "Exact copy" mode for mobs like Wither Skeletons. Tesseracts below the spawners is supplying the power and Mob essence, and on top of the spawners is attached two ME storage bus belonging to a sub-network. Now because of needing to have two spawners, each Safari net needs to be filtered into the correct Storage bus.
Behind the scenes we find the rest of the sub-network handling the Safari nets:
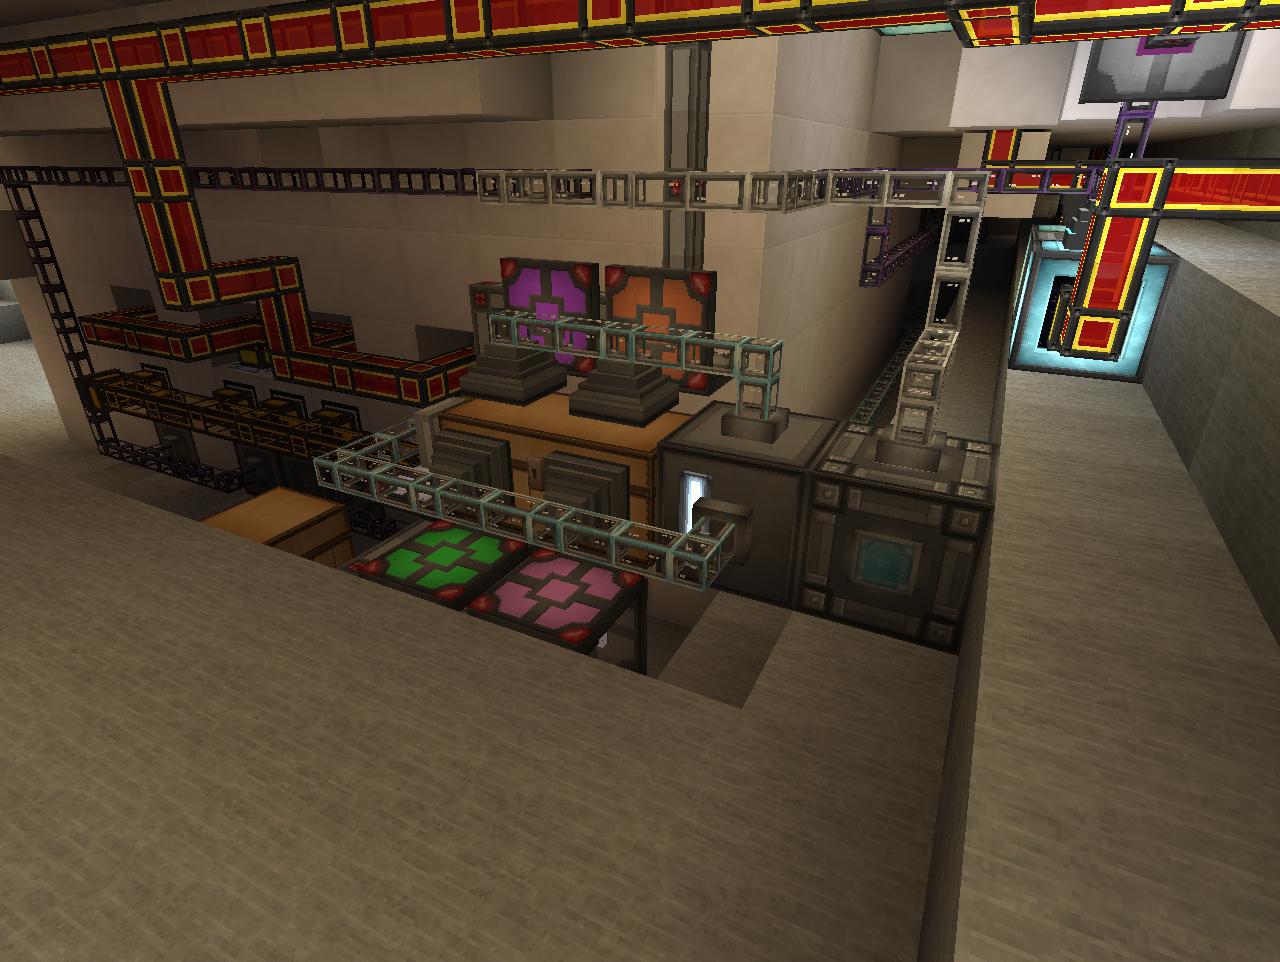
Basically just a double wooden chest storing all the Safari nets. On the chest is attached 8 ME precise import bus, one for each mob. On the end of the chest is also a ME fuzzy export bus attached with any filled safari net filtered. All the bus are set to work only on redstone signal and next to each bus is a MFR Rednet cable configured to separate colour channels corresponding to each Safari net and one for the Fuzzy bus. This way we can with redstone signals tell the ME network exactly which Safari net to take out of the chest(which will be put into the only valid inventory which is the Auto-spawner), or we can tell the ME Fuzzy Export bus to export any Safari nets into the Wooden chest(and thereby remove the Safari net).
If you are interested you can find the code for the control of the Autospawners here(again quite crude and not all finished yet. But should be functional): http://pastebin.com/aNZZpBLM
There is a list of which Bundled/MFR rednet cable colours goes with which button in the code as well.
Was starting to run low on stuff like Ender pearls and was getting tired of constantly nursing my Ender Lillies for the meagre rewards from them. And would probably also be good to have a source of other mob drops. Due to space concerns I opted for using a single MFR setup and then automating switching it to whichever mob I wanted to spawn. But in order to spawn things with MFR I need Mob Essence.
Nothing fancy. 5x15 Cursed earth darkroom spawner(Really hard to take screenshots of, even boosted brightness but you might be able to spot a some spider eyes
). The Cursed Earth is extended/retracted by TiCo drawbridges and the mobs are killed off by 3 MFR Grinders. Dark glass from Extra Utilities. Classic setup, nothing special. I decided however that I wanted the option of both having the farm run automatically depending on fluid levels in the ME system(extra cells) and have a manual override. After fiddling a bit with redstone circuits I decide that CC was the better choice. The choice of Auto/Manual is still kept to a redstone device however(I like buttons, but it is basically just a lever. Toggle Latch under the floor) so that it remembers its state during restarts etc.(yeah I know you can program CC to write such things to/load from files, but I am way to big a noob to do that
).
So in Auto mode the farm will run depending on a ME Fluid Level Emitter. When hitting the button it will switch to Manual mode and you can freely choose on and off as you like.
It is pretty crude, but if anyone can use it for anything(doesn't have to be cursed earth farms), the code can be found here: http://pastebin.com/w3w1BLu3
Jotted down a short description on how to use it in the beginning of the code so I also remember it tomorrow
Ok now I got Mob Essence we are ready for the main attraction:
(again sorry for dark pictures. It is intentionally build to be dark, but brightened the pictures and placed extra light sources for the following screenshots).
A 9x11x11(w x h x d) spawning room with Conveyor belts on the floor and Grinders along one side and up on the wall(for Ghasts):
and 2 MFR Auto-spawners hanging from the ceiling:
Had to have two spawners opposed to the planned one due to needing "Exact copy" mode for mobs like Wither Skeletons. Tesseracts below the spawners is supplying the power and Mob essence, and on top of the spawners is attached two ME storage bus belonging to a sub-network. Now because of needing to have two spawners, each Safari net needs to be filtered into the correct Storage bus.
Behind the scenes we find the rest of the sub-network handling the Safari nets:
Basically just a double wooden chest storing all the Safari nets. On the chest is attached 8 ME precise import bus, one for each mob. On the end of the chest is also a ME fuzzy export bus attached with any filled safari net filtered. All the bus are set to work only on redstone signal and next to each bus is a MFR Rednet cable configured to separate colour channels corresponding to each Safari net and one for the Fuzzy bus. This way we can with redstone signals tell the ME network exactly which Safari net to take out of the chest(which will be put into the only valid inventory which is the Auto-spawner), or we can tell the ME Fuzzy Export bus to export any Safari nets into the Wooden chest(and thereby remove the Safari net).
If you are interested you can find the code for the control of the Autospawners here(again quite crude and not all finished yet. But should be functional): http://pastebin.com/aNZZpBLM
There is a list of which Bundled/MFR rednet cable colours goes with which button in the code as well.
No idea, but probably too muchWhelp, I just spent half an hour looking through all that. WOW! You sir have done an awesome job. How much time have you spent on that world?
Just remember, "too much" is all opinion. You could have played the same amount of time, but in different people's mind you could have "hardly played at all" or "played an inhumanly amount."No idea, but probably too much
Time for some farming:
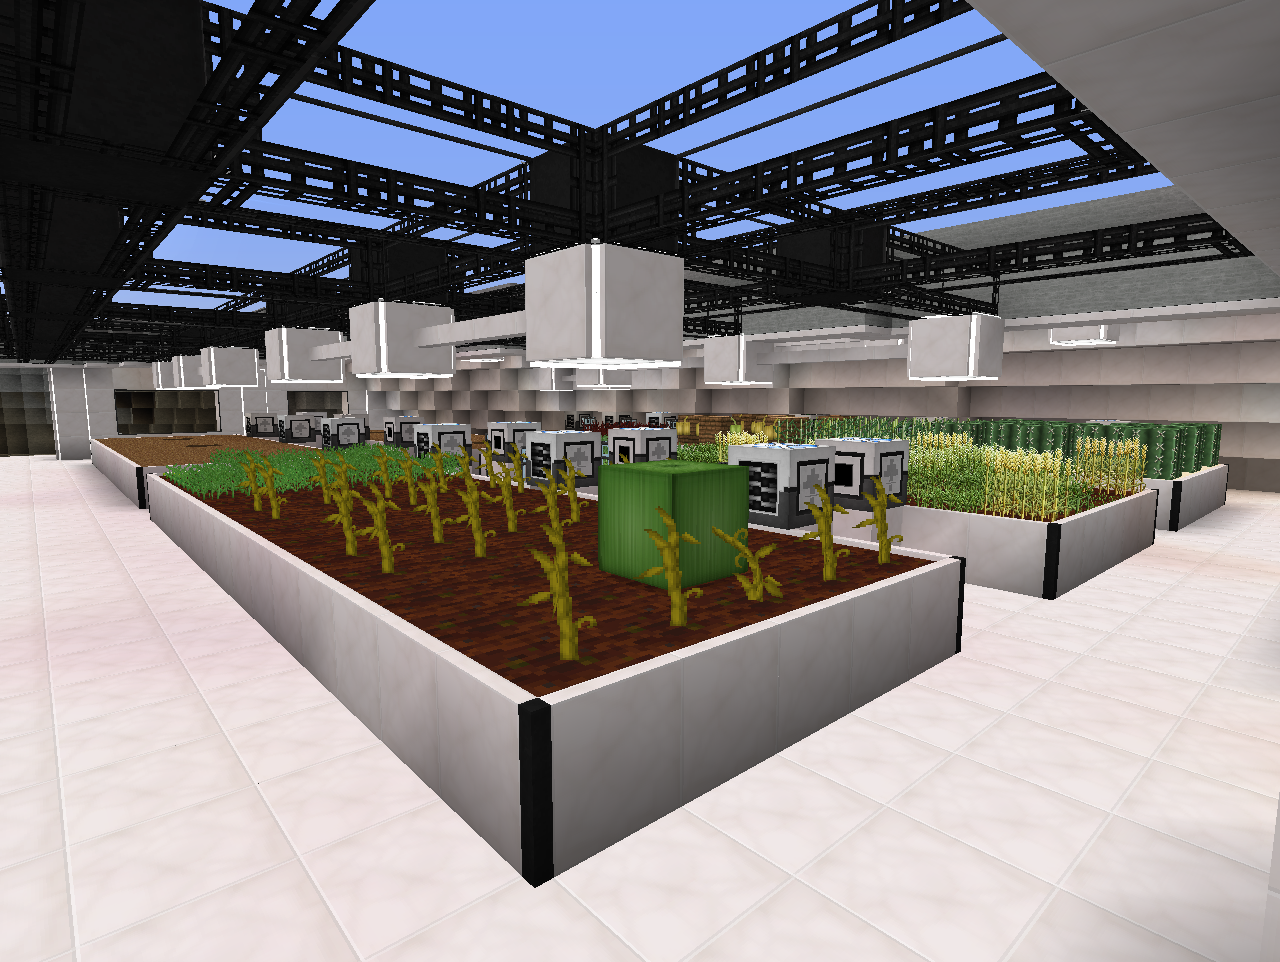
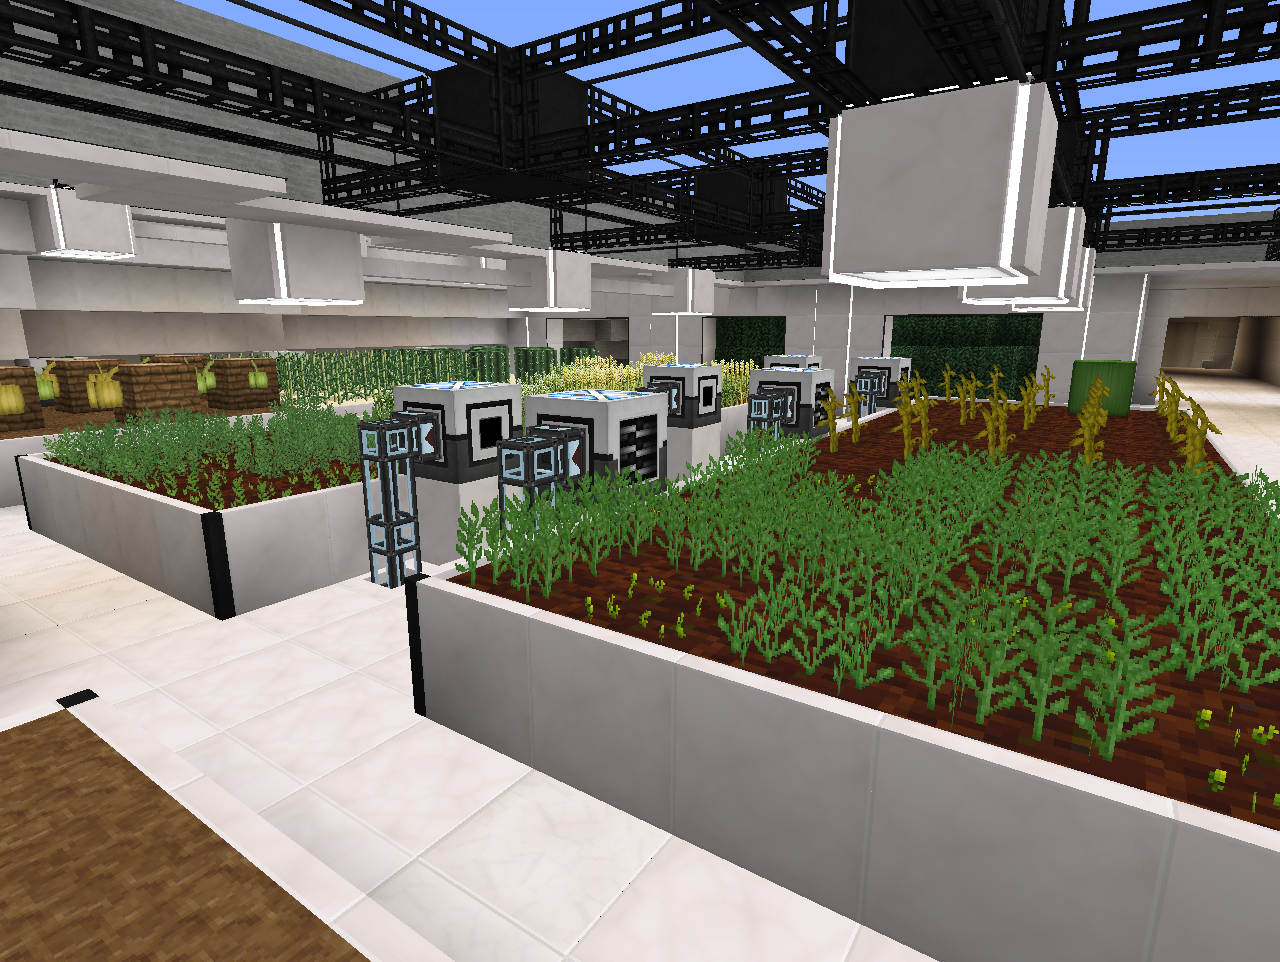
Went with MFR for the common crops here due to its compact nature allowing for the "greenhouse" feel. I set up all the planting beds with Planters and Harvesters even though the crops on them don't need Planters. This way I can easily swap around the crops later on(which I am going to do fairly soon I think). It is also super simple to swap out a Harvester with a Fruit Picker should that be needed.
Using Fertilized Dirt from Random Things where that apply. Going to swap around the crops and have the middle plot in each planter set with a crop that allows space for Lilypads of Fertility(Sugarcane, Cactus, Cocoa beans etc.) so they cover most of the planting beds.
Managed to fit everything into a single layer of blocks(the floor I walk on), by hiding ME cables and TE conduits with Facades and Covers:
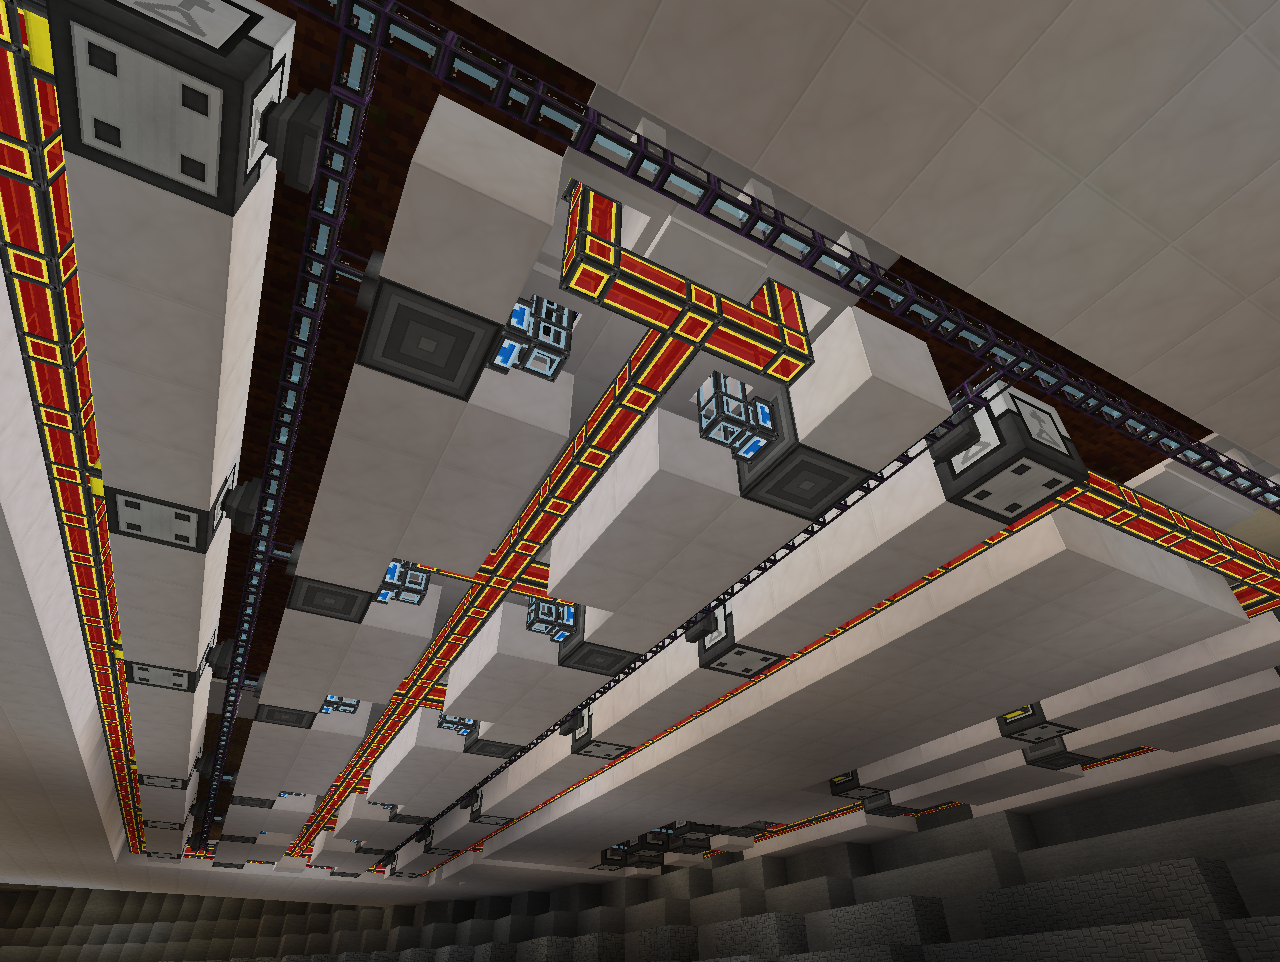
This way I have more room to build the level underneath the farm(which is most likely going to be partly for livestock).
Next to the greenhouse area I fitted in a max. sized Forestry Multifarm, currently just running Oak trees:
(Haven't been running for a long time as you can see by the Humus having turned into sand. Controlled by ME level emitter).
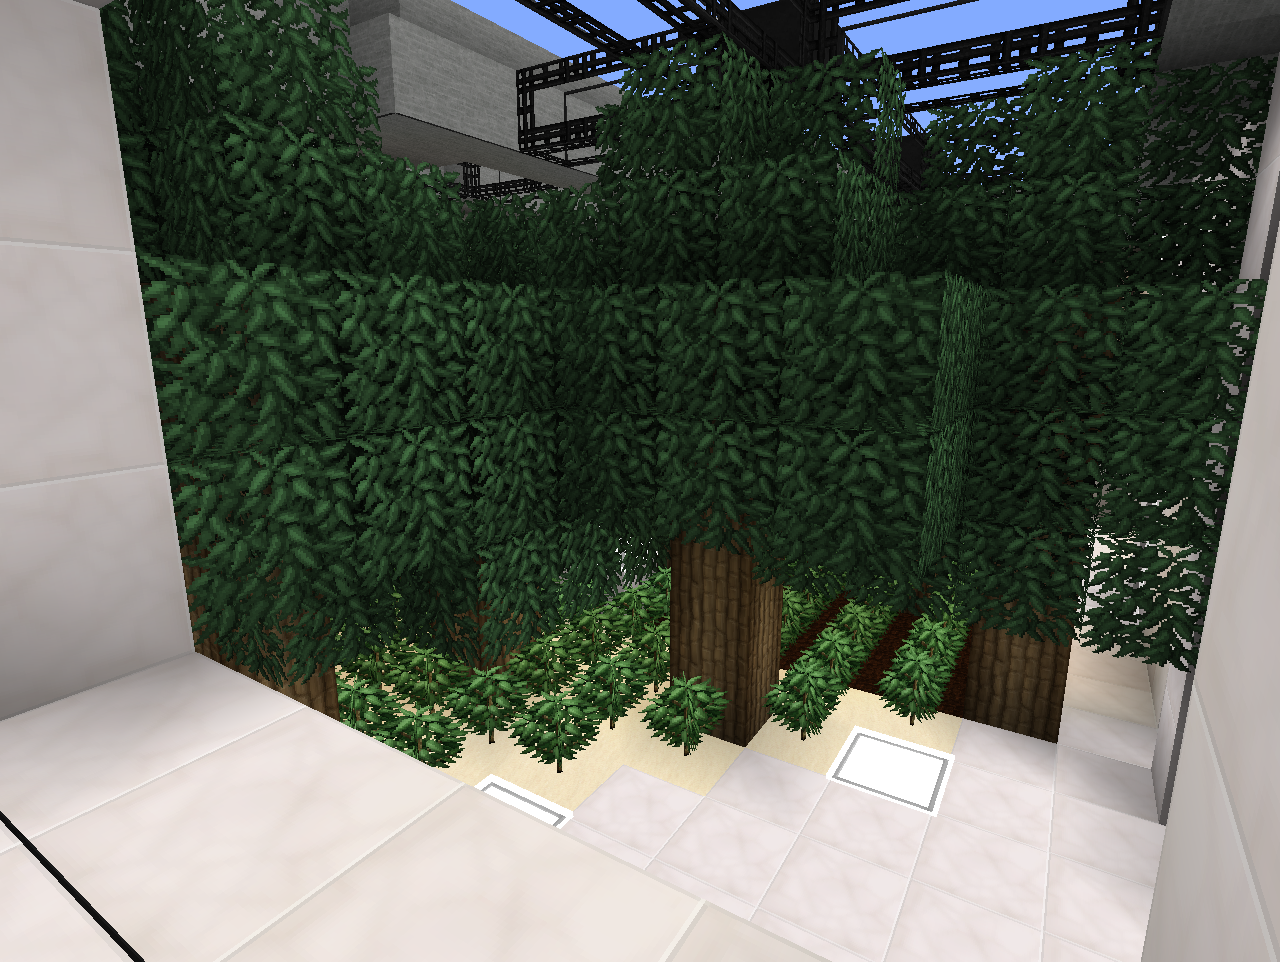
To end off a little sneak peak of the other wing of the ship where I am making preparations for beekeeping(and a small park area):

Went with MFR for the common crops here due to its compact nature allowing for the "greenhouse" feel. I set up all the planting beds with Planters and Harvesters even though the crops on them don't need Planters. This way I can easily swap around the crops later on(which I am going to do fairly soon I think). It is also super simple to swap out a Harvester with a Fruit Picker should that be needed.
Using Fertilized Dirt from Random Things where that apply. Going to swap around the crops and have the middle plot in each planter set with a crop that allows space for Lilypads of Fertility(Sugarcane, Cactus, Cocoa beans etc.) so they cover most of the planting beds.
Managed to fit everything into a single layer of blocks(the floor I walk on), by hiding ME cables and TE conduits with Facades and Covers:
This way I have more room to build the level underneath the farm(which is most likely going to be partly for livestock).
Next to the greenhouse area I fitted in a max. sized Forestry Multifarm, currently just running Oak trees:
(Haven't been running for a long time as you can see by the Humus having turned into sand. Controlled by ME level emitter).
To end off a little sneak peak of the other wing of the ship where I am making preparations for beekeeping(and a small park area):
Time for some farming:
Went with MFR for the common crops here due to its compact nature allowing for the "greenhouse" feel. I set up all the planting beds with Planters and Harvesters even though the crops on them don't need Planters. This way I can easily swap around the crops later on(which I am going to do fairly soon I think). It is also super simple to swap out a Harvester with a Fruit Picker should that be needed.
Using Fertilized Dirt from Random Things where that apply. Going to swap around the crops and have the middle plot in each planter set with a crop that allows space for Lilypads of Fertility(Sugarcane, Cactus, Cocoa beans etc.) so they cover most of the planting beds.
Managed to fit everything into a single layer of blocks(the floor I walk on), by hiding ME cables and TE conduits with Facades and Covers:
This way I have more room to build the level underneath the farm(which is most likely going to be partly for livestock).
Next to the greenhouse area I fitted in a max. sized Forestry Multifarm, currently just running Oak trees:
(Haven't been running for a long time as you can see by the Humus having turned into sand. Controlled by ME level emitter).
To end off a little sneak peak of the other wing of the ship where I am making preparations for beekeeping(and a small park area):
Never seen such a clean, fitted and majestic looking farm in FTB.
Guys, do we have an award for farm of the year?
We need an award for farm of the year.
Someone make an award for the farm of the year.
Google "Achivecraft".Never seen such a clean, fitted and majestic looking farm in FTB.
Guys, do we have an award for farm of the year?
We need an award for farm of the year.
Someone make an award for the farm of the year.
Just for you, rhn.
(Thank you, trajing.)

(Thank you, trajing.)
HQ texture pack, microblocks, smart use of mods, basic aesthetic skills.Never seen such a clean, fitted and majestic looking farm in FTB.
Seems enough to impress 99% of FTB community... GJ
Time for some farming:
Went with MFR for the common crops here due to its compact nature allowing for the "greenhouse" feel. I set up all the planting beds with Planters and Harvesters even though the crops on them don't need Planters. This way I can easily swap around the crops later on(which I am going to do fairly soon I think). It is also super simple to swap out a Harvester with a Fruit Picker should that be needed.
Using Fertilized Dirt from Random Things where that apply. Going to swap around the crops and have the middle plot in each planter set with a crop that allows space for Lilypads of Fertility(Sugarcane, Cactus, Cocoa beans etc.) so they cover most of the planting beds.
Managed to fit everything into a single layer of blocks(the floor I walk on), by hiding ME cables and TE conduits with Facades and Covers:
This way I have more room to build the level underneath the farm(which is most likely going to be partly for livestock).
Next to the greenhouse area I fitted in a max. sized Forestry Multifarm, currently just running Oak trees:
(Haven't been running for a long time as you can see by the Humus having turned into sand. Controlled by ME level emitter).
To end off a little sneak peak of the other wing of the ship where I am making preparations for beekeeping(and a small park area):
have you thought about using ender io conduits for the harvesters? seeing that you can use power, liquid and item conduits in the same block, and ender io having it's own facade system, you could properly hide the conduits/ducts from the harvester. heck, ender io even has AE conduits now so you can run AE cables through the conduits aswell
Yeah I did consider them(still am sort of), but decided a bit to not use it to preserve the challenge of wiring problems behind the scenes. Already making it way too easy with tripple layer separators between floors in some places. They seem awesome, but maybe a bit too easy.have you thought about using ender io conduits for the harvesters? seeing that you can use power, liquid and item conduits in the same block, and ender io having it's own facade system, you could properly hide the conduits/ducts from the harvester. heck, ender io even has AE conduits now so you can run AE cables through the conduits aswell
But yeah you are absolutely right. In this case I might be able to avoid having the itemduct on the side of the harvesters. If the Harvesters recognises the EnderIO item conduits as valid export options.