COFH World Generation User's Manual
This post contains two resources that I hope will prove useful to anyone wanting to make their own modpack. Here I will maintain a guide that covers how to customize ore generation using COFH features and a cheat-sheet that lists the internal block names used by Minecraft to identify special resource blocks found within mods.-------------
External links for those who would like a printable or more easily readable version:
COFH World Generation User's Manual [Google Docs]
Minecraft Internal Ore Names Cheat Sheet [Google Sheets]
-------------
If you see any errors, misinformation, or would just like to contribute then feel free to post a reply to this thread or leave a comment in the Documents!External links for those who would like a printable or more easily readable version:
COFH World Generation User's Manual [Google Docs]
Minecraft Internal Ore Names Cheat Sheet [Google Sheets]
-------------
-------------
More mods will be added to the Internal Ore Names Cheat Sheet when I have time.
Feel free to post ores from mods that aren't yet added here, and I will add them to the Spreadsheet and this post when I get time. Let's keep it just to ores and special worldgen, please!
-------------

COFH World Generation User’s Manual
Shape the world how you will!
COFH World Generation User’s Manual
Shape the world how you will!
This is an introduction and guide for utilizing and customizing the powerful new generation features found in COFH Core for Minecraft 1.7.10.
First you will learn how to understand what you're looking at when editing the necessary files, then you will learn some advanced techniques for absolute control over how your world is made!
Ore! Huah! What is it good for?
The very first thing you may not immediately understand is why exactly you might want to go through the trouble of editing these files instead of just using the defaults. While assuming that the defaults are best is a perfectly sane conclusion on the surface, some knowledge of how generation methods work and how they interact with one another will give you the knowledge necessary to make a more informed decision about whether all of this is necessary for you. What mods you use, how many mods you use, and your play style will all come into play. Other considerations may also be appropriate, such as how many people would be playing on your server or if you would be using a pre-generated world with a border.
Most mods are designed from the standpoint that you should be able to successfully play them when they are the only mod installed. This can cause some overlap when multiple mods that provide their own generation are used at the same time. For example, Thermal Expansion, Tinkers’ Construct, Forestry, and Mekanism all generate Copper and Tin ores. If all of these mods are allowed to generate their resources you will end up with four different versions of each resource! This has some consequences, such as each individual version of the same ore will not stack, and that each resource will be made too abundant because all four mods are generating their resources without regard for what any other mod may be providing.
Get a grip!
Before we get started, the first thing you’ll want to do is get yourself a good text editor. The format of these files is very specific, and having a good text editor with syntax highlighting will make finding the inevitable errors much, much easier. I use Linux, so my favorite is Medit (which is also available for Windows). Another good solution is Notepad++.
These editors are capable of color-coding blocks of text in accordance with the format of the file you’re editing. This means that you will have a much easier time finding missed commas, brackets, etc.

The second thing you’ll want to do is to locate these three files:
- In the minecraft/config/cofh directory:
- CoFHCore.cfg
- In the minecraft/config/cofh/world directory:
- ThermalExpansion-Ores.json
- Vanilla.json
You’ll notice that the file begins with one opening brace { and ends with one closing brace }. The placement of braces { }, brackets [ ], colons, and commas is very specific when editing this file. Pay close attention to them! If your ore generation breaks for any reason chances are good that one of these critical components was accidentally left out or misplaced. These special characters separate the code into blocks of data. As the file is parsed the specific placement of each is how the program will understand how the current value it is looking at should be interpreted.
It may appear daunting at first, but let’s break it down section-by-section and explain what each does. Here is a reference image in which I have trimmed down the entire file into one single ore entry:

You’ll notice, as previously mentioned, that the first character (Line 1) is a single open brace { and the last line (Line 20) is a single close brace }. These are very important and should always be the first and last characters of your file.
Definitions
Here are some definitions for the different elements of the file. References to these definitions from here out will be bolded for visibility and quick reference.
- STRING: A String is a sequence of characters wrapped in double quotation marks. A string may contain any character except a backslash or quotation mark. All text in the image above which is magenta-colored or red-colored is an example of a String.
- VALUE: A Value can be a String, a number, a true, or a false. Any text in the image above which is blue-colored or red-colored is an example of a Value.
- ARRAY: An array is a list of Values surrounded by [ ] (brackets). Each Value in the array is separated by a comma. Lines 13 and lines 15 through 18 are examples of Arrays.
- NAME: A Name is a String that serves the special purpose of defining the meaning of the Value or Array it is paired with. All Names are followed by a colon. Any text in the image above which is magenta-colored is an example of a Name.
- PAIR: A Pair is the combination of a Name and a Value or a Name and an Array. Lines 3 through 20 are each an example of a Pair.
- OBJECT: An Object is a Name preceding a list of Pairs surrounded by { } (braces). Each Pair in the list is separated by a comma. The entirety of lines 2 through 19 is an example of an Object.
Make an Object!
Line 2 is an object that defines an actual resource. This block of information specifies everything about this resource; including what block should spawn for this resource, where the resource should spawn, and how abundant this resource should be. The name for this object is an alias for the resource, which follows the same conventions as a string. In this case it has been named “darkIron.” It is, quite simply, a way to provide a human-readable name for the resource, to make editing the file simpler. The alias you provide for the resource will have no bearing over what the in-game name for the item is. These aliases should be unique; any alias referenced more than once in the file will have its values overwritten by the values assigned to the last instance of it in the file. Each Object should be separated by a comma, except for the very last Object in the list. In the example above there is no comma after the Object’s closing brace (Line 19) because it is the only Object listed in the file.
Give it a Template!
Line 3 is a pair given the name of “template,” and its value can be one of two strings: “uniform” or “normal.” Uniform is the type of template you will most frequently use. It allows a resource equal chance to spawn at any level between the minimum and maximum height. Normal is only used by one type of ore by default: Lapis Lazuli Ore. The normal-type template causes the resource to spawn more frequently at a certain specified depth. More information about this will be covered later, in the section titled “Set how deep it spawns!”
Specify the Block!
Line 4 is a pair given the name of “block,” and its value should be a string containing the internal name that Minecraft uses to identify the desired block for this resource. This internal name is normally hidden from the user; however, there are a few ways to discover it. The most accessible option is to refer to the Minecraft Internal Ore Names Cheat Sheet. Another option would be to press F3+H while playing Minecraft, which will turn on an option that adds internal item names to the mouseover tooltip displayed when hovering your cursor over an item in your inventory.
Line 5 is a pair given the name of “metadata,” and its value should reflect the number used for the metadata on the desired block for this resource.
Restrict the spawn!
Line 6 is a pair given the name of “material,” and its value should be a string containing the internal name of the block you wish the resource to replace when it spawns. In the image above “minecraft:stone” is given as the material, meaning that Stone is the only block which this resource will be allowed to replace. The benefit of providing this restriction is that the resource will not be able to replace any other (possibly more rare) resources.
Set the rarity!
Lines 7 and 8 determine the rarity of the resource. Increasing the numbers makes the resource more abundant and decreasing the numbers makes the resource more rare. The values provided in these lines are not a guarantee; invalid spawn locations will affect how much of the resource is able to be spawned. Examples of invalid spawn location could be that the resource attempted to spawn in dirt when its “material” is restricted to stone, or that the resource tried to generate at y=80 when the world terrain only generated up to y=60.
Line 7 is a pair given the name of “clusterSize,” and its value should be a number greater than 0. The cluster size specifies the maximum number of pieces of this resource that can spawn in one attempt (cluster).
Line 8 is a pair given the name of “numClusters,” and its value should be a number greater than 0. The number of clusters specifies the maximum number of attempts to spawn a cluster in the given height range.
Set how deep it spawns!
Lines 9 and 10 determine the range of depths that the resource is able to spawn in. The minimum height should probably be greater than 2 or 3 so that the world’s Bedrock is not disturbed, but less than the value of the maximum height. The maximum height can be any number greater than the minimum height and less than or equal to world height (256). Setting the maximum very high will not cause ores to spawn floating above the ground; air is an invalid spawn block. These pairs work in conjunction with the “numClusters” pair. If the number of clusters is set to 10, the minimum height set to 5, and the maximum height set to 80, the game will attempt to generate ten clusters randomly scattered throughout the y=5 to y=80 range.
Note that if a resource’s template is set to “normal” instead of “uniform,” these lines should be named “meanHeight” and “maxVariance.” Mean height will specify a preferred depth level for the resource to spawn at, and max variance will specify how much lower or higher from that depth the resource generation is allowed to deviate when it forms a cluster.
Line 9 is a pair given the name of “minHeight,” and its value should be a number greater than 0 and less than the value given for “maxHeight.” The minimum height specifies the lowest depth at which a resource cluster will attempt to be generated. When the value of “template” is set to “normal,” the name of this pair should be changed to “meanHeight,” and its value should be a number greater than 0 and less than or equal to 256. The mean height specifies the preferred depth that this resource will spawn at.
Line 10 is a pair given the name of “maxHeight,” and its value should be a number greater than the value given for “minHeight,” and less than or equal to 256. The maximum height specifies the highest depth at which a resource cluster will attempt to be generated. When the value of “template” is set to “normal,” the name of this pair should be changed to “maxVariance,” and its value should be a number greater than or equal to 0 and less than or equal to 256. The maximum variance specifies how far from the value for “meanHeight” the generation is allowed to deviate when generating clusters.
Retroactively generate it!
Line 11 is a pair given the name of “retrogen,” and its value can be one of two strings: “true” or “false.” Retrogen, or retroactive generation, will allow the game to evaluate chunks that have previously been generated and attempt to spawn new resources which have been added since that chunk was originally generated. This is useful when adding a new resource once you’ve been playing in a world for a while. I recommend that you just leave this set to true at all times; there’s really no need to set it to false.
Make it Biome specific!
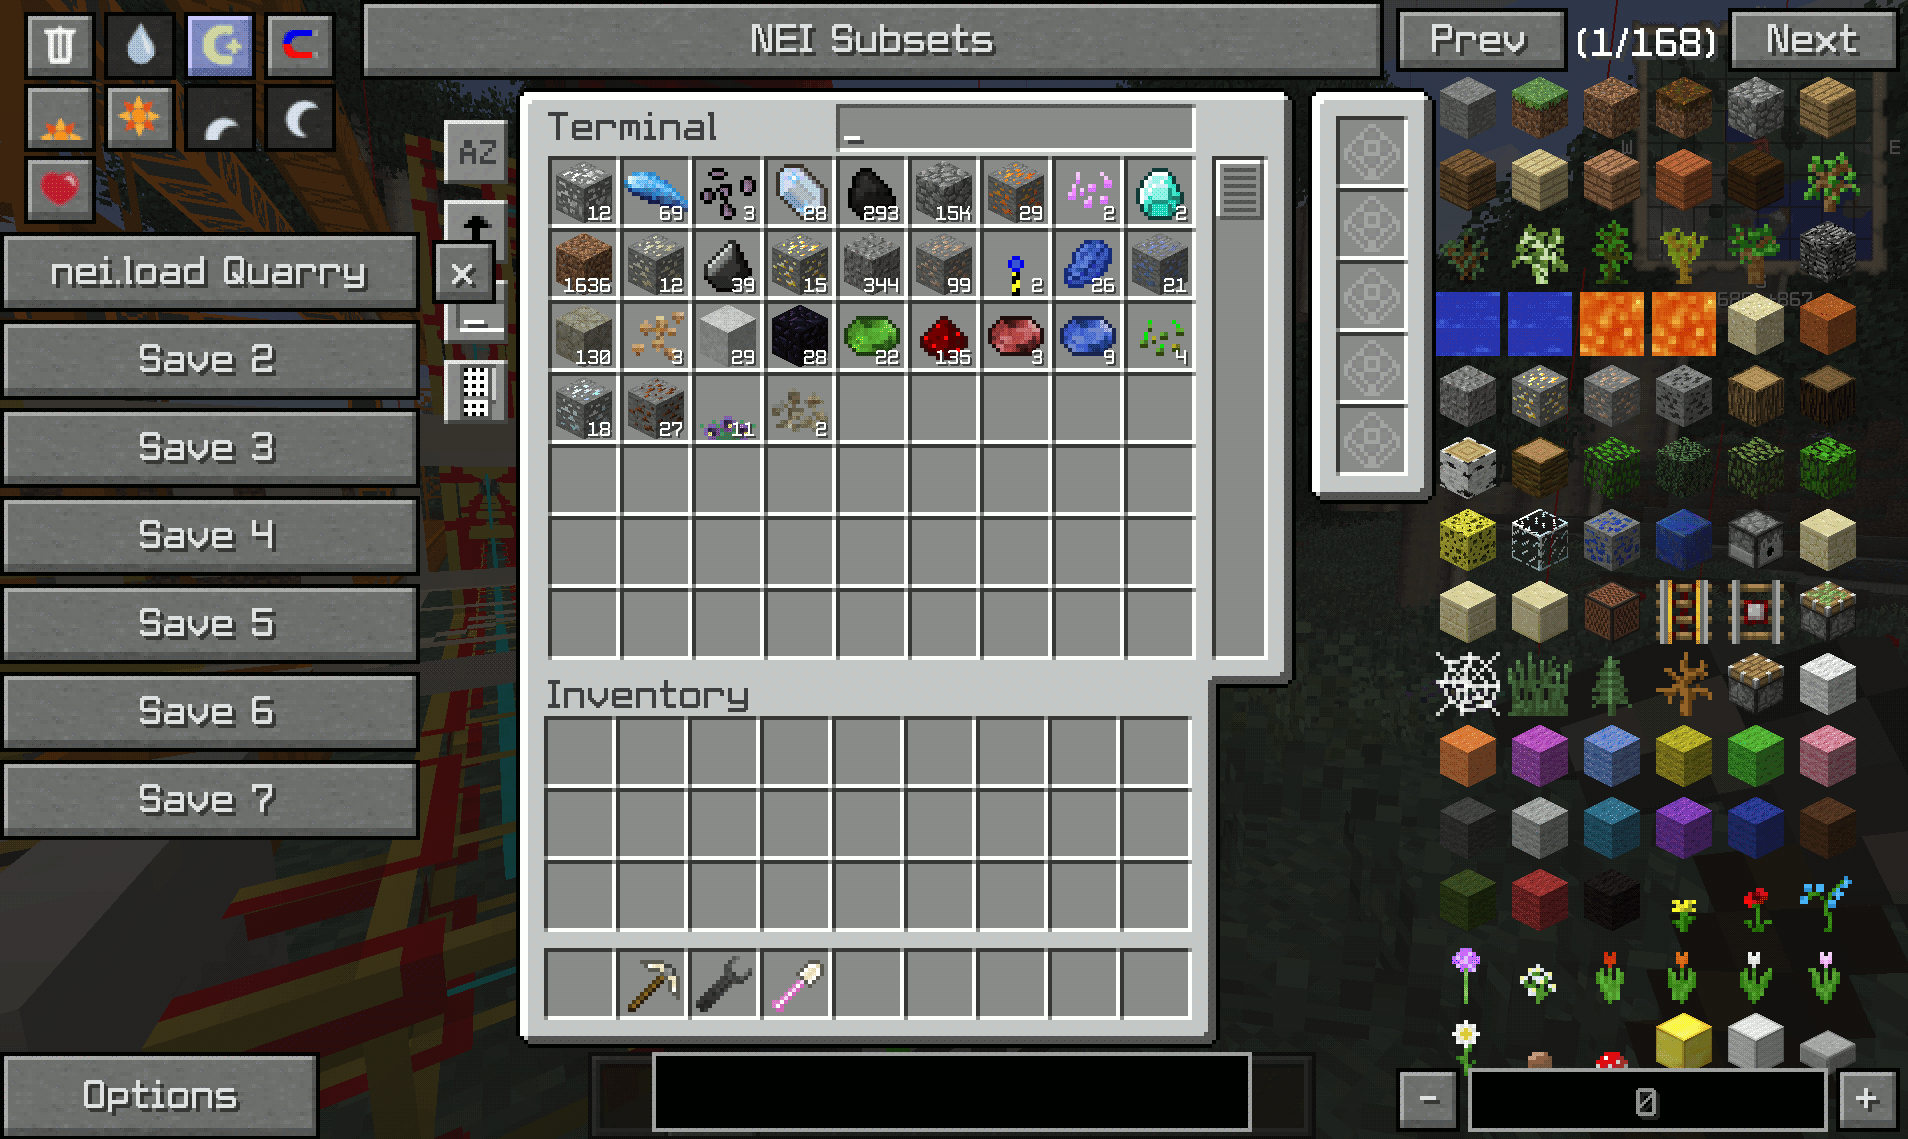
Lines 12 and 13 determine what biomes the resource is allowed to spawn in. Biomes are referred to by their ID number. The availability of biomes and the ID number they are assigned will change depending on what mods are installed. The only way to find this information is to use Not Enough Items (NEI) to create a dump of current biome information. This can be done by opening your inventory, clicking NEI’s “Options” button, clicking “Tools,” clicking “Data Dumps,” and finally clicking the “Dump” button in the row titled “Biomes.” This will create a folder labelled “dumps” in your Minecraft folder, and place a file labelled “biome.csv” inside that new folder. Use a spreadsheet program that can import comma separated value (csv) files, such as OpenOffice Calc, Microsoft Excel, or Google Sheets to view it in an easily-readable format.
Line 12 is a pair given the name of “biomeRestriction,” and its value can be one of three strings: “blacklist,” “whitelist,” or “none.”
Line 13 is a pair given the name of “biomes,” and its value may be formatted as an array. The values it contains should be numbers that reflect desired biome IDs. Each biome ID should be separated by a comma. The purpose of this pair differs according to what value is given to “biomeRestriction.” If “biomeRestriction” is set to “blacklist,” each biome referenced in this pair will be excluded from the generation of this resource. If “biomeRestriction” is set to “whitelist,” each biome referenced in this pair will be included in the generation of this resource. If “biomeRestriction” is set to “none,” the contents of this pair are ignored.
*Note that in the version 3.0.0B3-26 release of CoFH Core, biome specific generation is broken.
Make it Dimension specific!
Lines 14 through 18 determine what dimensions the resource is allowed to spawn in. Dimensions are referred to by their ID number. The availability of dimensions and the ID number they are assigned will change depending on what mods are installed. Below is a chart that lists dimension IDs for various mods according to their default configuration settings.
Line 14 is a pair given the name of “dimensionRestriction,” and its value can be one of three strings: “blacklist,” “whitelist,” or “none.”
Lines 15 through 18 comprise a pair given the name of “dimensions,” and its value may be formatted as an array. The values it contains should be numbers that reflect desired dimension IDs. Each dimension ID should be separated by a comma. The purpose of this pair differs according to what value is given to “dimensionRestriction.” If “dimensionRestriction” is set to “blacklist,” each dimension referenced in this pair will be excluded from the generation of this resource. If “dimensionRestriction” is set to “whitelist,” each dimension referenced in this pair will be included in the generation of this resource. If “dimensionRestriction” is set to “none,” the contents of this pair are ignored.
Advanced Techniques
Now that you’ve got a grasp on what is required to make the most basic generation rules, we can touch on some more in-depth techniques that will allow greater fine-tuning of resource generation.
Weighting
Through the use of a new pair given the name of “weight,” it is possible to spawn clusters that contain several different resources. To take advantage of this, the values of the “block” and “metadata” pairs are formatted as arrays.
Below is an example of one entry that uses the newly introduced weighting system:

When using the weighted system, the “block” pair is formatted as an array. Its values should be a list of strings that contain the internal names that Minecraft uses to identify the blocks for the desired resources. In the example above, the two blocks that will spawn in this resource cluster will be Minecraft Gravel and Tinkers’ Construct Aluminum Gravel Ore.
When using the weighted system, the “metadata” pair is also formatted as an array. Its values should be a list of numbers that correspond to the metadata on the desired blocks for the desired resources. The order of the values here should be listed respectively to the order of the values in the “block” array.
The final requirement to using the weighted system is the inclusion of a new pair given the name of “weight.” The value of this pair is formatted as an array, and should be a list of numbers that set the desired frequency of occurrence for each resource in the cluster. The order of the values here should be given respective to the resources listed in the values for “block” and “metadata.” The numbers given here do not appear to be an actual percent, as providing numbers that give a total which exceeds 100 does not cause errors. It is advised, though, to treat it as such.
What this all means is that, for the example given, each cluster that spawns would contain a total of 15 blocks. 20% of those blocks would be Tinkers’ Construct Aluminum Gravel Ore, and 80% of those blocks would be Minecraft Gravel. Keep in mind, however, that this would be a perfect cluster spawn. The values provided are never a guarantee; invalid spawn locations will affect how much of the resource is able to be spawned.
-------------
Minecraft Internal Ore Names Cheat Sheet
- The spreadsheet currently contains gems, ores, and special worldgen from the following mods:
- Applied Energistics
- Artifice
- Big Reactors
- Biomes O' Plenty
- Chisel
- Factorization
- Forestry
- Mekanism
- Minecraft
- Nether Ores
- Professor Flaxbeard's Wondrous Steam Power
- Project: Red
- Railcraft
- Thaumcraft
- Thermal Expansion
- Tinkers' Construct
-------------
Special thanks to contributors:
-------------
The data from the Minecraft Internal Ore Names Cheat Sheet will no longer be pasted here; it was making the post too long. Please use the Google Docs link at the top of the post.
Last edited:


")