Hello everyone! This thread is for all the hotshots who want to make their own modpack! There are many guides out there but I have found few that give you the needed files and folders to make this as easy as filling in the blanks. I will go over how to do these things yourself but if you have trouble with a particular thing, I will try and make that portion downloadable for your ease.
Lets get started now!
Some quick terminology:
Modpack: A modpack is a collection of 5 or more mods that is in a format easy to install. Why make a modpack? Modding your own client can be difficult and very troublesome for some people and this can be a great problem for modded servers. Modpacks allow for users to very easily install the same mods and configs the server has.
Forge Mod Loader: Forge Mod Loader (Commonly referred to as FML or just Forge) is the software that actually makes modding minecraft possible. Without it mods would be very difficult to install and to make.
Archive: Archiving is compressing or zipping files and folders into smaller formats. Archiving is absolutely needed to make a modpack.
Software you need!
WinRar Archiver. This works very well and I have not had a single issue with this for the past 5 months.
http://www.rarlab.com/download.htm
I trust this site but if you are uncomfortable with it then you may use any archiving program you wish. Just be aware that some steps will be different and I will not be able to help you with a program I do not know myself.
If you are using a MAC, it is suggested to use The Unarchiver.
-(Jyric_Qaewyn)
MultiMC. This is a program that lets you have multiple versions of minecraft used mostly for having multiple modded clients.
http://www.minecraftforum.net/topic/1000645-multimc-43-windows-linux-mac/
Windows OS. Yes it is slightly different for a Mac, no I do not know in what ways and how to compensate. I don’t own a Mac. If a Mac/Linux user know where things would be different, please say so and I will add those alterations to this post as I want this to be a universal guide.
If at any point somthing is changed due to user input, they will be mentioned by a
"-(username)"
and I hope you thank them for that step!
It is suggested to get permission before setting up your modpack as if you cannot get permission for a mod, then why would you want to spend an hour trying to get it to play nice with other mods?
-(Jyric_Qaewyn)
Step one, MultiMC.
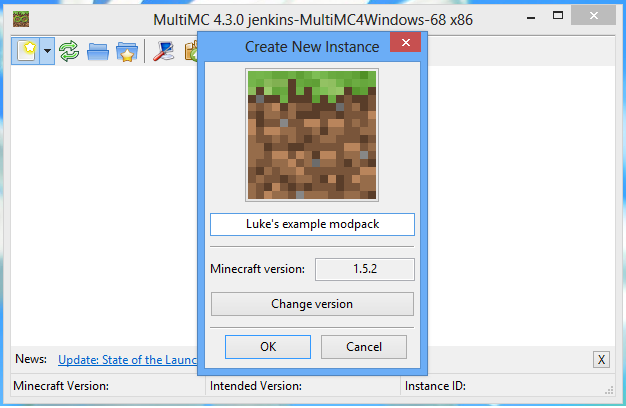
Download and run MultiMC then install it to the location of your chosing. I installed mine in a folder on my desktop for easy access. In the top left of the window you will see a blank page with a star. Clicking it will bring you to this window.
Name it what you want and select the minecraft version you wish to use. For this example, I will use 1.5.2.

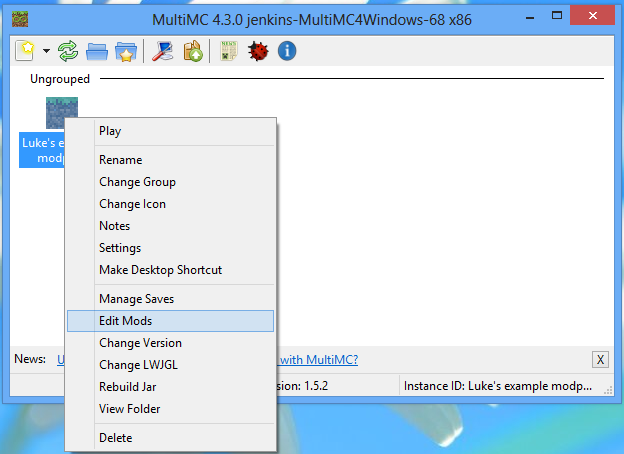
Next up you will press OK and get a small Icon in the first window titled what ever you named it. For me it is Luke's example modpack. Right click on it and select "Edit Mods".

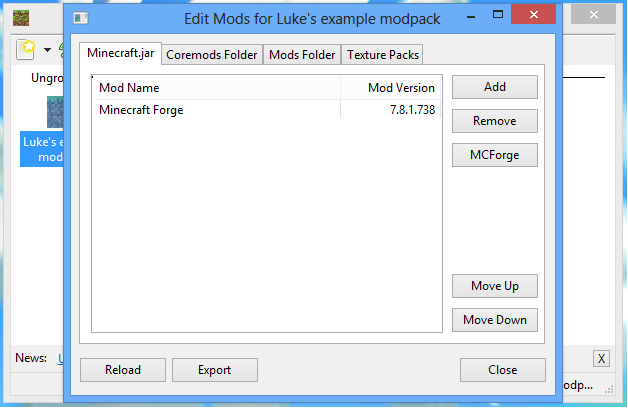
Next you will need to get a copy of ForgeModLoader. Now click "MCForge" and select the latest version of forge for the version of minecraft you are using. For instance, if I am making a pack for 1.2.5 I would go to Forge 3.3.7 Minecraft 1.2.5 and download the latest universal version.
For me with my 1.5.2 version, 7.8.1.738 will do the trick.

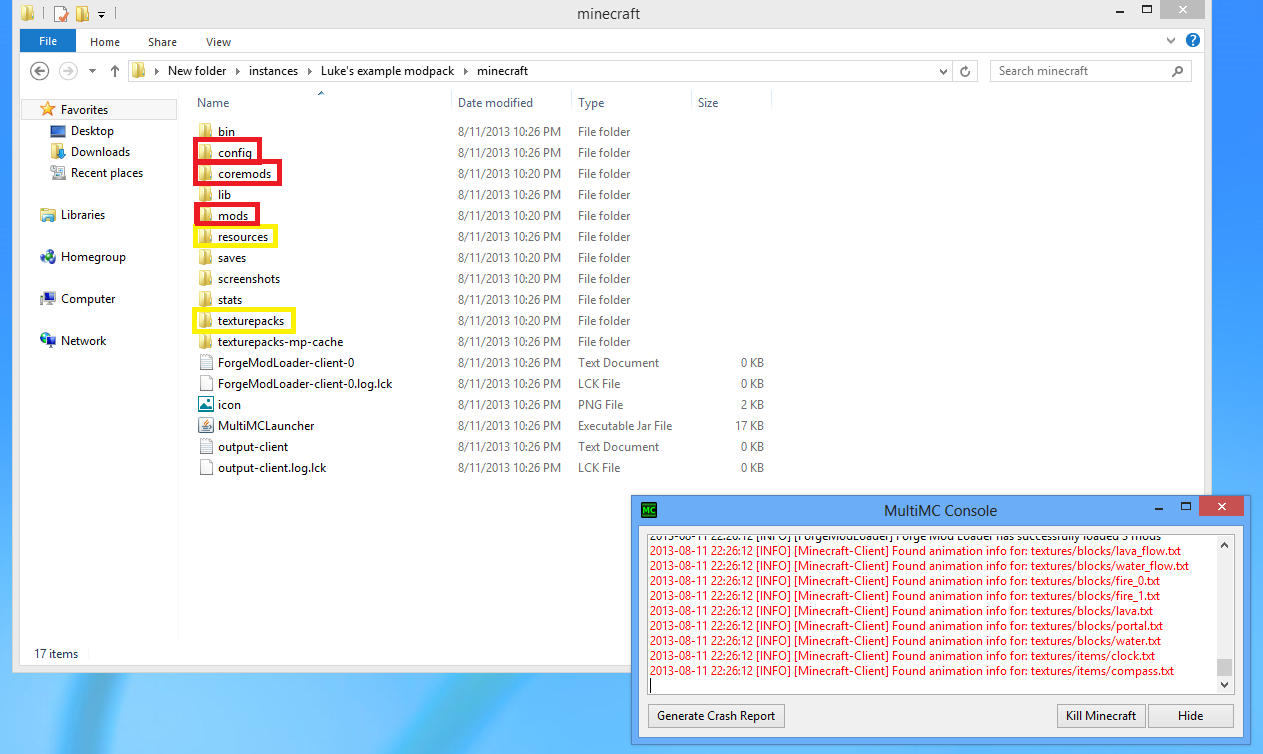
Now press "Close" and double click on your modpack's icon in the first window. You will be presented with a log in screen. Log in and let minecraft launch fully, do not exit out mid launch. Once it does fully launch, close out of minecraft and open the folder where you saved MultiMC. If you forget where you installed it, right click on your modpack's icon and select "View Folder". Now go into the sub folder called "instances" then into your modpack's folder and then into the "minecraft" folder. It should now look like this but without the highlights.
FOR MAC: On mac you'll need to right click on MultiMC and click on Show Package Contents and then open Contents and Resources to access the instances folder.
-(Jyric_Qaewyn)

The red highlighted folders are the ones that are important and we will use a lot of. The yellow ones are optional if you wish to include resources/texture packs. Now we build your modpack!
Next thing you need to do is add mods to the mods folder. This is as easy as downloading the mods you want and putting them into the mods or coremods folders. Look on the mod page's install instructions to see what mods need to go in what folder. I suggest only adding two or three mods at a time and then launching the minecraft instance to test for errors.
Fixing ID errors!
If you crash, it was probably due to an ID conflict.
To help fix this, we are going to get an NEI Item ID Block dump! I got this from http://forums.technicpack.net/threads/how-to-create-and-use-a-block-id-dump.10289/and I thank Yuriy very much for this little guide!!! If you did crash, remove the last mod you put in and launch the game (Without crashing hopefully) and follow this guide. Since we only just added two mods, we are going to remove one and launch with the other. It does not matter which.
[Guide Stealing]
To create the block ID dump, launch Technic and go into a world.
Go into your inventory and into the options for NEI (bottom left corner).
http://i.imgur.com/u6jGb.jpg
Then go to "Block/Item ID Settings".
http://i.imgur.com/sU0zg.png
Then create the actual block ID dump by clicking "Dump ID Map Now"
http://i.imgur.com/fzIsE.png
Once you complete this process, you will have a text document in your "%appdata%/Roaming/.techniclauncher/" Technic or Tekkit directory named "IDMap dump [date at time].txt"
[/Guide Stealing]
Special Note: BlockID max with forge is 4095. The ItemID max is in the 21000s. Mods will not come with different values so you have to make sure that when your editing ID's, you don't go over 4095 for placable blocks, and 21000 for an item.
Now we are going to open the text file and be presented with a list of taken and untaken IDs. Minimise that for now and open the FML error report found in the tekkit lite folder near the bottom. Scroll down to the bottom and look for a section of code thats out of place. They normally show up as wider areas of text. Look for the part of that that says something like: “block ID xxxxx is already taken by Buildcraft.” Go into the config of the offending mod and change that ID to somthing available. You can tell what's available with the ID dump we just did.
Continue to add your mods launching the pack every time and fixing ID issues as they come. Remember what configs you had to change to prevent having to add every single one.
THIS WILL TAKE A LONG TIME!!!! PLEASE DO NOT WHINE ABOUT IT BEING SO LONG!!
This is the longest way but eliminates the problem of not knowing what crashed your game. It is also a very good way to learn how to fix problems as they come.
Once you are satisfied with your pack, delete everything in the minecraft folder besides mods, coremods, and the config folder (Also leave behind the texture packs and/or resources folder if you added content to them). Once they are gone, go up one folder level so that the only files are "instances" and "minecraft". Ignore the other files. Now highlight them both by Ctrl + leftclicking them and right click to select “add to archive” and save the file as a .zip and the name of your pack.
For large packs (60+ mods) make sure to set the “Compression method” to “Best” or the mods may become corrupted.
Story on this:
When I was making a pack with 95 mods, I did not do this and spent 7 hours trying to figure out what had gone wrong. In a last ditch effort before I threw my computer out the window I did this and it worked the first try.
Congratulations! You are 5% finished!! Next up is to get permission from all the mod authors. I don't think I need to make up a guide for that however. Once you have them, refer to THIS for instructions on submitting your modpack to the officials with FTB.
Before giving up...
Ask yourself the following:
How many times did you try? What archiver did you use? Did you set the compression method to best? Did you set it the compression format to .zip or did you set it to .rar?
If you answered "no" or "I don't know" to ANY of those then you need to take it to the top and try again before posting your problem.
Adding pre-installed servers!
Making your server pre-installed is a major plus for anyone who wants to use your pack on your server!
To do so, go into any old pack and clear all the servers you have saved. Now enter your server ip and name it the name of your server. Exit out and go into the modpack folder and look for the server.dat. Copy that and add it to your minecraft folder as a separate file. You should now have mods, coremods, config, and server.dat in your minecraft folder. Now when a user downloads the pack, the server will come pre-installed!
If you have any questions, comments, or concerns, do not hesitate to ask them! Just make sure you followed these steps to the letter before saying it doesn't work.
Cheers!
Lets get started now!
Some quick terminology:
Modpack: A modpack is a collection of 5 or more mods that is in a format easy to install. Why make a modpack? Modding your own client can be difficult and very troublesome for some people and this can be a great problem for modded servers. Modpacks allow for users to very easily install the same mods and configs the server has.
Forge Mod Loader: Forge Mod Loader (Commonly referred to as FML or just Forge) is the software that actually makes modding minecraft possible. Without it mods would be very difficult to install and to make.
Archive: Archiving is compressing or zipping files and folders into smaller formats. Archiving is absolutely needed to make a modpack.
Software you need!
WinRar Archiver. This works very well and I have not had a single issue with this for the past 5 months.
http://www.rarlab.com/download.htm
I trust this site but if you are uncomfortable with it then you may use any archiving program you wish. Just be aware that some steps will be different and I will not be able to help you with a program I do not know myself.
If you are using a MAC, it is suggested to use The Unarchiver.
-(Jyric_Qaewyn)
MultiMC. This is a program that lets you have multiple versions of minecraft used mostly for having multiple modded clients.
http://www.minecraftforum.net/topic/1000645-multimc-43-windows-linux-mac/
Windows OS. Yes it is slightly different for a Mac, no I do not know in what ways and how to compensate. I don’t own a Mac. If a Mac/Linux user know where things would be different, please say so and I will add those alterations to this post as I want this to be a universal guide.
If at any point somthing is changed due to user input, they will be mentioned by a
"-(username)"
and I hope you thank them for that step!
It is suggested to get permission before setting up your modpack as if you cannot get permission for a mod, then why would you want to spend an hour trying to get it to play nice with other mods?
-(Jyric_Qaewyn)
Step one, MultiMC.
Download and run MultiMC then install it to the location of your chosing. I installed mine in a folder on my desktop for easy access. In the top left of the window you will see a blank page with a star. Clicking it will bring you to this window.
Name it what you want and select the minecraft version you wish to use. For this example, I will use 1.5.2.
Next up you will press OK and get a small Icon in the first window titled what ever you named it. For me it is Luke's example modpack. Right click on it and select "Edit Mods".
Next you will need to get a copy of ForgeModLoader. Now click "MCForge" and select the latest version of forge for the version of minecraft you are using. For instance, if I am making a pack for 1.2.5 I would go to Forge 3.3.7 Minecraft 1.2.5 and download the latest universal version.
For me with my 1.5.2 version, 7.8.1.738 will do the trick.
Now press "Close" and double click on your modpack's icon in the first window. You will be presented with a log in screen. Log in and let minecraft launch fully, do not exit out mid launch. Once it does fully launch, close out of minecraft and open the folder where you saved MultiMC. If you forget where you installed it, right click on your modpack's icon and select "View Folder". Now go into the sub folder called "instances" then into your modpack's folder and then into the "minecraft" folder. It should now look like this but without the highlights.
FOR MAC: On mac you'll need to right click on MultiMC and click on Show Package Contents and then open Contents and Resources to access the instances folder.
-(Jyric_Qaewyn)
The red highlighted folders are the ones that are important and we will use a lot of. The yellow ones are optional if you wish to include resources/texture packs. Now we build your modpack!
Next thing you need to do is add mods to the mods folder. This is as easy as downloading the mods you want and putting them into the mods or coremods folders. Look on the mod page's install instructions to see what mods need to go in what folder. I suggest only adding two or three mods at a time and then launching the minecraft instance to test for errors.
Fixing ID errors!
If you crash, it was probably due to an ID conflict.
To help fix this, we are going to get an NEI Item ID Block dump! I got this from http://forums.technicpack.net/threads/how-to-create-and-use-a-block-id-dump.10289/and I thank Yuriy very much for this little guide!!! If you did crash, remove the last mod you put in and launch the game (Without crashing hopefully) and follow this guide. Since we only just added two mods, we are going to remove one and launch with the other. It does not matter which.
[Guide Stealing]
To create the block ID dump, launch Technic and go into a world.
Go into your inventory and into the options for NEI (bottom left corner).
http://i.imgur.com/u6jGb.jpg
Then go to "Block/Item ID Settings".
http://i.imgur.com/sU0zg.png
Then create the actual block ID dump by clicking "Dump ID Map Now"
http://i.imgur.com/fzIsE.png
Once you complete this process, you will have a text document in your "%appdata%/Roaming/.techniclauncher/" Technic or Tekkit directory named "IDMap dump [date at time].txt"
[/Guide Stealing]
Special Note: BlockID max with forge is 4095. The ItemID max is in the 21000s. Mods will not come with different values so you have to make sure that when your editing ID's, you don't go over 4095 for placable blocks, and 21000 for an item.
Now we are going to open the text file and be presented with a list of taken and untaken IDs. Minimise that for now and open the FML error report found in the tekkit lite folder near the bottom. Scroll down to the bottom and look for a section of code thats out of place. They normally show up as wider areas of text. Look for the part of that that says something like: “block ID xxxxx is already taken by Buildcraft.” Go into the config of the offending mod and change that ID to somthing available. You can tell what's available with the ID dump we just did.
Continue to add your mods launching the pack every time and fixing ID issues as they come. Remember what configs you had to change to prevent having to add every single one.
THIS WILL TAKE A LONG TIME!!!! PLEASE DO NOT WHINE ABOUT IT BEING SO LONG!!
This is the longest way but eliminates the problem of not knowing what crashed your game. It is also a very good way to learn how to fix problems as they come.
Once you are satisfied with your pack, delete everything in the minecraft folder besides mods, coremods, and the config folder (Also leave behind the texture packs and/or resources folder if you added content to them). Once they are gone, go up one folder level so that the only files are "instances" and "minecraft". Ignore the other files. Now highlight them both by Ctrl + leftclicking them and right click to select “add to archive” and save the file as a .zip and the name of your pack.
For large packs (60+ mods) make sure to set the “Compression method” to “Best” or the mods may become corrupted.
Story on this:
When I was making a pack with 95 mods, I did not do this and spent 7 hours trying to figure out what had gone wrong. In a last ditch effort before I threw my computer out the window I did this and it worked the first try.
Congratulations! You are 5% finished!! Next up is to get permission from all the mod authors. I don't think I need to make up a guide for that however. Once you have them, refer to THIS for instructions on submitting your modpack to the officials with FTB.
Before giving up...
Ask yourself the following:
How many times did you try? What archiver did you use? Did you set the compression method to best? Did you set it the compression format to .zip or did you set it to .rar?
If you answered "no" or "I don't know" to ANY of those then you need to take it to the top and try again before posting your problem.
Adding pre-installed servers!
Making your server pre-installed is a major plus for anyone who wants to use your pack on your server!
To do so, go into any old pack and clear all the servers you have saved. Now enter your server ip and name it the name of your server. Exit out and go into the modpack folder and look for the server.dat. Copy that and add it to your minecraft folder as a separate file. You should now have mods, coremods, config, and server.dat in your minecraft folder. Now when a user downloads the pack, the server will come pre-installed!
If you have any questions, comments, or concerns, do not hesitate to ask them! Just make sure you followed these steps to the letter before saying it doesn't work.
Cheers!

