Initial Entry
In order to begin Blood Magic, it is recommended you have a few valuable materials lying around.The first block we will create is the Blood Altar, which is used for creating a large amount of the items needed throughout the mod. Put this in a safe place, as you will not be capable of too much fighting (or any, for that matter) when you begin work. Now that that's done, you need a way to get blood into your altar for manipulation. To this end, craft yourself a Sacrificial Knife / Orb. Each right click of this will put a mere 200 LP into your altar at the cost of a single heart. Now, before you go and start filling up your altar, remember that it has a cap of 10,000 LP, and that you will need either a large amount of food or some way to speed up your regeneration process.
So, you've found out how to generate LP, but now want to store it. In order to do this, grab yourself a diamond and 2,000 LP in an altar. Toss your diamond in, and watch it carefully. See those particles? That shows that your altar is consuming the available LP. If it turns into any color other than red, you're losing progress due to a lack of LP. Watch carefully for this! Once your diamond is done absorbing the LP, there will be a burst of particles, and your new Weak Blood Orb will be sitting in the altar, ready to store all the LP you can throw at it! (Up to 5,000 for this tier) In order to do this, you must first right click with the orb in your hand, binding it to your personal LP network. From here, you can either continue right clicking to donate some of your life to your network, or you can place the orb back into the altar and begin using your knife.
Now you're probably beginning to wonder how to tell just what your storage levels are. To answer this question, get yourself a piece of smooth stone and toss it into your altar with about 1,000 LP. This will create a blank slate, which you can use with your Weak Blood Orb to create a Divination Sigil (Don't worry, the blood orb is returned). Just like with most Blood Magic items, right click to bind it to yourself. This sigil will now allow you to see how much LP is in both your network and your altar. A right click to the altar will show how much it contains, while a right click elsewhere will show how much is in your network. The next two sigils you can make are the Water Sigil and Lava Sigil. These will place a single source block of their respective liquid, for 100 (Water) and 1000 (Lava) LP. You may have noticed that the Lava Sigil takes a Lava Crystal, and are now wondering what it can do for you. Go ahead and craft one, bind it to yourself, and toss it into a furnace with a few pieces of cobble (Make sure your network has some LP before you do this). This crystal acts as a fuel source, much like coal, but at the cost of 25 LP per smelt.
Using your new-found powers of the Lava Crystal (Or with another source, if you insist on doing it the old way
") ), smelt up some more smooth stone for rune creation. These Blank Slates can be used in a crafting table to create runes, which will be used to advance your altar's tier. The first tier is the altar block itself, with the second tier requiring the altar and eight Blood Runes, with the runes being placed one level below the altar around it. Do note that Speed Runes can also be used in place of regular runes, and will do what its name implies. The Speed Runes increase the speed at which the altar performs actions by 20% (additively).
), smelt up some more smooth stone for rune creation. These Blank Slates can be used in a crafting table to create runes, which will be used to advance your altar's tier. The first tier is the altar block itself, with the second tier requiring the altar and eight Blood Runes, with the runes being placed one level below the altar around it. Do note that Speed Runes can also be used in place of regular runes, and will do what its name implies. The Speed Runes increase the speed at which the altar performs actions by 20% (additively).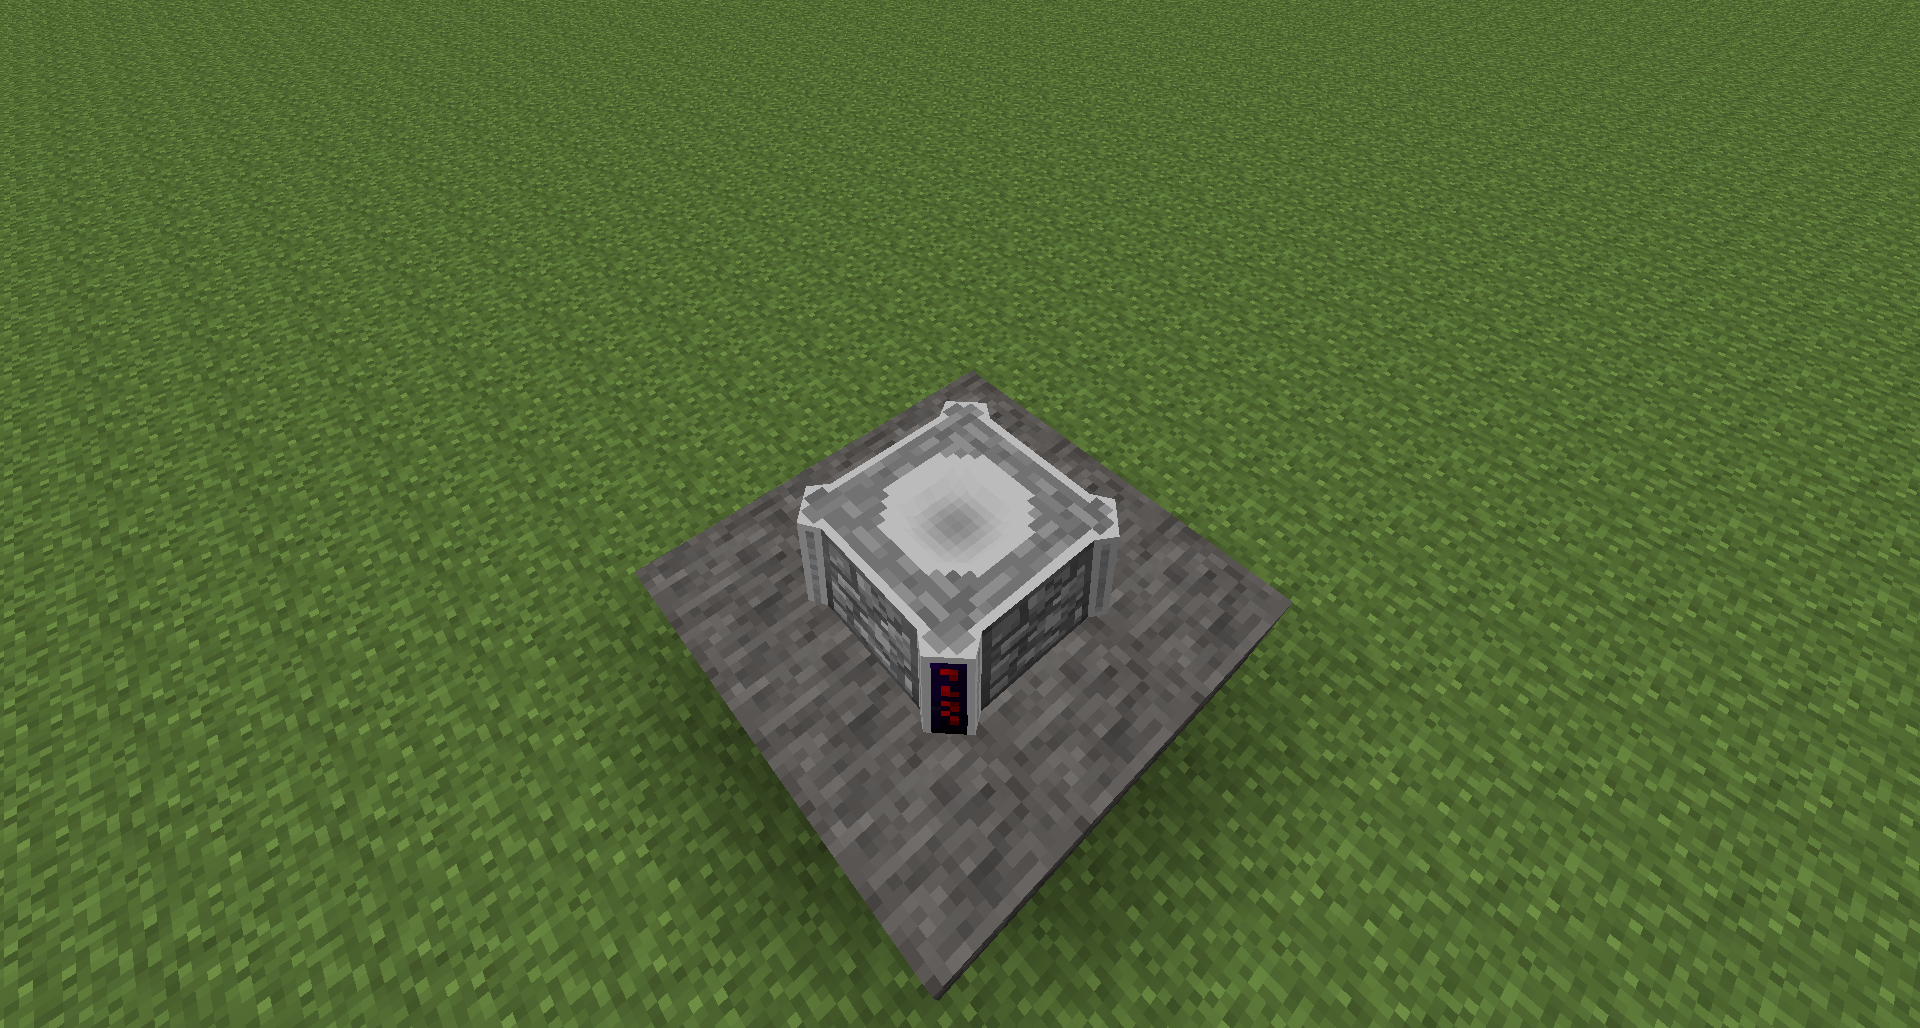
Increased Sacrifice
With a new tier altar comes a new blood orb. This one, however, requires an elusive emerald and 5,000 LP in an altar. This fancy new Apprentice Blood Orb you just received will increase your storage to 25,000 LP, as well as unlock a few additional crafting recipes.
If you're lacking in increased regeneration, you're probably getting annoyed with the large amount of downtime there is when filling your altar. Now that you're at the second tier, you can create some more advanced runes, specifically the Rune of Self-Sacrifice and the Rune of Sacrifice. These runes require Reinforced Slates to be created, which require a total of 3,000 LP per smooth stone in an altar. You can also place any extra Blank Slates into the altar with 2,000 LP to get Reinforced Slates. Now, the Rune of Self-Sacrifice increases the amount of LP you receive per heart when using the Sacrificial Knife by 20 LP per rune (Credit: @James_Grimm), while the Rune of Sacrifice increases the total amount of LP you receive when sacrificing an entity by 10% (additively).
Dirty Deeds (Done Dirt Cheap)
I've made mention of sacrificing something other than yourself, now it's time to go into detail. If this is the way you've chosen to generate LP, grab yourself an Iron Sword and toss it into your altar with 3,000 LP and watch the magic happen. When it's done, grab your shiny new Dagger of Sacrifice and go find some entities to poke with it.
There are different entities you can sacrifice, each with its own LP values. All entities that can be sacrificed, if they are close enough to the altar, will be instantly killed, and all essence will be absorbed. Babies cannot be sacrificed to the altar, however. Below are the LP values for each entity:
- Animals (Cows, sheep, etc.) = 250 LP
- Hostile Mobs (Creepers, zombies, etc.) = 500 LP
- Villagers = 2,000 LP
New Toys!
Now that you have access to this new tier and set of slates, you can make some new sigils. Having liquid problems? Create a Void Sigil! It magically removes any liquid blocks at the cost of 50 LP and the liquid itself.
Ever wanted to fly, without needing special armor? The Air Sigil is for you. This allows you to fly in the direction you are facing at the cost of 50 LP per click. Be warned though, falling is hazardous to your health.
The vanilla enchanting system isn't good, and that's no secret. So rather than fool with an annoying system for your pickaxe, grab yourself a Sigil of the Fast Miner. Activation (and every 10 seconds) will draw 100 LP from your network in return for an increased mining speed.
For those who enjoy large, manual farms and can't stand dealing with bone meal, the Sigil of the Green Grove has you covered. It has two uses, the first being a constant, passive effect. As you move around with the sigil activated, it will send additional growth ticks to plants, speeding their growing progress. The second effect is that it is able to act like bone meal, but at the cost of LP.
Even More Storage
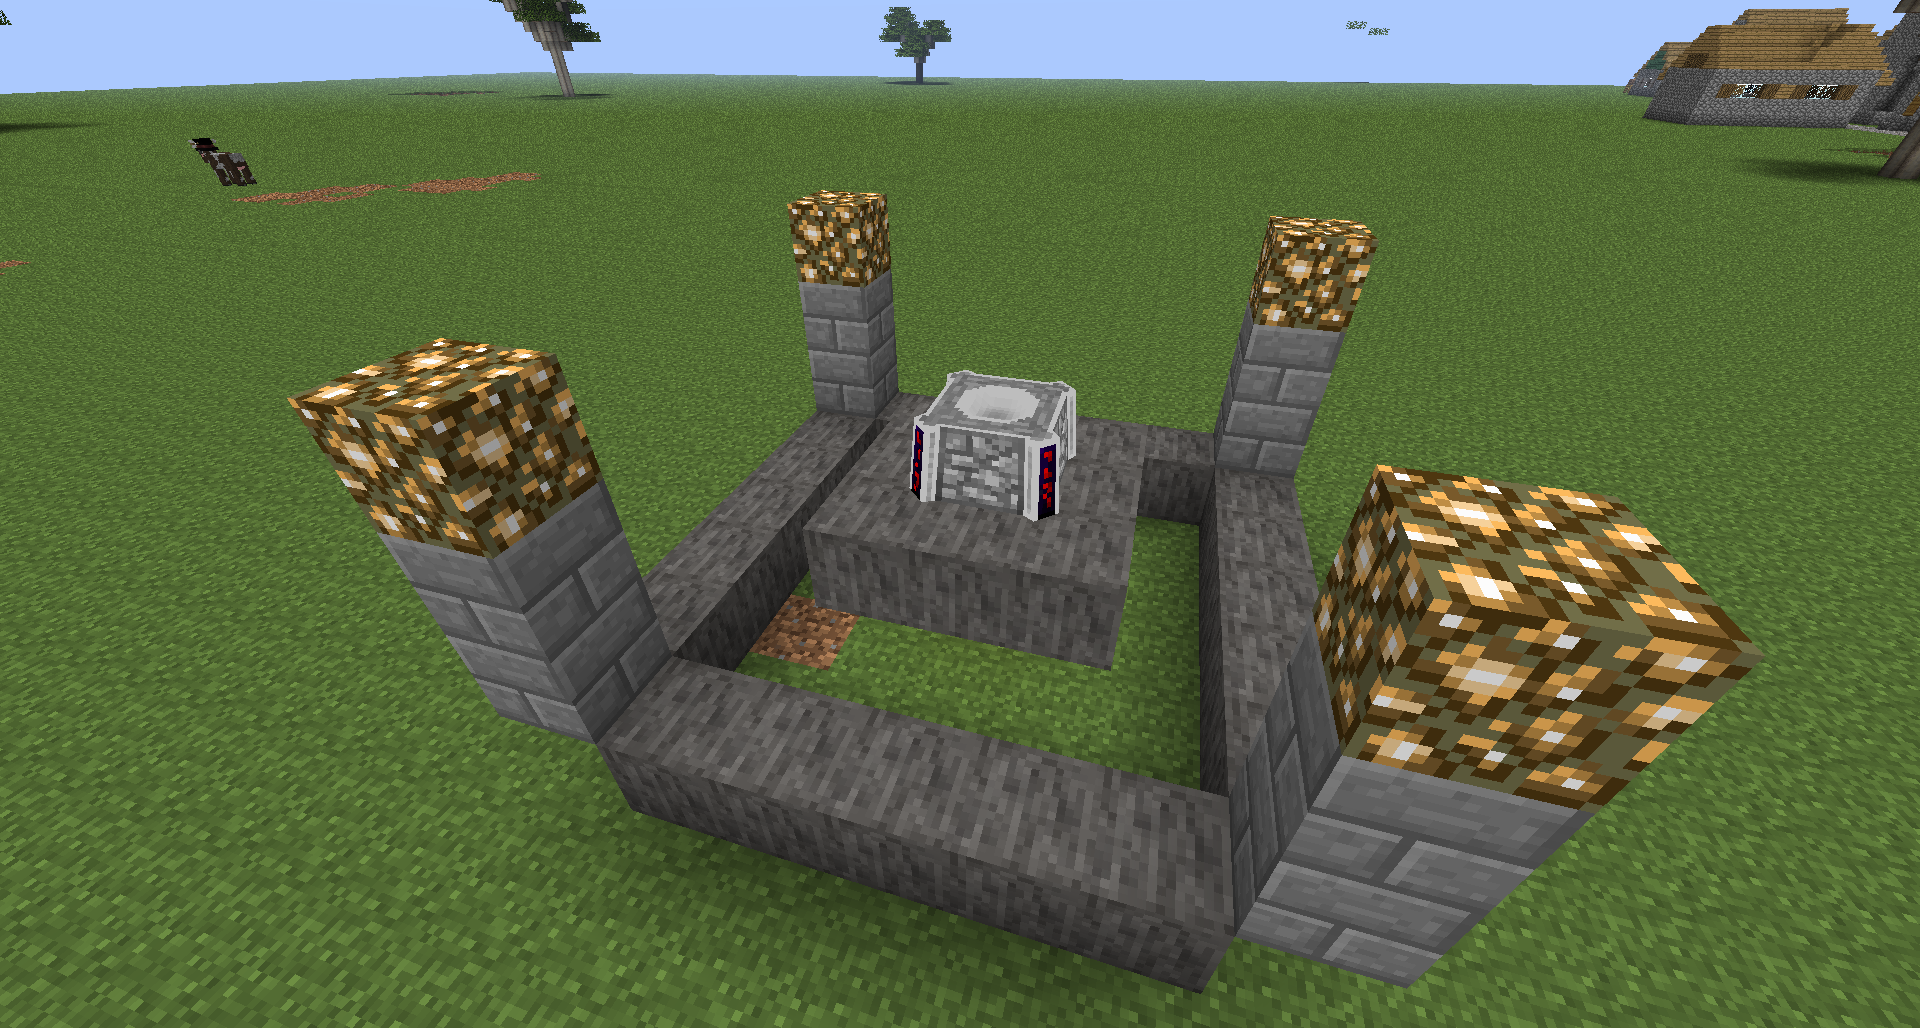
So the second tier altar was helpful, but you want more power. Grab yourself twenty additional runes of any kind, and four blocks of glowstone. Now, go out one additional block on each side, and down one. Place five runes per side, and build a two tall pillar of whatever material you wish, and cap it with glowstone. You now have access to a tier 3 altar. Grab your Divination Sigil and give the altar a whack and see what it says, just to be safe.
As I said earlier, each altar gives a new blood orb. This one requires a block of gold and 40,000 LP. This is four times as much as the altar can hold, so be prepared for this! After successfully creating your new Magician’s Blood Orb, bind it as normal, and you will have access to 150,000 LP storage in your network, as well as some additional treats.
The first of the new toys you get are two additional runes, the Rune of Augmented Capacity and the Rune of Dislocation. The Rune of Augmented Capacity will increase your altar's storage by 1,500 LP (Also known as 1.5 buckets) per rune, while the Rune of Dislocation speeds up the process of adding and removing fluids by 20% (multiplicative). This means you can setup piping networks and have them run much faster than previously possible. In order to create these runes, you need to create Imbued Slates, which will set you back 10,000 LP per slate.
More Sigils!
Lava has always been a problem with mining straight down. A solution to that problem is the Sigil of Elemental Affinity. This sigil, when active, will consume 200 LP every 10 seconds in return for water breathing, lava immunity, and fall damage negation. Use in conjunction with the Air Sigil to zip around like a drunk humming bird.
Should you have created every sigil so far, you'll realize they take up quite a bit of space. Craft yourself a Sigil of Holding, and shift-right click with it to find another sigil in your inventory, which will bind it to this Sigil of Holding, freeing up inventory slots. To use the held sigil, simply right click. To cycle through held sigils, a simple shift-right click will do.
The Sigil of Magnetism is your standard item magnet, collecting everything around it in a five block radius.
Remember that Ars Magica light spell? Well, Blood Magic has something very similar with the Sigil of the Blood Lamp. This sigil allows you to both place and throw light sources where you wish. Now you can light your caves with blood!
For those that need a portable platform, the Sigil of the Phantom Bridge is for you! Once activated, the bridge can be called when falling by attempting to sneak. Once summoned, the bridge can easily be destroyed by a single punch, and can even be replaced with blocks. Sneaking will cause the bridge to move down one block. This only works on newly formed bridge blocks; all current blocks will remain at their current height. The bridge will also despawn over time, so no need to worry about cleaning it up.
Ritual Preparation
Your advance through the “tech tree” is now limited. In order to continue with Blood Magic, you need to get your hands on a Bound Blade. Easier said than done, as this means you need to get into rituals (which are rather easy). To get started with rituals, let’s make the Elemental Inks that are used to define what runes are to be used. To do this, take obsidian, a lapis block, a ghast tear, and a magma cream and toss them into an altar with about 1,000 LP each. This will get you an Elemental Ink for earth, water, air, and fire.
At this point, you have the choice of either making a Ritual Diviner, or manually creating the rituals. Regardless of your choice, you will still need a Master Ritual Stone, and the required number of Ritual Stones to create a ritual. Should you choose the Ritual Diviner, you should notice that there are two listed in NEI. At this point, you can only create one, as the other requires a tier 4 altar.
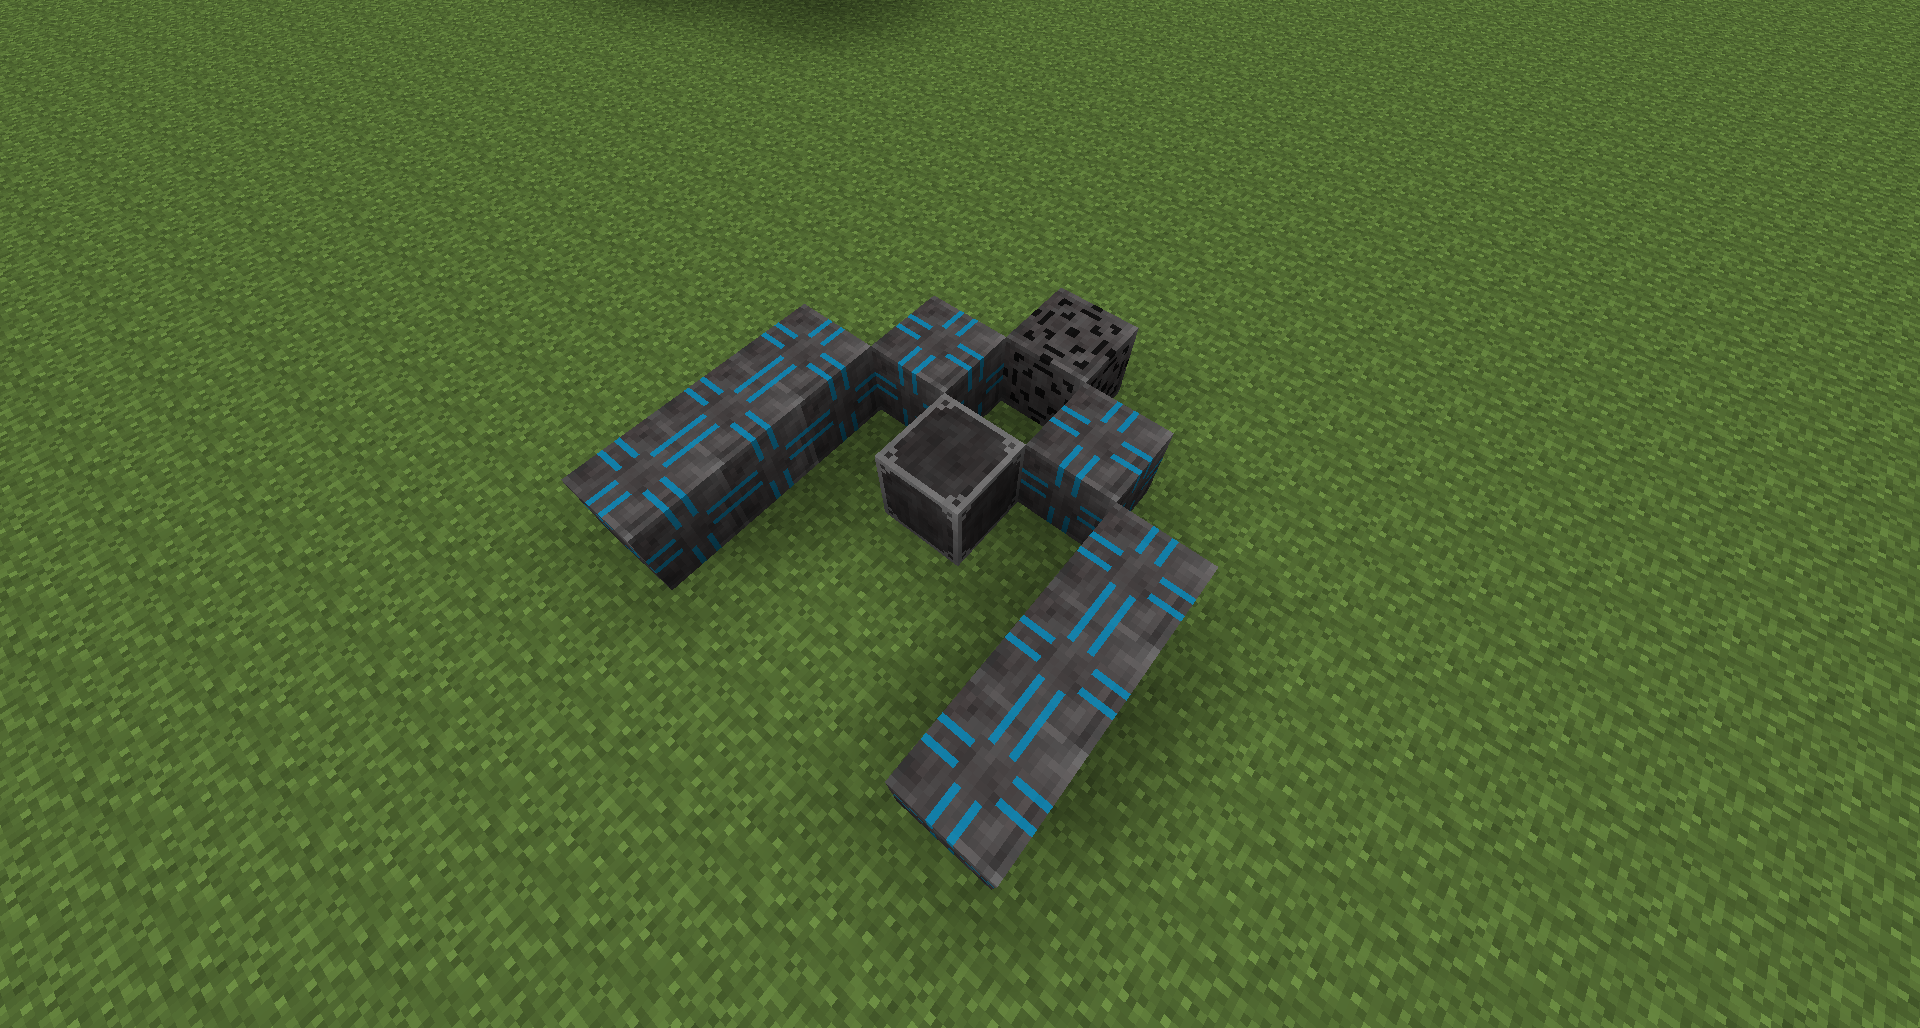
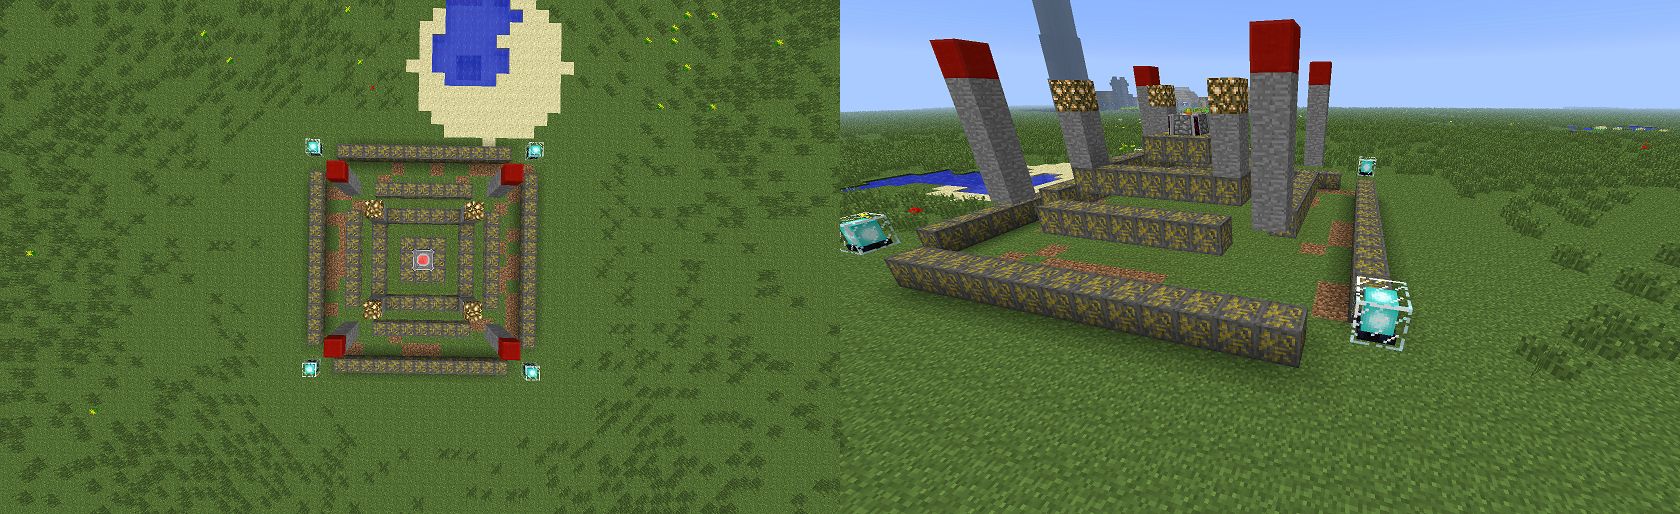
So you have your Master Ritual Stone, several Ritual Stones, and your Elemental Inks (or Ritual Diviner). In order to use them, you need a Weak Activation Crystal. Grab a Lava Crystal, and throw it into the altar with 10,000 LP to create this Crystal. Now, head to a location you want your Ritual of Binding to be at (It’s a 9x9 sized multiblock). Make sure you have cleared some space for the ritual, as the stones cannot be placed if there's anything other than air where they need to go if using the Diviner (Credit to @hiroshi42 for reminding me of this!). Place down your Master Ritual Stone, and hit it with your Ritual Diviner until there's no more particles. Your structure is then complete. Should you be doing this manually, refer to the below picture for how it should appear.
As a warning, snow can cause issues with both ritual placement and ritual use, so keep your ritual areas clear of any possible obstructions. (Credit to SawBlade for this!)
Binding Contracts
The Ritual of Binding is an impressive ritual, simply due to its products. Grab yourself a diamond sword, and head to the Master Ritual Stone. Smack it with your Weak Activation Crystal, and throw your diamond sword at it. Now, quickly put out the fire around the center as it can destroy the item when it is done, and begin to dodge lightning until the ritual is complete. When it finishes, retrieve your newly created Bound Blade from the ground somewhere around the ritual site. Then, just shift-right click to activate (and de-activate) the blade.
Each diamond tool (except the hoe) has a bound version you can create through the same method. Have caution with these tools! A single, accidental right click can clear your base out! For example, right clicking with an active Bound Pickaxe will clear a very large area of all stone (which can be useful for mining). Most importantly though, don’t get them wet, and don't feed them after midnight.
Since bows are boring, you can take your Apprentice Blood Orb and toss it into the ritual, and get an Energy Blaster from it. This deals 12 base damage just like the Bound Blade, and also must be activated and deactivated.
Kills made with your Bound Blade have a chance of dropping a Weak Blood Shard, which can be used to create your next tiered altar and blood orb. Collect at least two shards, and be ready for more construction.
As a bonus to all aspiring Thaumaturges, you can take your Goggles of Revealing, and bind them with your Ritual of Binding. This will create a Sanguine Helmet, which functions like the goggles, allowing you to see nodes and other important information. As a bonus, the helmet will provide an 8% discount, up from the standard 5% of the goggles.
Building with Blood
The path to your fourth tier blood altar requires 28 additional runes, laid out in pattern similar to the third tier: drop down and out one additional block, and place seven runes per side. In each corner, create a pillar that is five blocks high, capped with a Large Blood Stone Brick. These bricks are created by fusing stone with a Weak Blood Shard in any crafting grid. Each craft will yield 32 bricks. To ensure your altar was assembled properly, hit it with your Divination Sigil.
Remember that extra Weak Blood Shard you have? Take it and fuse it with 50,000 LP in your altar. This gives you a Master Blood Orb, increasing your LP storage to one million.
The last rune you unlock is the Rune of the Orb, which will increase the capacity of your blood orbs by 2% when filling, per rune.
Sigils, Sigils, and More Sigils
With this fourth tier, you gain access to the Demonic Slates, requiring an impressive 25,000 LP per slate. With these, you can create two additional sigils. The Sigil of Haste gives you haste in every activity except mining, where your progress will be slowed. Simply sneak to temporarily cancel this effect. One of the more useful sigils for combat is the Sigil of the Whirlwind. This will create a barrier that will knock away certain projectiles, such as arrows.
Wearable Blood
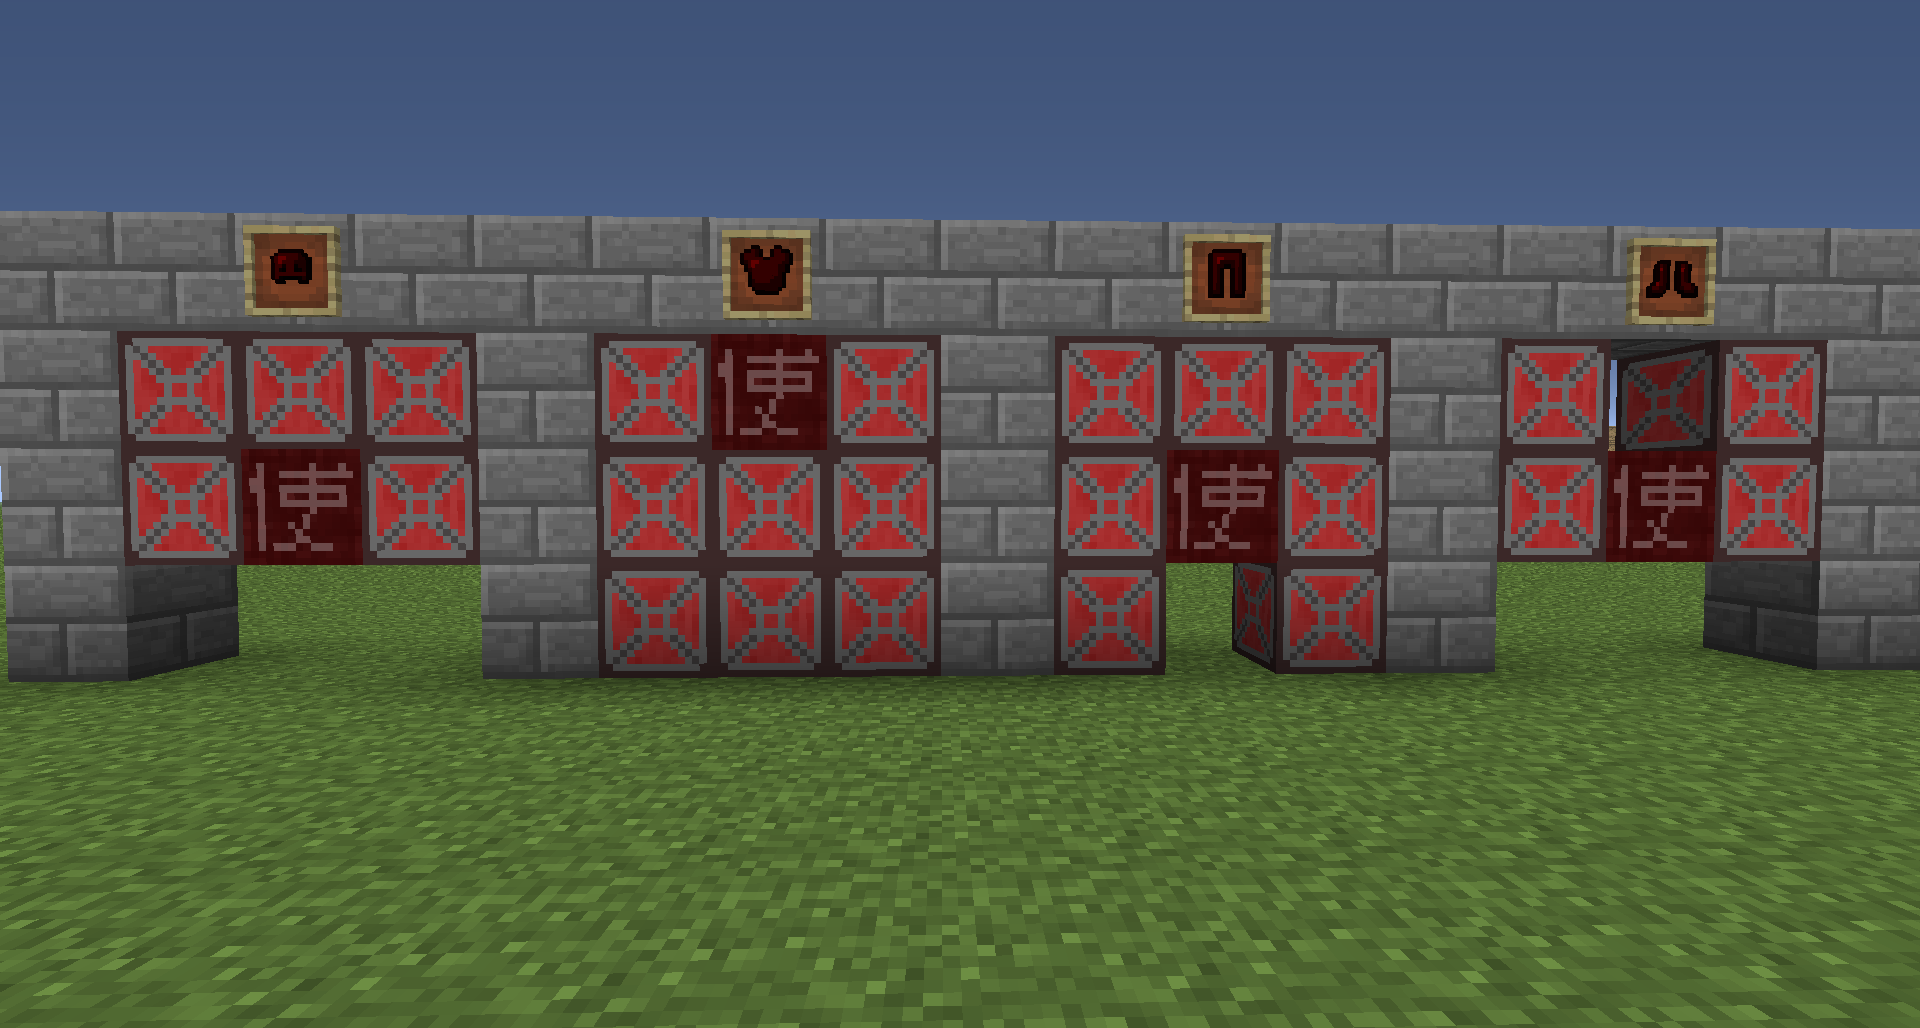
Just like the Bound Tools, there is Bound Armor. The creation for this is slightly different however, so don’t go tossing diamond armor at your ritual just yet. In order to craft a full set of Bound Armor, you will need 28 Empty Sockets. Take these sockets, and toss them into your altar with 30,000 LP each to get a Filled Socket, which is used for armor creation.
In order to craft your armor, you must first create a Soul Armour Forge. This is used in the creation of every piece, and will not be consumed. Now, take your Filled Sockets, and lay them out in the pattern of the armor you wish to create, in either a horizontal or vertical pattern. Take your Soul Armour Forge, and place it so it is in contact with as many sockets as possible. Now, you can either right click the forge to get your armor, or you can customize it a little.
Now, I hope I have your attention, as this customization is impressive. In order to customize your armor, you will need access to some blood shards (weak or demon), some blood orbs, and the sigils you want to put into your armor. A Weak Blood Shard, when placed into a socket (right click the socket) will allow you to have one sigil work on your armor, while demon will increase that. Your blood orbs will help to lower the cost of running the sigil, with the Master Blood Orb and above making it free to run. Once those are in place, grab yourself a sigil and put it into your armor. When you’re ready to get your armor, right click the forge. You’ll notice that the tooltip on the armor shows what you placed into the sockets.
If you've added a sigil and realize you need it to be deactivated every once and a while, craft yourself an Armor Inhibitor. This is a free to use item, and will deactivate any active effects on your armor when you have the Inhibitor active.
Should you have made a mistake with a sigil, or decide you don’t want to have a sigil in your armor anymore, build yourself a Ritual of Unbinding, activate it, and toss in that armor piece. The parts will then be sent flying from the center.
Weak Rituals
I initially skipped over these as they are not used in progressing through altar tiers, but they’re still important (and useful) depending on your play style, or if you just like messing with people on a server. The first thing you need to do if you wish to use these rituals is craft yourself an Imperfect Ritual Stone (which is very cheap compared to some of the previous recipes). This block, when right clicked, checks to see what block is above it, and if it’s a valid block, drains 5,000 LP and activates. Here’s a list of each block, and their effects:
- Bedrock = Grants the user Resistance II.
- Block of Coal = Summons a rather strong zombie.
- Block of Lapis = Instantly changes the day into night.
- Water Source = Instantly summons a storm. Good for fighting the Ars Water Guardian.
Standard Rituals
So you have your Ritual Diviner, and have noticed all these other rituals as you’re trying to get to your Ritual of Binding, and want to know what they do. Before we go into the specific details, let’s start with the basics. All of the rituals in this section will not require Dusk Runes, so you can make them with the first tier of the Ritual Diviner. Most of these rituals will come with an activation cost, some will have a cost over time, and some will have both. Rituals that also constantly run (such as the Ritual of the Green Grove, Serenade of the Nether, etc.) can be disabled temporarily with a redstone signal.
Ritual of the Full Spring
If you’re using water for cooling engines, pumping for another purpose, or just don’t like infinite pools, this ritual can help. For the startup price of 500 LP and 25 LP per bucket, it will have a constant source block of water for you to use.
Serenade of the Nether
One of my favorite rituals, this one costs an impressive 20,000 LP to activate, as well as 500 LP per bucket. This ritual provides an infinite source of lava as long as you have the LP. So no need to pump the Nether dry! As a warning, the lava will spread to the ritual stones, so the way I have it in the picture isn’t safe.
Ritual of the Green Grove
Very similar to the sigil, this ritual sends an extra growth tick to plants, speeding up their growing progress. This effect applies to plants that are up to two blocks above the ritual. It will cost 1,000 LP to activate this ritual.
Interdiction Ritual
For those who are fans of EE2’s Interdiction Torch, you’ll be a fan of this ritual. At the cost of 1,000 LP to activate, this ritual will repel mobs by about six blocks from the Master Ritual Stone.
Ritual of Containment
The opposite of the Interdiction Ritual, this will contain mobs within its area of influence, sucking them in to the center block. Costing 2,000 LP to activate and a small amount while running, this ritual could come in handy later on.
Ritual of the High Jump
A fun ritual to prank people with, the Ritual of the High Jump costs 1,000 LP to activate and 15 LP per jump, and will launch any entities that step on the center block high into the air. Be warned though, falling outside of the center block will hurt!
Ritual of Magnetism
This ritual is useful for ore collection, as it will pull ore blocks from the ground and place them within the ritual. At a starting cost of 5,000 LP and 50 LP per ore, it sure beats running cables all over the place.
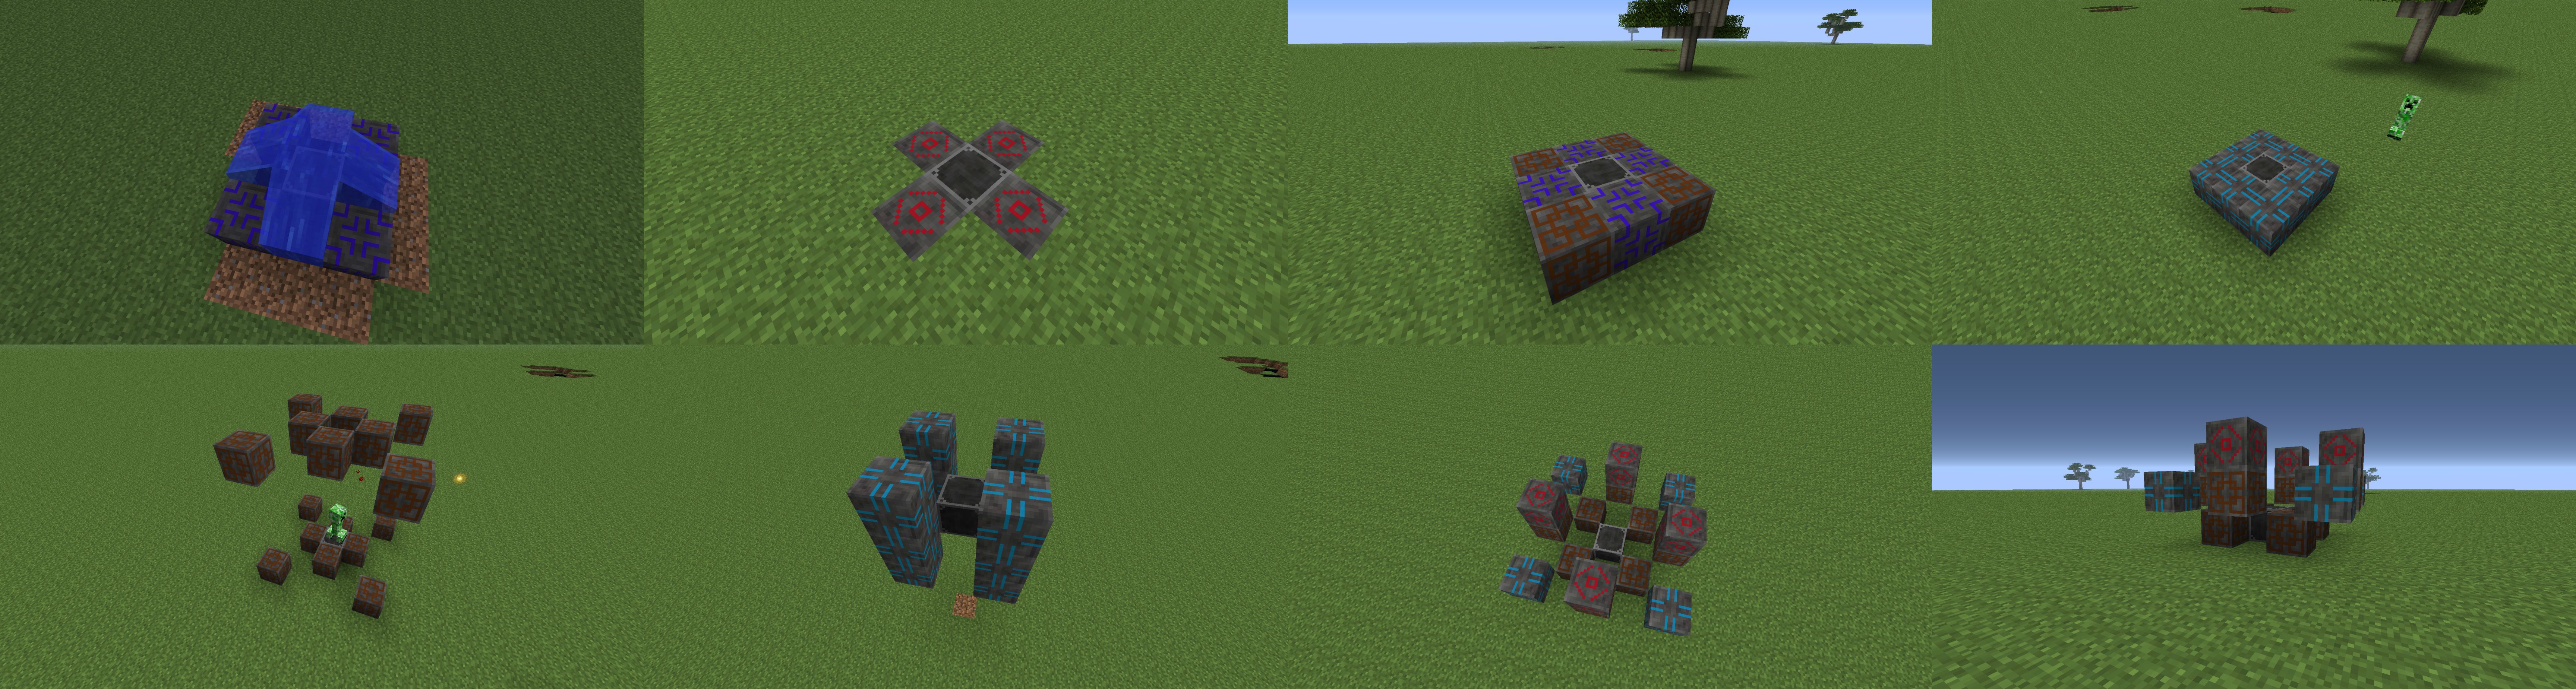
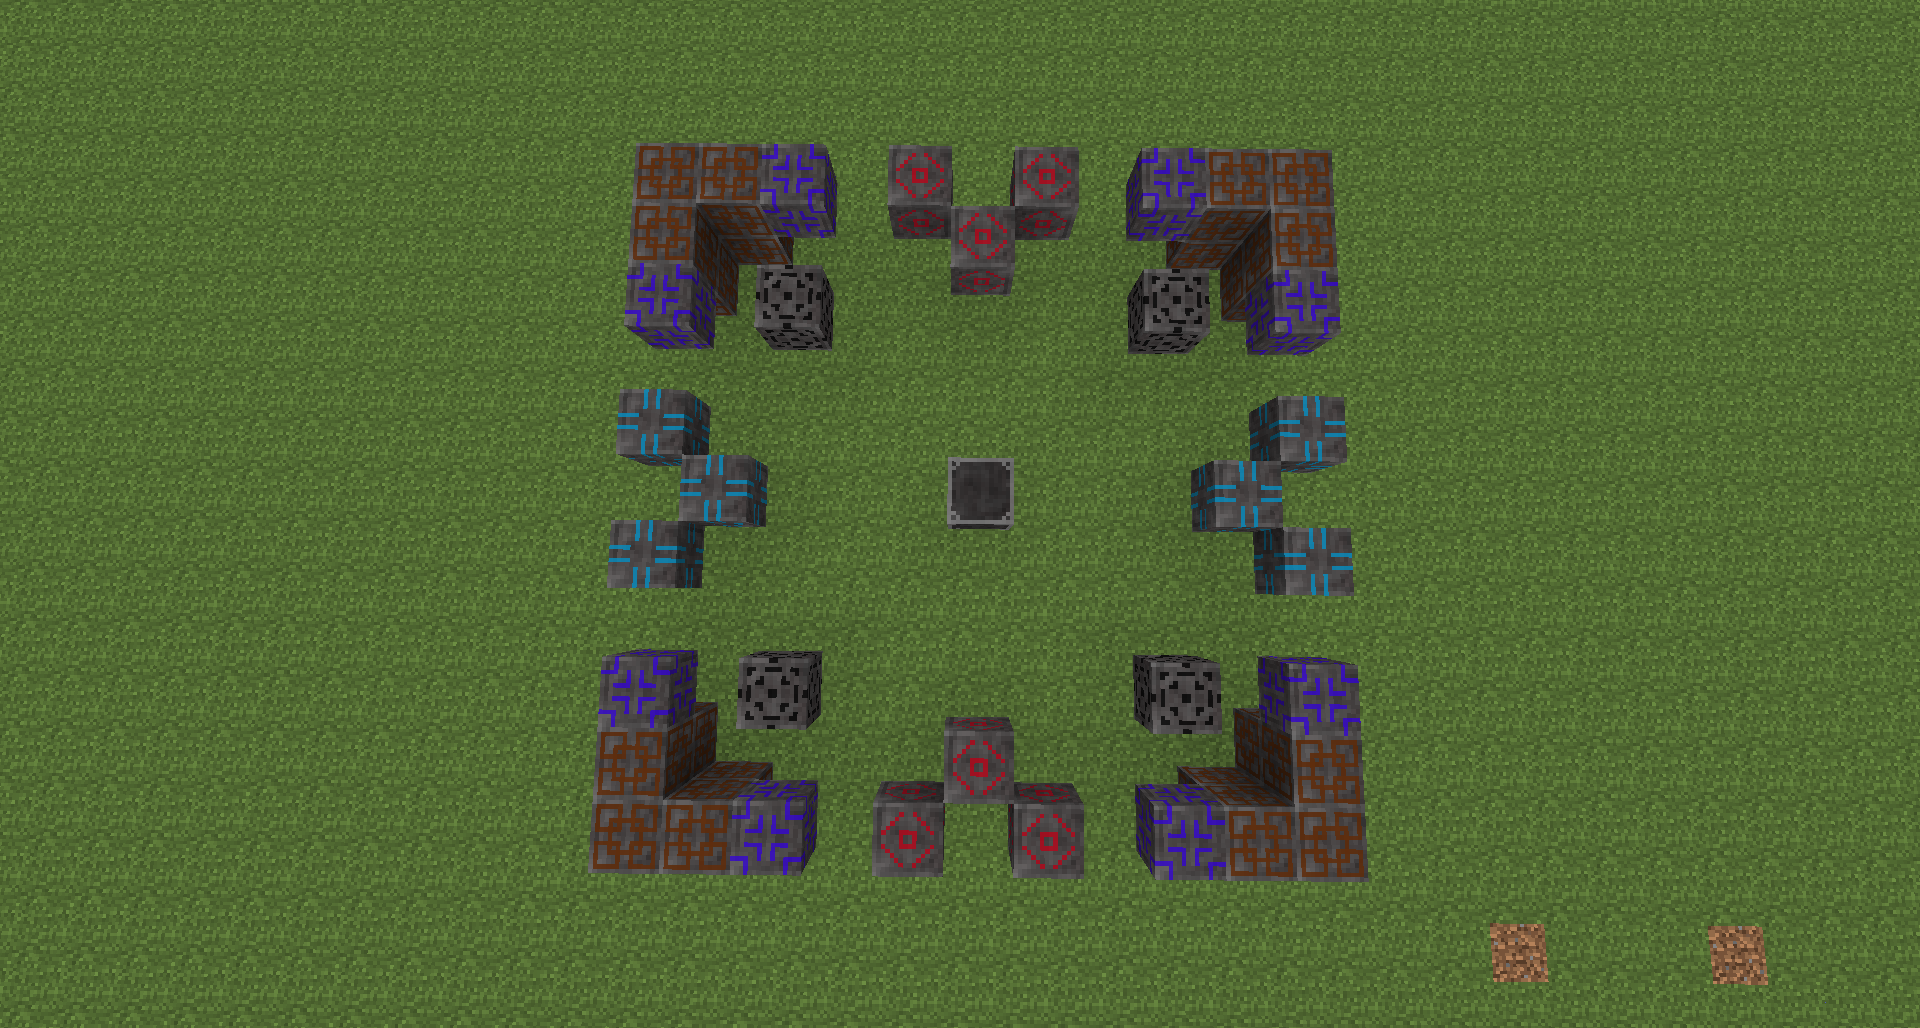
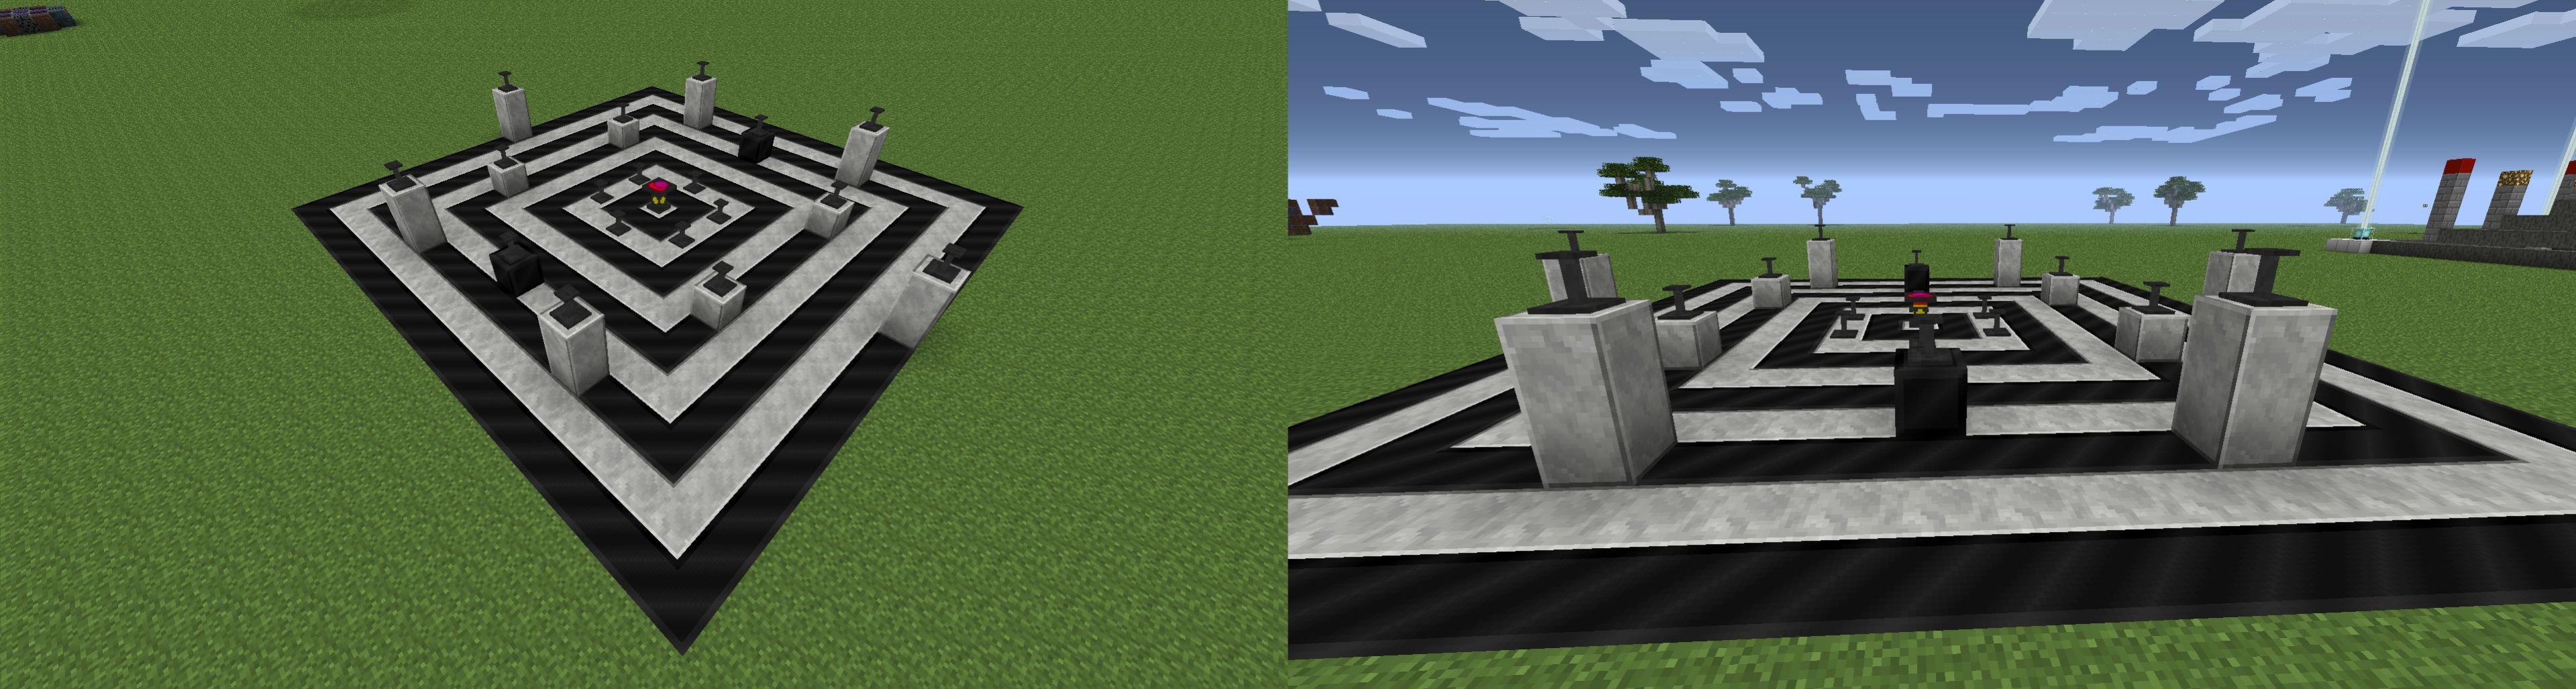
In order, from top left, to bottom right:
Ritual of the Full Spring
Serenade of the Nether
Ritual of the Green Grove
Interdiction Ritual
Ritual of Containment
Ritual of the High Jump
Ritual of Magnetism (Top)
Ritual of Magnetism (Side)
Advanced Rituals
Ritual of the Crusher
This ritual looks for any block in a 3x3x3 range below it and will harvest it, placing it into an inventory that is above the Master Ritual Stone. At a cost of 2,500 LP to start, and 7 LP per block, this ritual can be useful for automatic mining in conjunction with the Ritual of Magnetism. Please note, this ritual will NOT harvest without an inventory above it.
Ritual of Speed
Remember those launch pads from Portal? This ritual mimics those. At a starting cost of 1,000 LP and 25 LP per launch, anyone who approaches it will be launched in the direction of the Dusk Rune, and take no fall damage.
Ritual of the Shepherd
This ritual is for those who have a desire to quickly grow their animals. Costing 10,000 LP to start, and about 400 LP per animal, it will fully grow a baby animal in 3 minutes.
Well of Suffering
Costing an impressive 50,000 LP to activate, the Well of Suffering is your first option for passive LP generation. This ritual will select entities (except players) within its radius and damage them, generating about 10 LP per half heart of damage, donating it to the closest altar in range. This amount of LP can be increased through Sacrifice Runes.
Ritual of Regeneration
This ritual does exactly what it sounds like it does: Casts regeneration on most entities within range. Costing 25,000 LP to activate, this ritual will make sure everything has regeneration. This effect will cost more for players than it will other creatures. Also, the ritual is designed to have either the Ritual of the Feathered Knife or the Well of Suffering placed within it, although this is not required.
Ritual of the Feathered Knife
Another option for passive LP generation, the Ritual of the Feathered Knife draws from the health of nearby players and places it into an altar in range, giving about 80 LP per half heart, and will scale with Runes of Self-Sacrifice. To start the ritual, it will set you back 50,000 LP.
Four Times the Wither
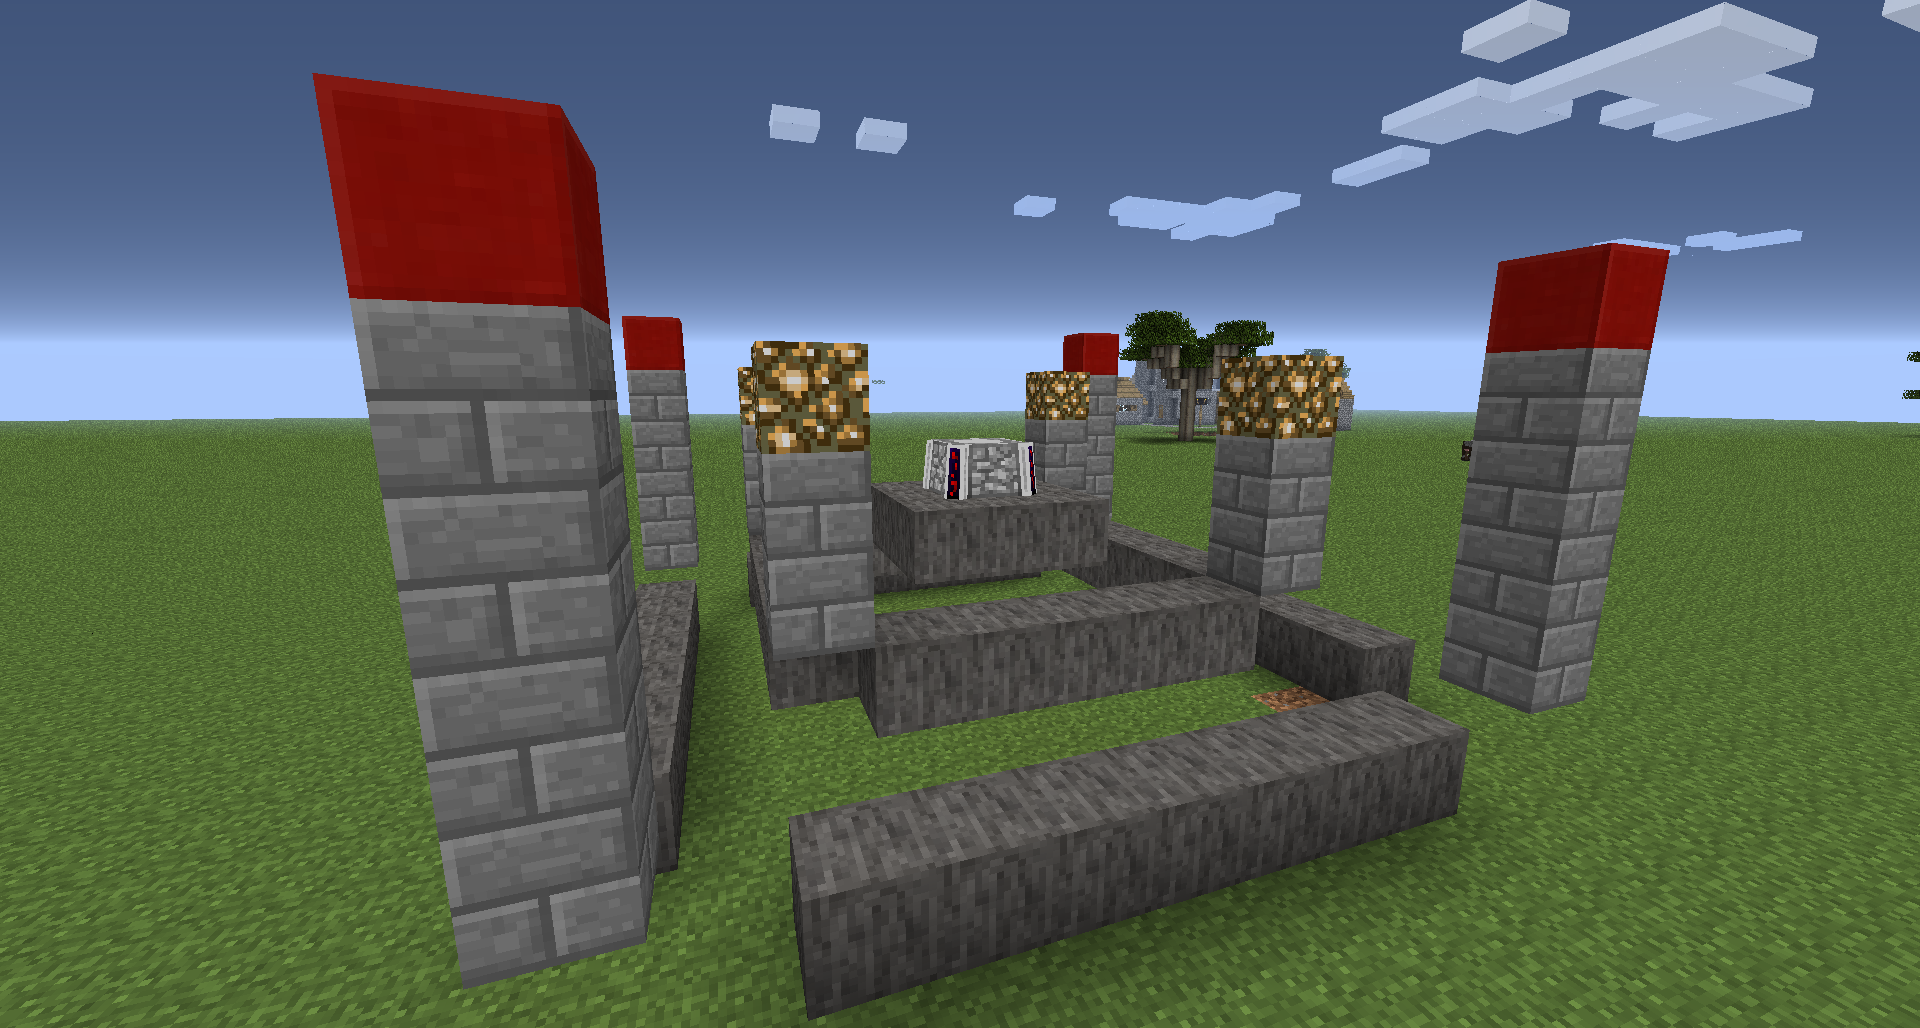
So you’ve played around with the fourth tier long enough and want to get your hands on the fifth and final tiered altar. Before you can do this, you will need four beacons, one for each corner of your altar. On top of the four beacon requirement, you need to grab 52 (13 per side) additional runes of your choosing. From here, drop down a single Y level, and move out two blocks from your last ring. Now, place the runes, any beacon base of your choosing, and then the beacons themselves. Smack the altar with your Division Sigil to make sure the creation worked, and you’re good to go.
Your blood orb won't come as easily as the previous ones, so let's dive right into the process to get it.
Blood Alchemy
Before we can begin to make the tier 5 orb, we have to delve into demon summoning. Alchemy is rather straight forward, with each product listing what is required to make it when you mouse over it and hit shift. As such, I will not go into details about what's required to create products. Be aware, however, that in order to create anything, you must have a blood orb placed in the lower right slot.
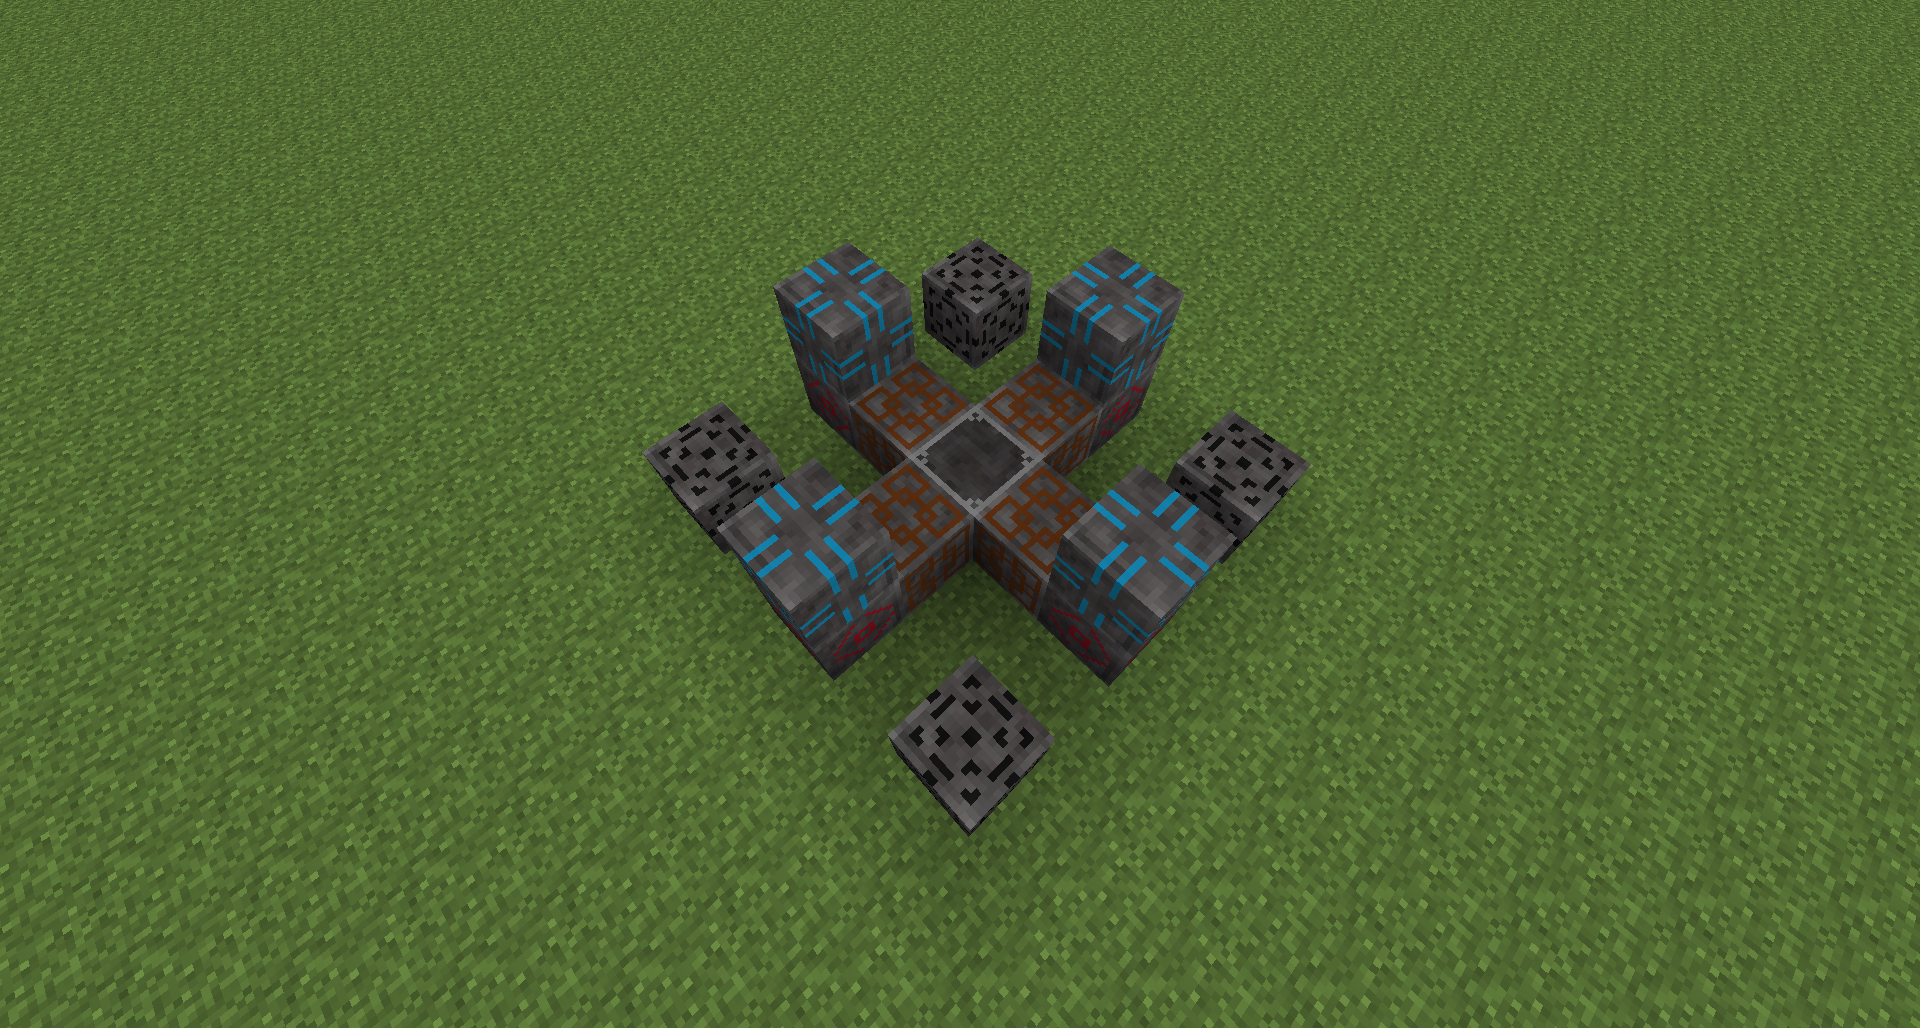
So, it's time to begin demon summoning. This section details the steps to get your own demon helpers, which are recommended for the elemental fights. If you feel like you're strong enough to handle them without any demons, feel free to skip this section.
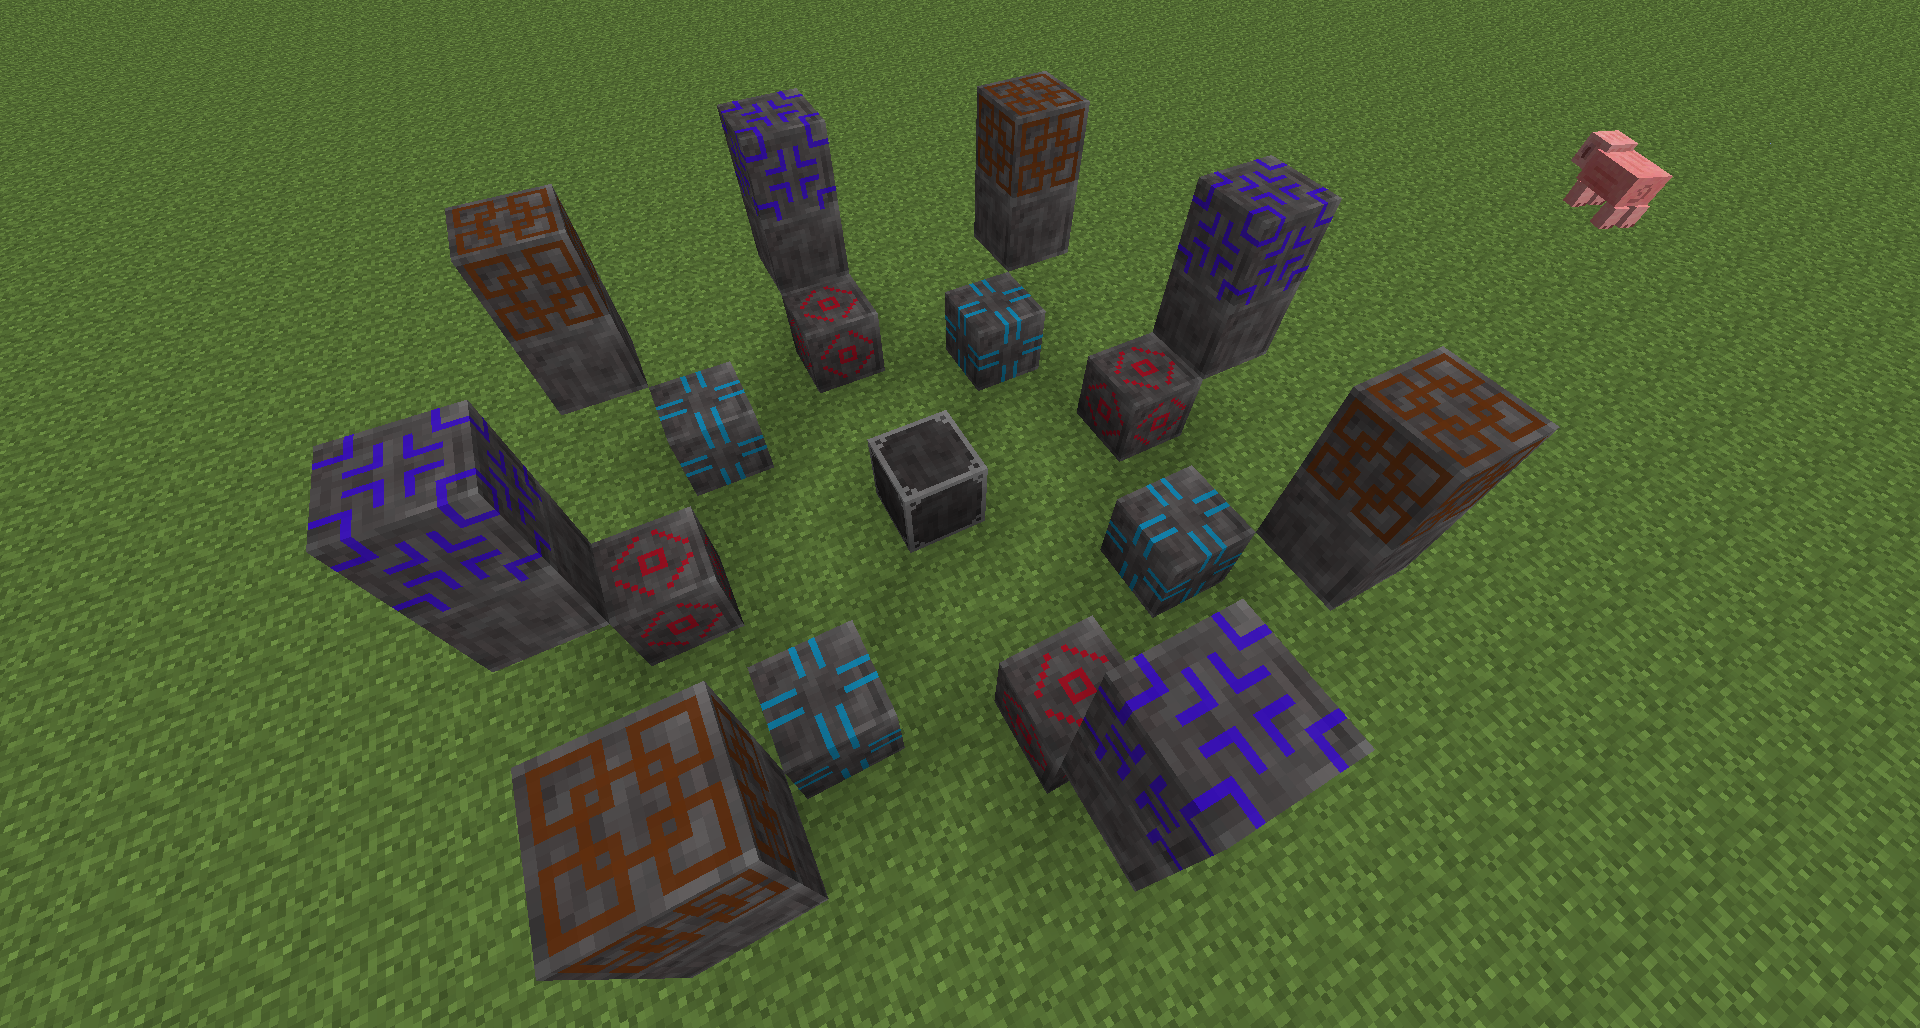
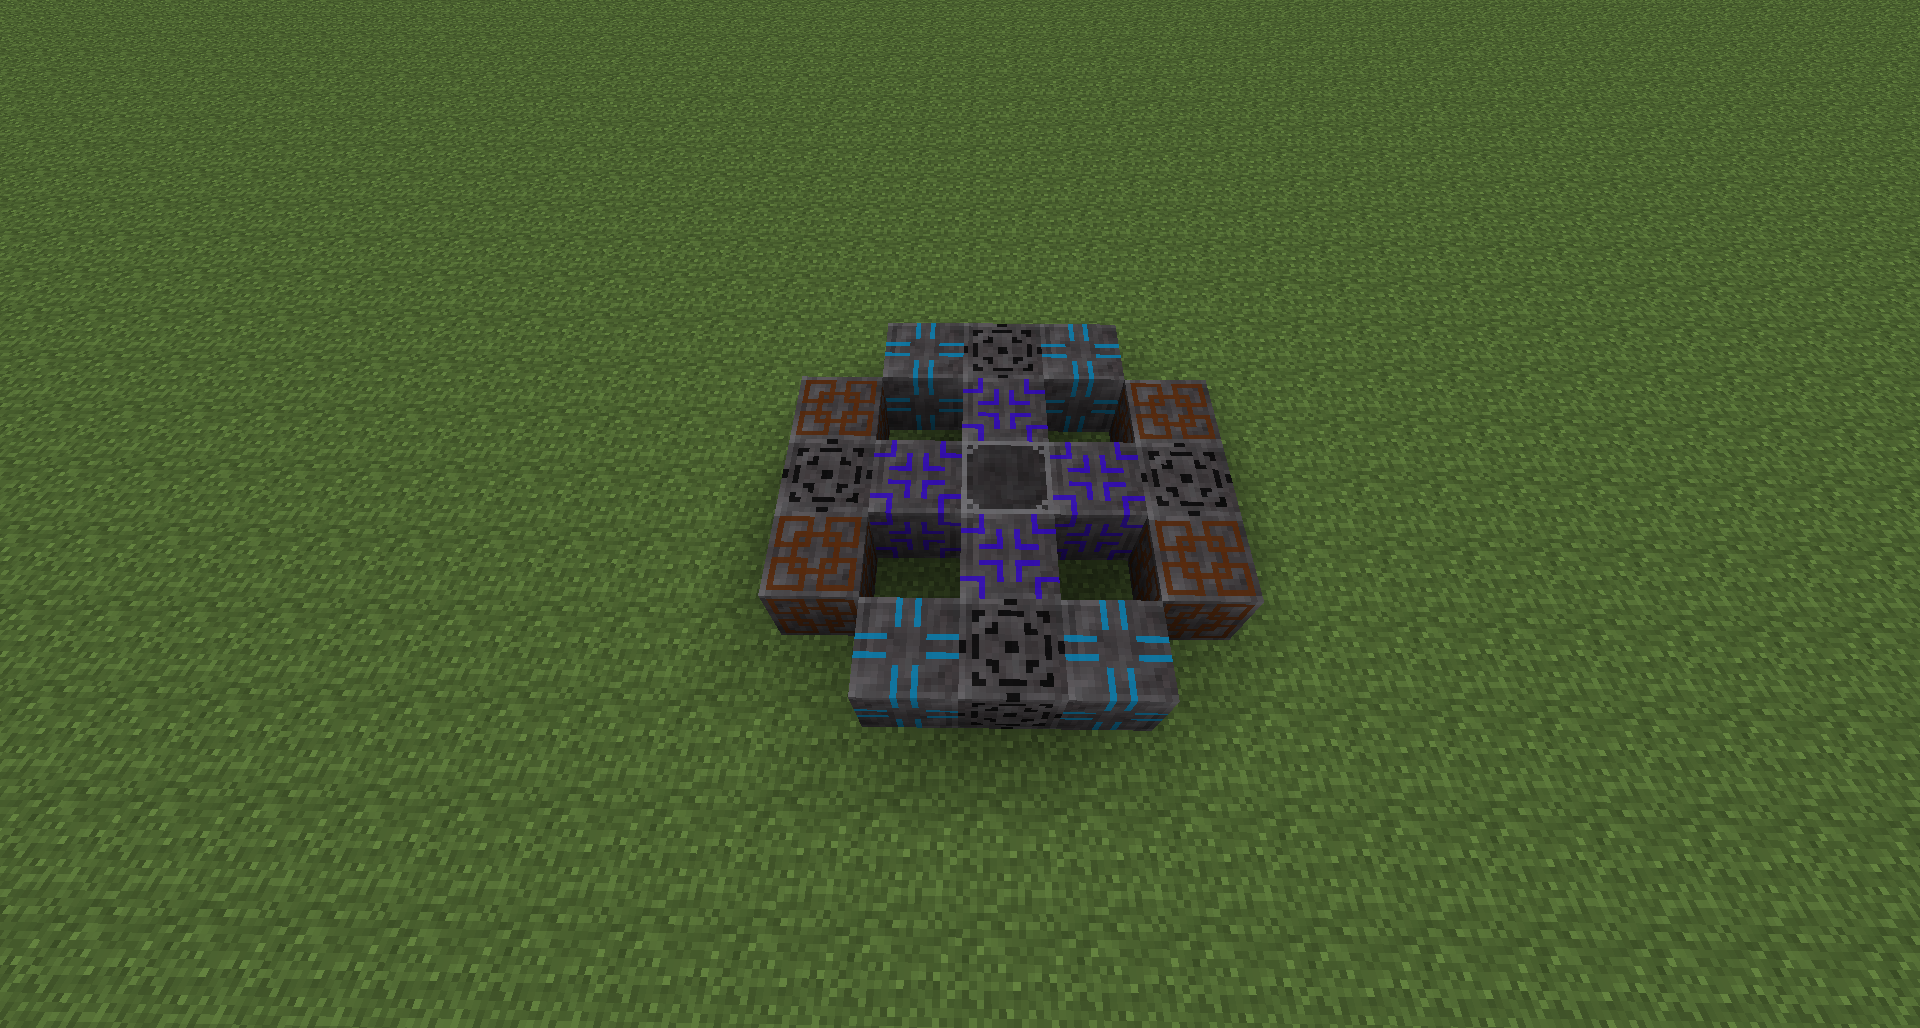
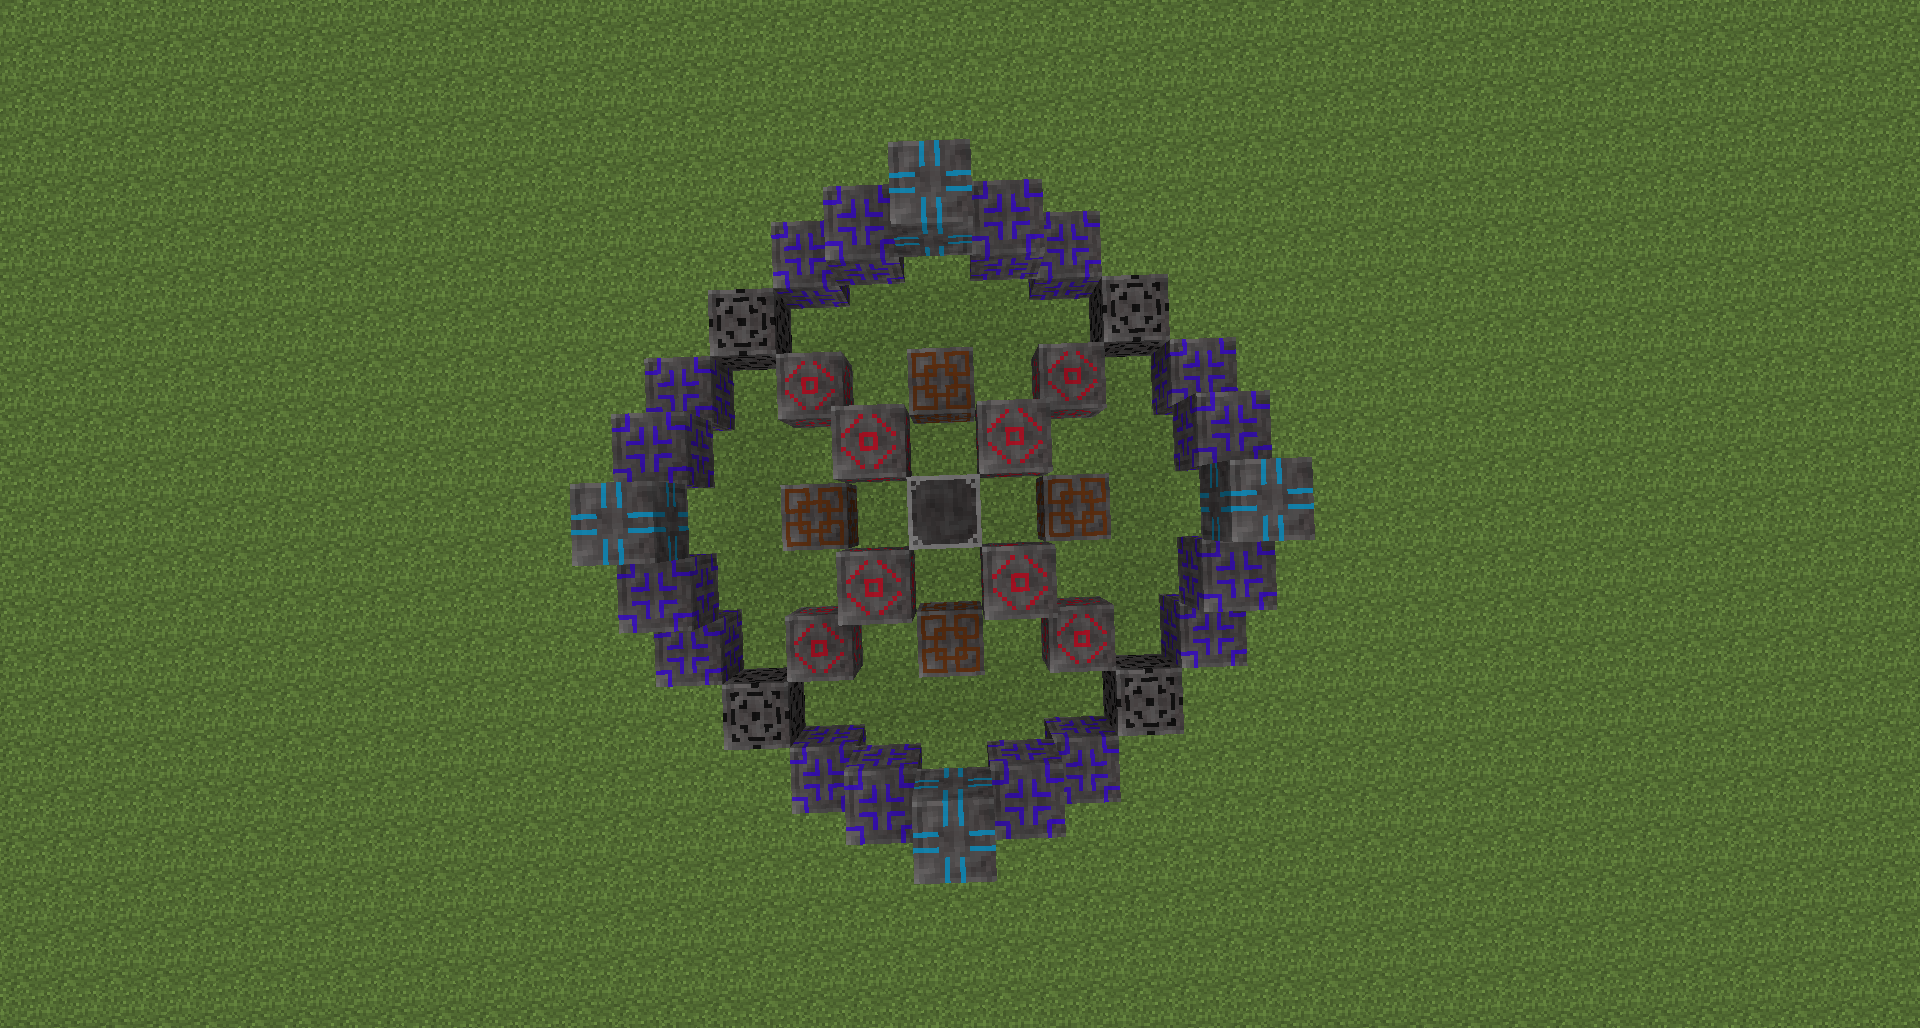
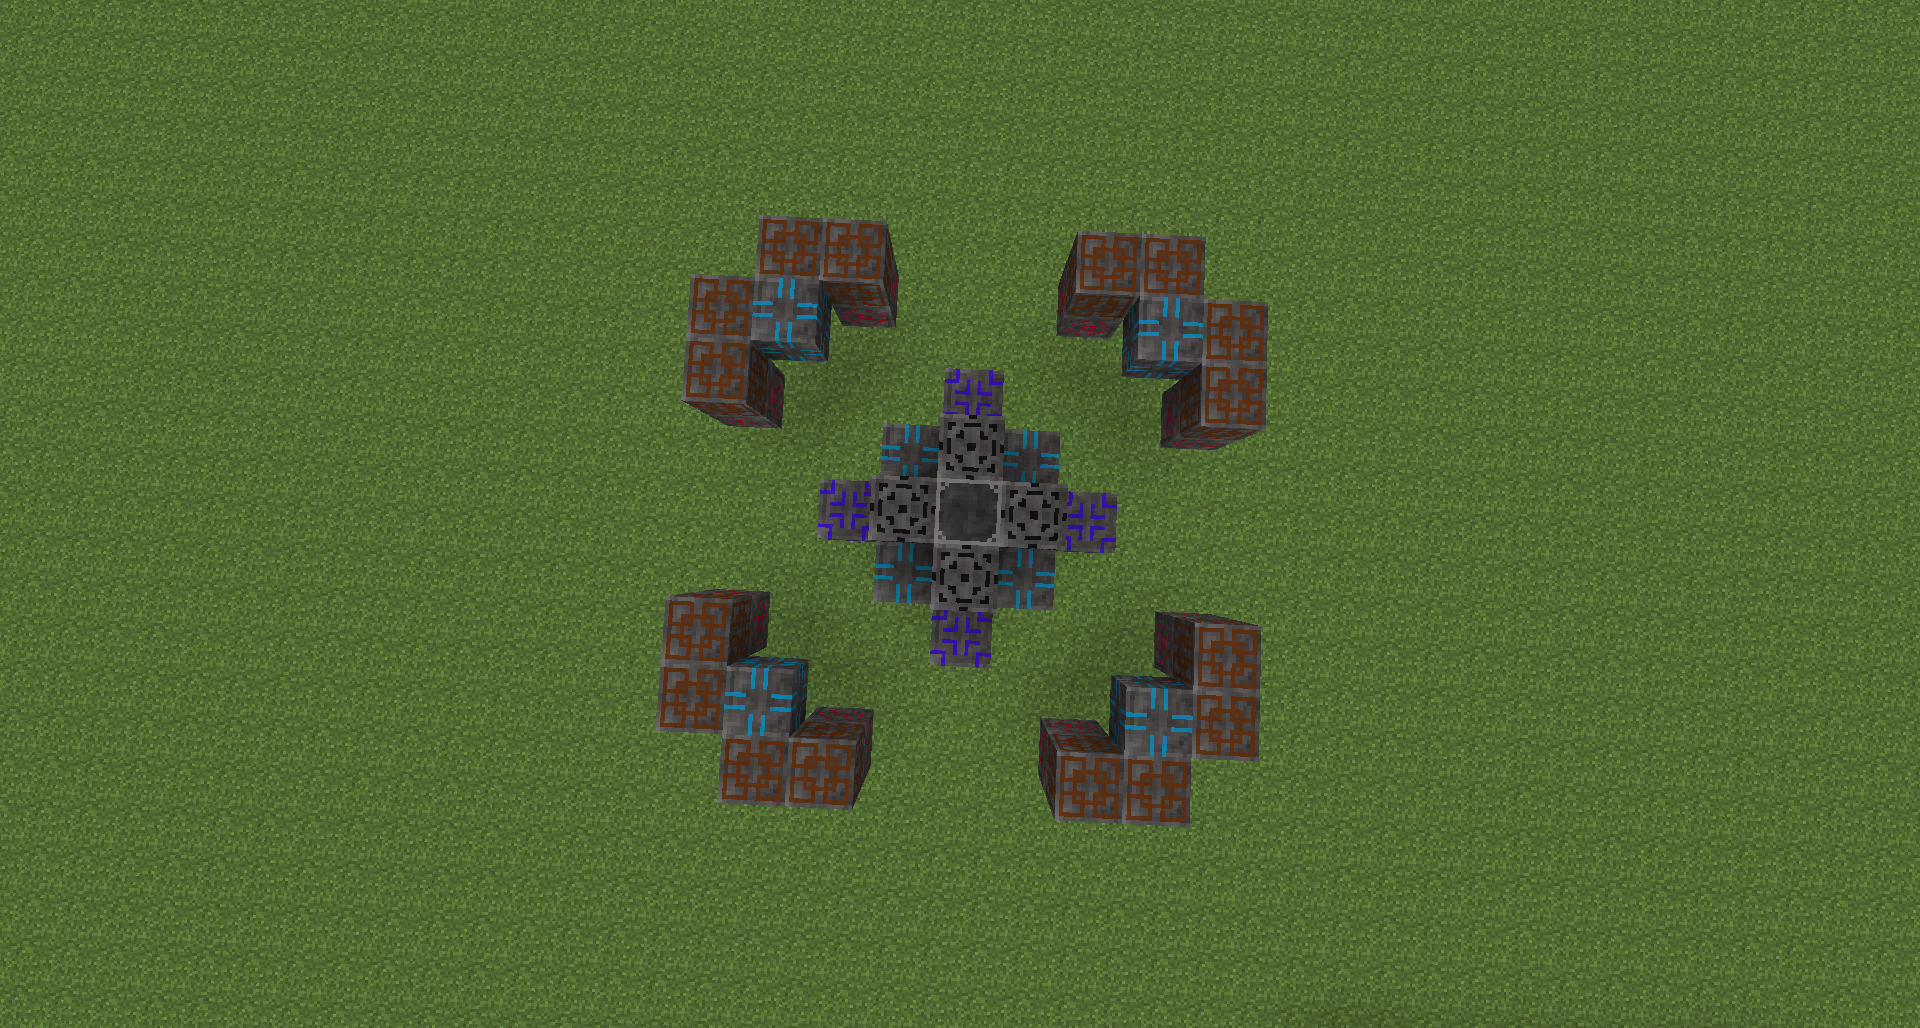
Now, the first thing you need to do is get yourself the below structure setup. This will allow you to summon all of the following demons.
In order to summon demons, you must take the products from your alchemy runs and place them on the pedestals. Single ring summons require a Master Blood Orb to be placed in the center, while two ring summons will require an Archmage Blood Orb. Each killed demon will drop a Demon Crystal (which can be renamed in an anvil), which is how you will summon the demons. Once you have this, summon the demon and give it a Weak Blood Orb to bind it to you. The demons will now behave in a manner similar to tamed wolves. In order to de-summon a demon, simply kill it; you will receive the crystal back. Here are the possible summons and their requirements (with separations between ring requirements being denoted by a semicolon):
- Fallen Angel (Single Ring) = Sanctus, Sanctus, Sanctus, Aether, Terrae, Tennebrae
- Lower Guardian (Single Ring) = Cobblestone, Cobblestone, Terrae, Tennebrae, Iron ingot, Gold nugget
- Small Earth Golem (Single Ring) = Clay, Terrae, Terrae
- Ice Demon (Single Ring) = Crystallos, Crystallos, Crystallos, Aquasalus, Sanctus, Terrae
- Boulder Fist (Single Ring) = Terrae, Sanctus, Tennebrae, Bone, Steak, Steak
- Shade (Single Ring) = Tennebrae, Tennebrae, Tennebrae, Aether, Glass bottle, Glass block
- Bile Demon (Double Ring) = Poisonous Potato, Tennebrae, Terrae, Raw porkchop, Raw beef, Egg; Crepitous, Crepitous, Terrae, Iron block, Iron block, Diamond
- Winged Fire Demon (Double Ring) = Aether, Incendium, Incendium, Incendium, Tennebrae, Netherrack; Diamond, Gold block, Magicales, Magicales, Firecharge, Coal block
In order to create the Archmage Blood Orb, you must first get a Demon Blood Shard. These shards are only dropped by elementals, which are nasty little buggers. Each elemental corresponds to a specific element:
- Fire Elemental = 6 Incendium
- Water Elemental = 6 Aquasalus
- Earth Elemental = 6 Terrae
- Holy Elemental = 6 Sanctus
- Air Elemental = 6 Aether
Finishing the Job
Now that you have your Demon Blood Shard, run it over to your altar, and fuse it with 150,000 LP to receive your Archmage Blood Orb. This is the final orb, and has a huge storage of 10 million LP.
Last edited:

")